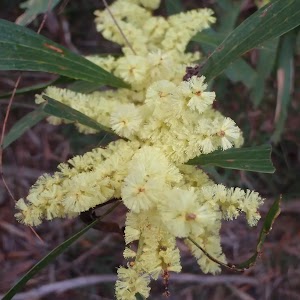
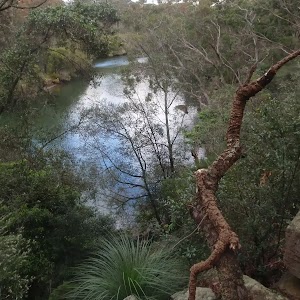
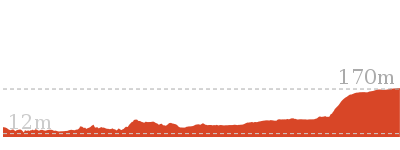
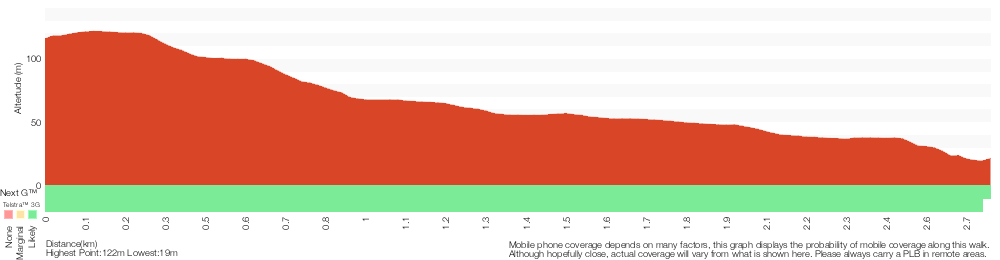
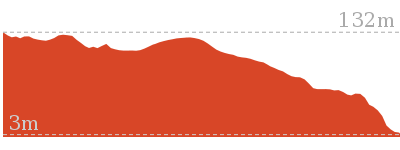
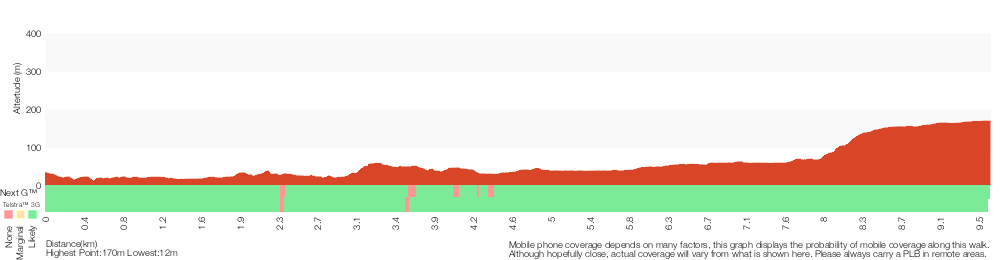
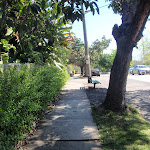
The Heritage Walk visits many of the historically significant buildings within the Lane Cove National Park. The walk follows the Lane Cove River from Fiddens Wharf and finishes at the Weir Precinct on Fullers Rd. The buildings are surprisingly intact, considering their age and history. A great walk for those wanting to see some culturally significant heritage buildings.
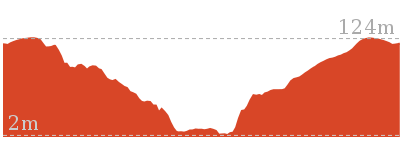
Lane Cove National Park Heritage Walk


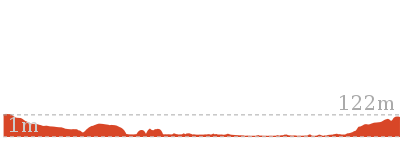
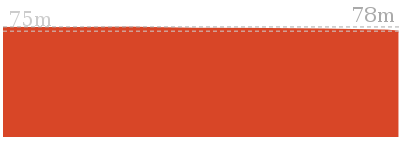
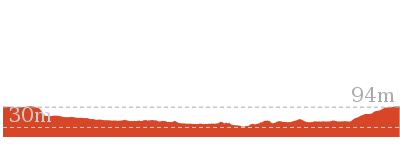
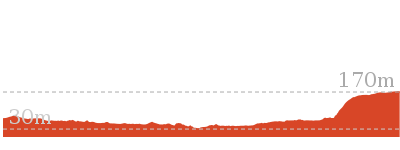
1 Hr
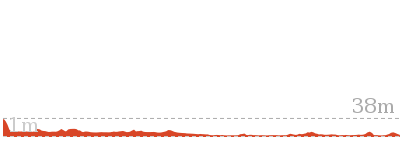
2.6 km One way

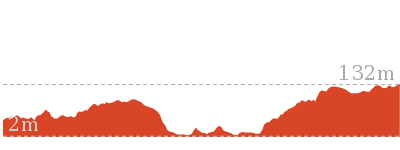
89 m
Moderate track


(0km) Fiddens Wharf Oval → Fiddens Wharf Oval Trk

30 m
1 mins
0m
-1m
Moderate track
(0.03km) Bottom of Fiddens Wharf Oval Trk → Thistlethwaytes Picnic Area
1.1 km
23 mins
49m
-51m
Moderate track
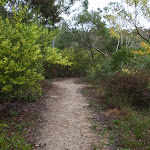
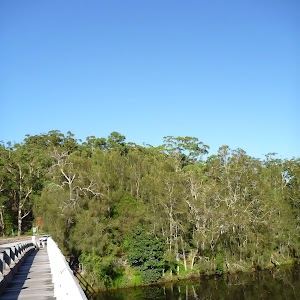
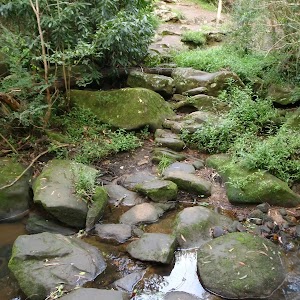
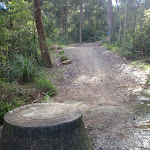
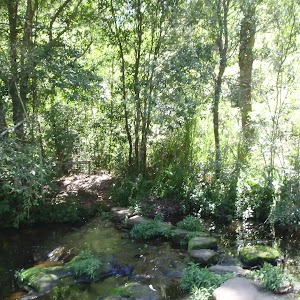
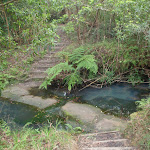
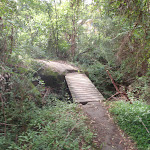
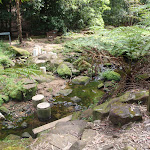
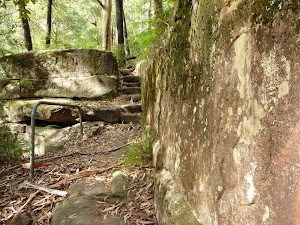
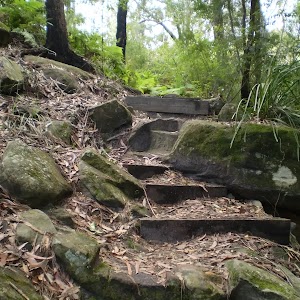
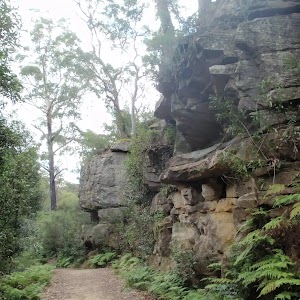
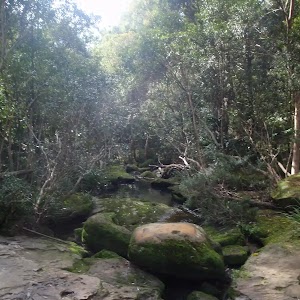
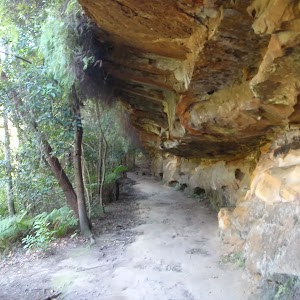
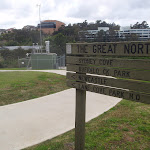
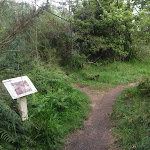
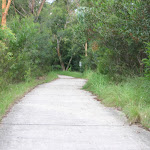
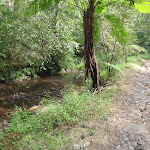
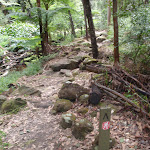
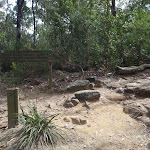
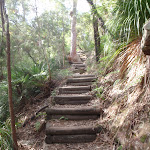
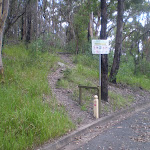
Turn left: From the intersection, the track follows the ‘Visitors Centre Loop’ arrow[5][6] along the track, keeping the river to your right. After about 50m, this walk heads over a short timber boardwalk[7] and crosses the ‘weedy’[8][9] creek. The walk then heads up some steps and a staircase to the top of a rock platform, where there is a ‘Blackbutts’ information sign[10]. The track leads gently up along the side of hill for about 70m, passing an unfenced cliff to your right[11], where the track bends left to lead across a rock gully[12]. The track then leads past the ‘Sydney Peppermint’[13] and ‘Sandstone Gully Community’[14] information signs and across a ferny gully to find a ‘Sydney Red Gum’ information sign[15]. From here, the walk heads up a series of timber steps[16] to where the track suddenly widens into a mostly flat trail. This trail soon bends right and leads through the casuarina forest, past the ‘Scribbly Gum’ information sign[17] to an intersection (with a narrower track on your left), just before the ‘Sandstone Hillslope Community’ information sign[18][19].
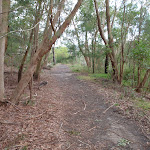
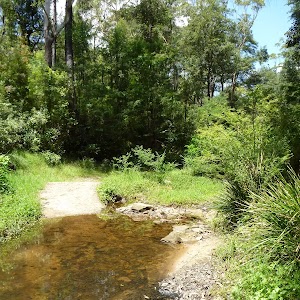
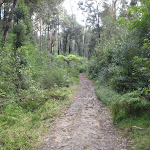
Continue straight: From the intersection, this walk heads around the hillside, with the river below on the right. The walk tends left as it contours around the hill. It then descends over speed bumps for approximately 50m to the car park of Thistlethwaytes picnic area.
Continue straight: From the intersection, this walk heads around the hillside, with the river below on the right. The walk tends left as it contours around the hill. It then descends over speed bumps for approximately 50m to the car park of Thistlethwaytes picnic area.
(1.18km) Thistlethwaytes Picnic Area → Schwartz Homestead
260 m
5 mins
4m
-6m
Very easy
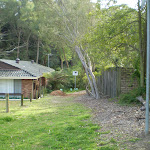
Continue straight: From the picnic area, this walk heads down the road, with the water to the right. The walk continues down the road for a short time, to the intersection with the entrance of the National Parks and Wildlife Service’s Depot on the left, and the Schwartz Homestead a short distance up the hill.
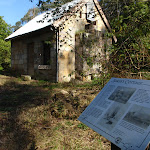
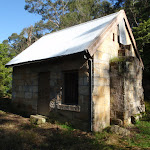
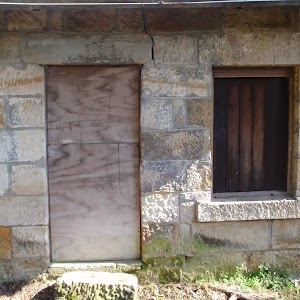
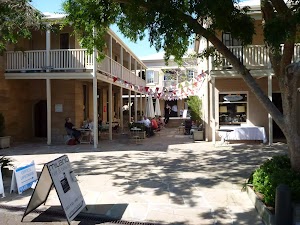
Schwartz Homestead
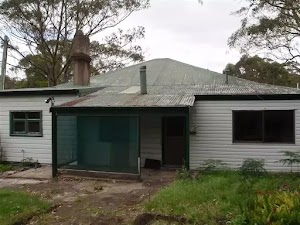
The Schwartz Homestead is a neat little white and green 1920’s timber cottage with a balcony on three sides. It was probably built by orchardist George Warr, who leased the land from 1917. More info.
(1.44km) Schwartz Homestead → Int. Opposite Bakers Flat
370 m
7 mins
9m
-7m
Very easy
Continue straight: From the intersection, this walk heads along the road, with the water on the right. The walk tends left, continuing up the road to pass a brick building on the right, before coming to the signposted intersection, opposite Baker’s Flat.
(1.8km) Int. Opposite Bakers Flat → Baker’s Cottage
120 m
3 mins
10m
-1m
Moderate track
Turn left : From the intersection, the walk heads up the stairs tending right, up the hill. The walk passes a sign about native grasses before continuing right, to Baker’s Cottage.
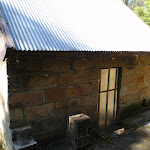
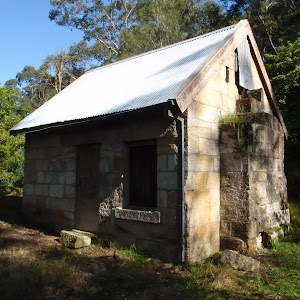
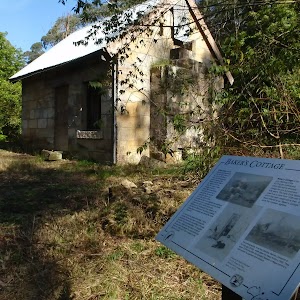
Baker’s Cottage
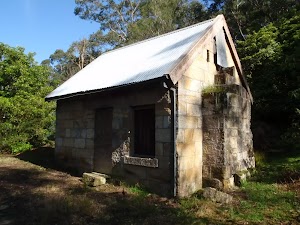
Baker’s Cottage was built in 1865 as the residence of William Baker and his family. The cottage once stood in the middle of a well-kept garden and orchard. The cottage itself was once larger, with more rooms and a verandah surrounding it. The residence changed hands only twice, and was then appropriated by the Minister of Lands in 1938.
(1.92km) Baker’s Cottage → Int. Opposite Bakers Flat
120 m
3 mins
1m
-10m
Moderate track
Turn around: From Baker’s Cottage, the walk heads down the stairs tending left. The walk continues down the hill to meet the road.
(2.04km) Int. Opposite Bakers Flat → Int. Max Allen Dr and Jenkins Hill Trk
330 m
7 mins
15m
-10m
Easy track
Turn left: From the intersection, this walk heads down the road towards the car park at ’29 Bakers Flat’. The walk continues along the road to pass the clearing and tend right, up the hill, to an intersection with a bush track on the right.
(2.37km) Int. Max Allen Dr and Jenkins Hill Trk → Int. Below Jenkins Hill Park
130 m
3 mins
0m
-6m
Very easy
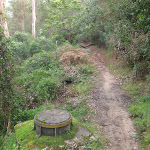
Turn right: From the intersection, this walk heads down the path for approximately 50m to pass a toilet block on the left of the track. The track continues to an intersection with a railed footpath.
(2.5km) Int. Below Jenkins Hill Park → Jenkins Hill
50 m
1 mins
0m
-1m
Very easy
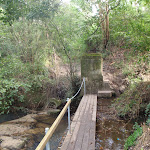
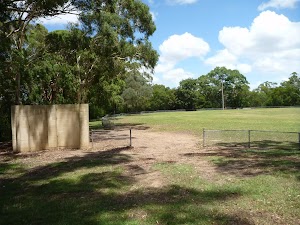
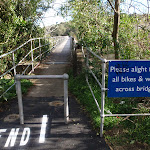
Veer right: From the intersection, this walk heads down the slight gradient, away from the toilet block to the large concreted area above the weir.
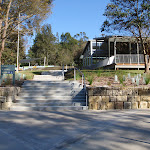
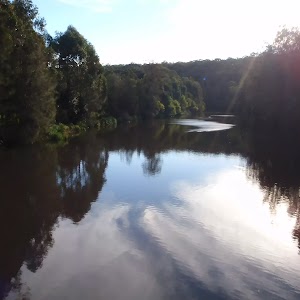
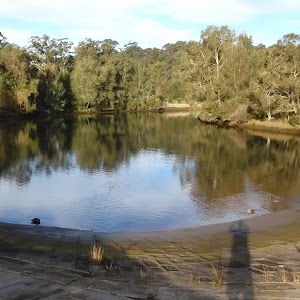
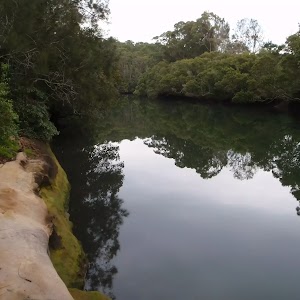
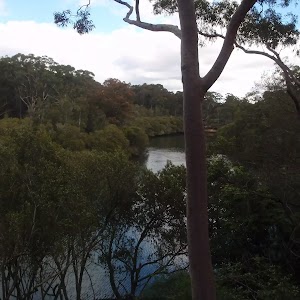
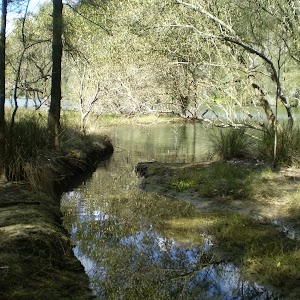
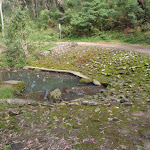
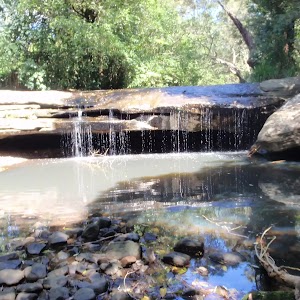
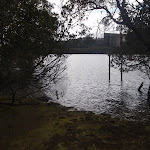
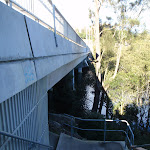
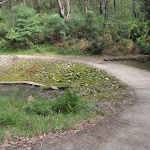
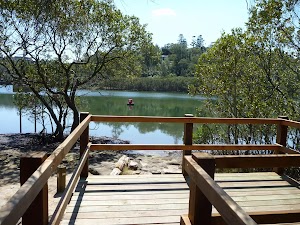
Lane Cove Weir
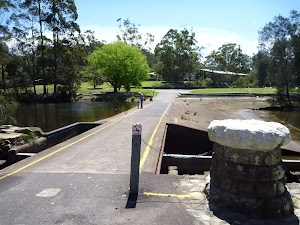
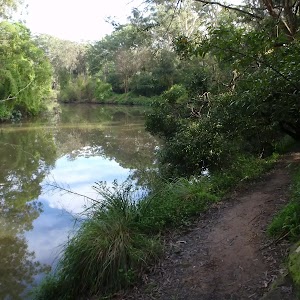
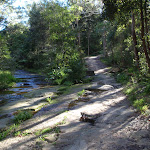
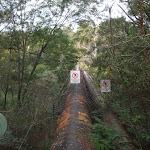
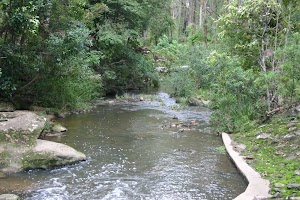
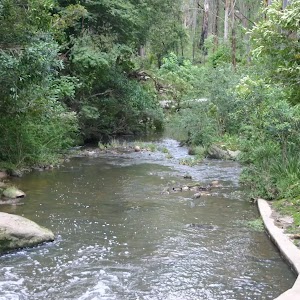
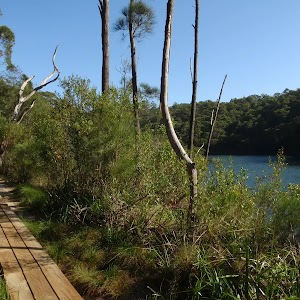
The Lane Cove River Weir was built in 1938 during the depression. The motivation for building the lake was to make the area more appealing for visitors’ picnics. The weir created environmental issues such as silting and a decline in native fish populations. In more recent years, a ‘fish ladder’[22] has been constructed to allow fish to undertake their natural migration route for breeding. The weir proves an easy way for walkers to cross the Lane Cove River whilst enjoying the views up[24] and downstream[25].
(2.55km) Jenkins Hill → Int. National Parks Office Trk and Max Allen Dr
40 m
1 mins
1m
0m
Very easy
Continue straight: From the intersection, this walk heads along the footpath to the road.
(2.59km) Int. National Parks Office Trk and Max Allen Dr → Max Allen Drive Bridge
50 m
1 mins
0m
-2m
Very easy
Maps for the Lane Cove National Park Heritage Walk walk
You can download the PDF for this walk to print a map.
These maps below cover the walk and the wider area around the walk, they are worth carrying for safety reasons.
| Parramatta River | 1:25 000 Map Series | 91303N PARRAMATTA RIVER | NSW-91303N |
| Sydney | 1:100 000 Map Series | 9130 SYDNEY | 9130 |
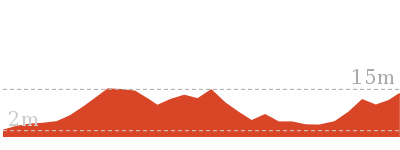
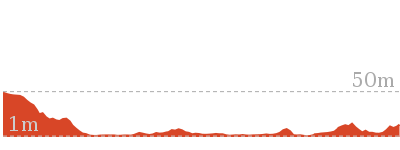
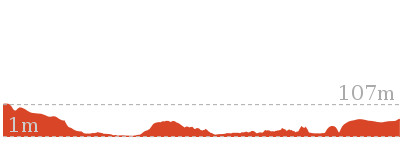
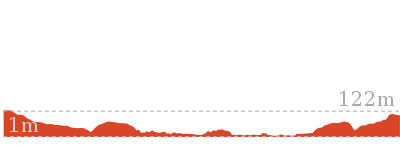
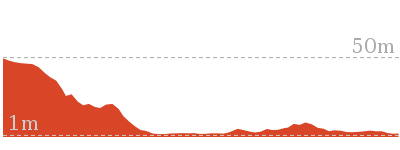
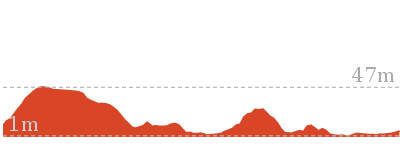
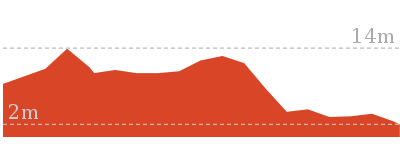
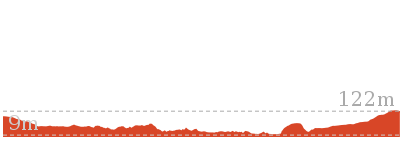
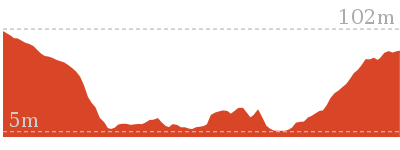
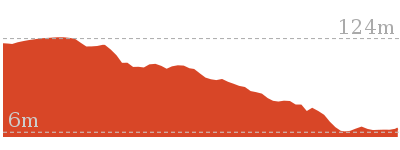
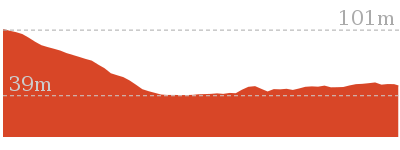
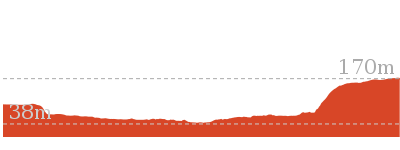
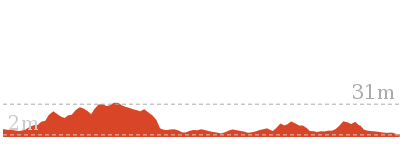
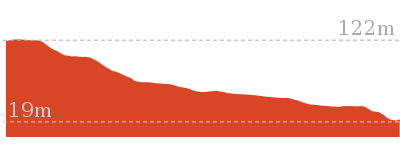
Cross sectional view of the Lane Cove National Park Heritage Walk bushwalking track

Analysis and summary of the altitude variation on the Lane Cove National Park Heritage Walk

Overview of this walks grade – based on the AS 2156.1 – 2001
Under this standard, a walk is graded based on the most difficult section of the walk.
| Length | 2.6 km | ||
| Time | 1 Hr | ||
| . | |||
| Grade 3/6 Moderate track |
AS 2156.1 | Gradient | Short steep hills (3/6) |
| Quality of track | Formed track, with some branches and other obstacles (3/6) | ||
| Signs | Clearly signposted (1/6) | ||
| Experience Required | No experience required (1/6) | ||
| Weather | Weather generally has little impact on safety (1/6) | ||
| Infrastructure | Limited facilities, not all cliffs are fenced (3/6) |
Some more details of this walks Grading
Here is a bit more details explaining grading looking at sections of the walk
Gradient
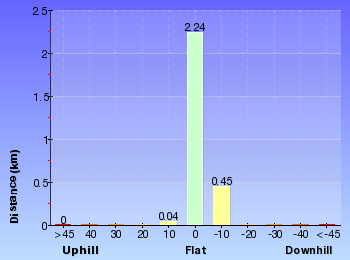
Around 1.4km of this walk has short steep hills, whilst the remaining 1.2km is flat with no steps.
Quality of track
Around 1.4km of this walk follows a formed track, with some branches and other obstacles, whilst the remaining 1.2km follows a smooth and hardened path.
Signs
This whole walk, 2.6km is clearly signposted.
Experience Required
This whole walk, 2.6km requires no previous bushwalking experience.
weather
This whole walk, 2.6km is not usually affected by severe weather events (that would unexpectedly impact safety and navigation).
Infrastructure
Around 1.4km of this walk has limited facilities (such as not all cliffs fenced), whilst the remaining 1.2km is close to useful facilities (such as fenced cliffs and seats).
Similar walks
A list of walks that share part of the track with the Lane Cove National Park Heritage Walk walk.
1.5 km Return
45 mins
Moderate track
4.3 km Circuit
1 hr 27 mins
Moderate track
5.9 km Return
2 hrs 30 mins
Moderate track
6 km One way
2 hrs 30 mins
Hard track
8.9 km One way
3 hrs 30 mins
Hard track
10.7 km One way
4 hrs 30 mins
Hard track

11.9 km Circuit
5 hrs
Hard track

12.2 km One way
4 hrs 30 mins
Hard track
16.3 km One way
6 hrs
Hard track
18.1 km One way
6 hrs 45 mins
Hard track

33 km One way
2 Days
Hard track

44.4 km One way
3 Days
Hard track

Other Nearby walks
A list of walks that start near the Lane Cove National Park Heritage Walk walk.
3.4 km Return
1 hr 30 mins
Moderate track
11.6 km One way
4 hrs 30 mins
Hard track
5.5 km One way
2 hrs
Hard track

1.3 km Return
1 Hr
Moderate track
5.3 km One way
2 hrs
Hard track
6.9 km Circuit
2 hrs 30 mins
Hard track

2.6 km One way
1 Hr
Hard track
5.3 km Circuit
2 hrs 30 mins
Hard track

9.7 km One way
3 hrs 45 mins
Hard track
6 km One way
2 hrs 30 mins
Hard track

1.5 km Circuit
1 Hr
Moderate track
978 m Return
30 mins
Easy track
Plan your trip to and from the walk here
The Lane Cove National Park Heritage Walk walk starts at the Fiddens Wharf Oval (gps: -33.784284, 151.14522)
Your main transport option to Fiddens Wharf Oval is by;
![]() Car. There is free parking available.
Car. There is free parking available.
(get details)
The Lane Cove National Park Heritage Walk ends at the Max Allen Drive Bridge (gps: -33.79072, 151.15604)
Your transport options to Max Allen Drive Bridge are by;
![]() Bus. (get details)
Bus. (get details)
![]() Car. There is free parking available.
Car. There is free parking available.
(get details)


Short URL = http://wild.tl/lcnphw
Gallery images
There are other downloads I am still working on.
You will probably need to login to access these — still all free.
* KML (google earth file)
* GPX (GPS file)
Special Maps/ brochures
* A3 topo maps
* PDF with Lands Topo map base
* PDF with arial image (and map overlay)
I wanted to get the main site live first, this extra stuff will come in time.
Happy walking
Matt 🙂
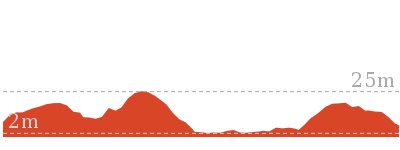
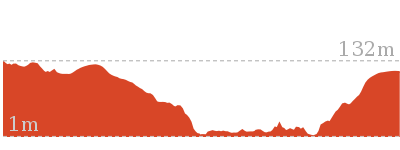
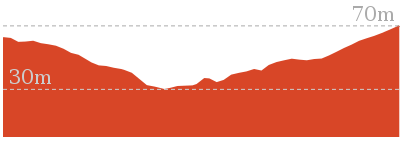
Blackbutt Creek Return
And Walk
Blackbutt Creek Return

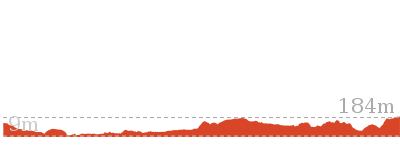
2 hrs
5.5 km Return
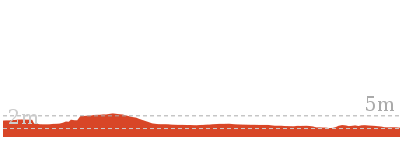
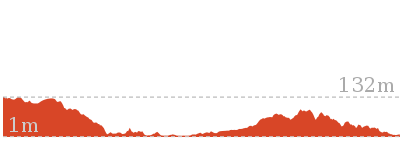
121 m
Moderate track


(0km) Gordon Station → Int. Blackbutt Creek Trk and Vale St
980 m
20 mins
6m
-54m
Easy track
From the top of the station, this walk heads towards the shops, down the stairs and to the road next to Gordon Station bus depot.
Continue straight: From Gordon Station bus depot, this walk heads up the hill of St Johns Ave to the Pacific Highway. The walk crosses to the other side at the pedestrian crossing. From here, this walk follows the shop fronts up the Pacific Highway, then turns left onto Moree St. This street is followed until the walk turns right onto Vale St. This walk continues along Vale St for a short time to the intersection with the bush track on the left of the street.
Continue straight: From Gordon Station bus depot, this walk heads up the hill of St Johns Ave to the Pacific Highway. The walk crosses to the other side at the pedestrian crossing. From here, this walk follows the shop fronts up the Pacific Highway, then turns left onto Moree St. This street is followed until the walk turns right onto Vale St. This walk continues along Vale St for a short time to the intersection with the bush track on the left of the street.
(0.98km) Int. Blackbutt Creek Trk and Vale St → Int. Lady Game Drive and Falls Creek Trk
1.8 km
33 mins
7m
-54m
Moderate track
Turn left : From the intersection next to house No. 31, this walk heads past a gate to follow a line of houses on the right. The track continues down a slight gradient for approximately 300m, turning left to come to the intersection, approximately 10m above a concrete sewerage inspection hole.
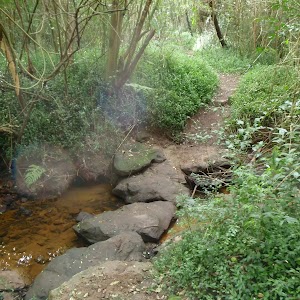
Veer left: From the intersection, this walk heads down the hill, passing a concrete sewerage inspection hole on the right. The trail continues along the creek line for another 20m, to the intersection which leads down to the creek on the right.
Continue straight: From the intersection, this walk follows the creek downstream for approximately 200m to the signposted intersection.
Continue straight: From the intersection, this walk follows the left-hand arrow on the ‘Blackbutt Creek Track’ sign, down the hill. The track contours with the creek on the right, and the houses high on the left, for approximately 1km to then steeply descend to the intersection above the concreted water-crossing.
Continue straight: From the intersection, this walk heads down the hill, across the concrete ford (creek), to then turn right and follow along side the creek. The trail tends left away from the creek, up to a white gate.
Maps for the Blackbutt Creek Return walk
You can download the PDF for this walk to print a map.
These maps below cover the walk and the wider area around the walk, they are worth carrying for safety reasons.
| Parramatta River | 1:25 000 Map Series | 91303N PARRAMATTA RIVER | NSW-91303N |
| Sydney | 1:100 000 Map Series | 9130 SYDNEY | 9130 |
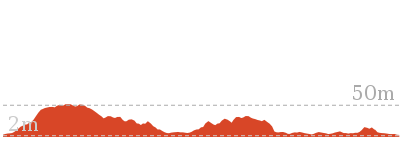
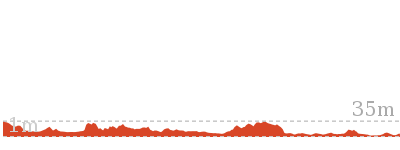
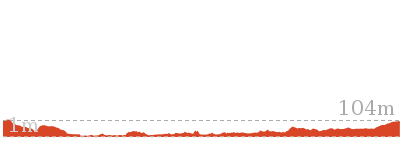
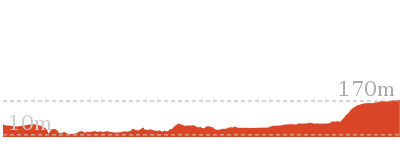
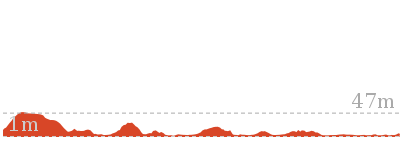
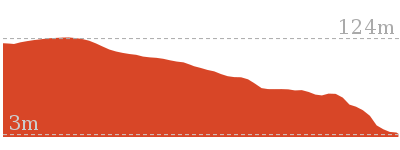
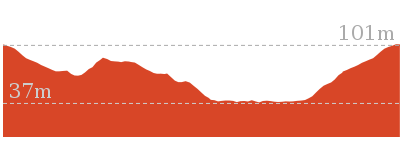
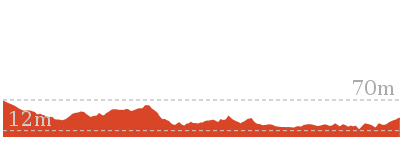
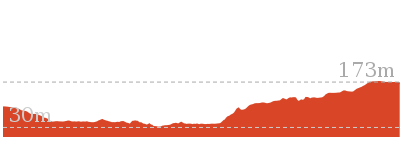
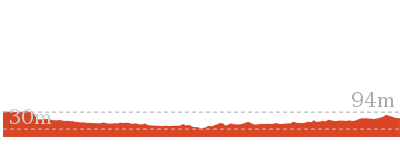
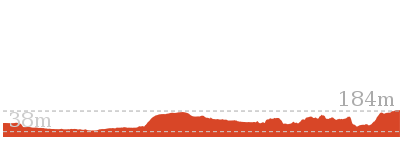
Cross sectional view of the Blackbutt Creek Return bushwalking track
Analysis and summary of the altitude variation on the Blackbutt Creek Return
Overview of this walks grade – based on the AS 2156.1 – 2001
Under this standard, a walk is graded based on the most difficult section of the walk.
| Length | 5.5 km | ||
| Time | 2 hrs | ||
| . | |||
| Grade 3/6 Moderate track |
AS 2156.1 | Gradient | Short steep hills (3/6) |
| Quality of track | Formed track, with some branches and other obstacles (3/6) | ||
| Signs | Directional signs along the way (3/6) | ||
| Experience Required | No experience required (1/6) | ||
| Weather | Weather generally has little impact on safety (1/6) | ||
| Infrastructure | Limited facilities, not all cliffs are fenced (3/6) |
Some more details of this walks Grading
Here is a bit more details explaining grading looking at sections of the walk
Gradient
Around 1.5km of this walk has short steep hills, whilst the remaining 1.2km has gentle hills with occasional steps.
Quality of track
1.8km of this walk follows a formed track, with some branches and other obstacles and another 960m follows a smooth and hardened path. The remaining (20m) follows a clear and well formed track or trail.
Signs
Around 1.4km of this walk has directional signs at most intersection, whilst the remaining 1.4km is clearly signposted.
Experience Required
This whole walk, 2.7km requires no previous bushwalking experience.
weather
This whole walk, 2.7km is not usually affected by severe weather events (that would unexpectedly impact safety and navigation).
Infrastructure
Around 1.4km of this walk has limited facilities (such as not all cliffs fenced), whilst the remaining 1.4km is close to useful facilities (such as fenced cliffs and seats).
Similar walks
A list of walks that share part of the track with the Blackbutt Creek Return walk.
10.7 km One way
4 hrs 30 mins
Hard track

11.7 km One way
4 hrs 15 mins
Hard track
12.2 km One way
4 hrs 30 mins
Hard track
13.3 km One way
4 hrs 30 mins
Hard track

25.8 km One way
2 Days
Hard track
Other Nearby walks
A list of walks that start near the Blackbutt Creek Return walk.

6 km One way
2 hrs 45 mins
Hard track
6.8 km One way
3 hrs
Experienced only
9 km One way
4 hrs
Hard track
4.7 km Return
2 hrs
Moderate track
4.7 km One way
2 hrs 15 mins
Hard track
360 m Return
15 mins
Easy track
2.6 km One way
1 hr 15 mins
Hard track
3.6 km Return
1 hr 30 mins
Hard track
3 km Return
1 hr 30 mins
Moderate track
3.5 km Circuit
1 hr 30 mins
Hard track

1.3 km One way
30 mins
Moderate track
4.4 km One way
1 hr 45 mins
Hard track
Plan your trip to and from the walk here
The Blackbutt Creek Return walk starts and ends at the Gordon Station (gps: -33.756038, 151.15425)
Your transport options to Gordon Station are by;
![]() Train. (get details)
Train. (get details)
![]() Car. There is free parking available.
Car. There is free parking available.
(get details)
![]() Bus. (get details)
Bus. (get details)
Short URL = http://wild.tl/bcr
Gallery images
There are other downloads I am still working on.
You will probably need to login to access these — still all free.
* KML (google earth file)
* GPX (GPS file)
Special Maps/ brochures
* A3 topo maps
* PDF with Lands Topo map base
* PDF with arial image (and map overlay)
I wanted to get the main site live first, this extra stuff will come in time.
Happy walking
Matt 🙂
De Burgs Bridge to Thornleigh station

3 hrs 45 mins
9.7 km One way
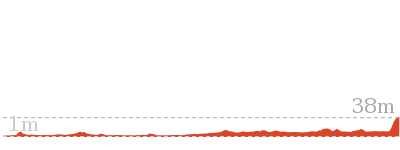
363 m
Hard track
This walk follows a section of the Great North Walk, starting from De Burghs bridge. The walk winds north west, through the Lane Cove Valley, passing through Browns Waterhole and continuing alongside Lane Cove river as it zigzags along the valley floor. The walk then climbs up to the Thornleigh playing field and along the streets to Thornleigh train station


(0km) Int. Opposite the end of Lady Game Drive → Int of GNW and Christie Park track
1.8 km
37 mins
47m
-64m
Moderate track
From the intersection, this walk passes over the timber railing and turns left down the hill. The track winds down the hill for approximately 200m to the signposted intersection.
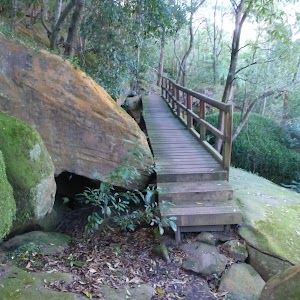
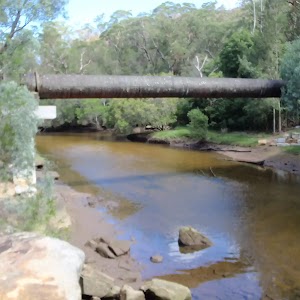
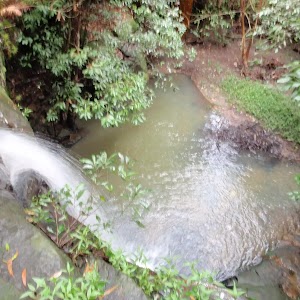
Turn right: From the intersection, this walk follows the ‘The Great North Walk’ sign[1] north, gently downhill along the management trail. After about 80m, this trail crosses a concrete bridge[2] over Rudder Creek (beside a concrete sewerage pipe[3]). From here, the trail leads uphill for just shy of 200m to come to an intersection with the GNW track (on your left), where a ‘Lane Cove Weir’ sign[4] points back down along the trail.
Turn left: From the intersection, this walk follows the ‘Thornleigh Oval’ sign[5] west, gently down the track, away from the management trail. The track almost immediately passes the large metal pipe (crossing the Lane Cove River[6]) then winds down the rocky track[7] for about 200m, through open eucalypt forest[8] with some limited views left over the valley, to come to a weedy section of track marked with a concrete sewerage access point[9]. Here the track mostly flattens out and leads along the side of the hill for about 400m to head down a few steps and cross Quarry Creek[10]. The walk then heads up some steps and follows the track for another 30m to come to a T-intersection[11] with the Gloucester Ave fire trail, marked with a GNW and NPWS arrow post[12].
Turn left: From the intersection, the walk follows the GNW arrow post[13] gently uphill along the management trail, away from the gate whilst keeping the power line poles on your left. After about 30m (just past the second power pole), this trail leads to an intersection with a track (on the left), marked with another set of NPWS & GNW arrow posts[14] (just under the high tension power lines[15]).
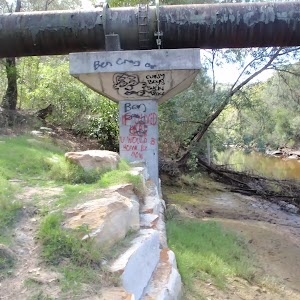
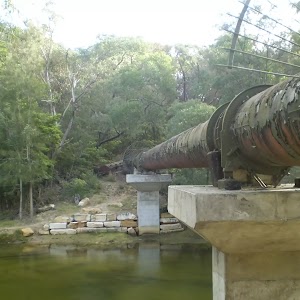
Turn left: From the intersection, this walk follows the GNW arrow post[16] south, downhill along the track and under the high tension power lines[17]. The track winds gently downhill for almost 150m until, just after passing close to the the high tension power line tower[18], this walk comes to a locked green shed[19] opposite a fenced-off pipe bridge[20] (down in the valley to your left).
Continue straight: From the green shed, this walk follows the track[21] along the side of the hill, keeping the valley to your left (running parallel with the high tension power lines, up to your right). After about 150m, this walk comes to an intersection with a faint track on your right (that leads a short distance to a management trail), marked with a GNW arrow post[22].
Continue straight: From the intersection, this walk follows the GNW arrow post along the mostly flat track, through the dense forest, and almost immediately passes a concrete sewerage access point[23]. After about 70m, this walk heads down a few timbers steps to cross a small gully[24], where the track continues for another 100m (passing close to a few houses[25]), then crosses two flat timber bridges[26] over Congham Creek. Here the walk veers left up onto the rock platform[27] and follows the track gently uphill for another 80m to come to a three-way intersection, marked with a GNW arrow post[28] (and a sign pointing left to ‘Marsfield’[29]).
Turn right: From the intersection, this walk follows the ‘The Great North Walk’ sign[1] north, gently downhill along the management trail. After about 80m, this trail crosses a concrete bridge[2] over Rudder Creek (beside a concrete sewerage pipe[3]). From here, the trail leads uphill for just shy of 200m to come to an intersection with the GNW track (on your left), where a ‘Lane Cove Weir’ sign[4] points back down along the trail.
Turn left: From the intersection, this walk follows the ‘Thornleigh Oval’ sign[5] west, gently down the track, away from the management trail. The track almost immediately passes the large metal pipe (crossing the Lane Cove River[6]) then winds down the rocky track[7] for about 200m, through open eucalypt forest[8] with some limited views left over the valley, to come to a weedy section of track marked with a concrete sewerage access point[9]. Here the track mostly flattens out and leads along the side of the hill for about 400m to head down a few steps and cross Quarry Creek[10]. The walk then heads up some steps and follows the track for another 30m to come to a T-intersection[11] with the Gloucester Ave fire trail, marked with a GNW and NPWS arrow post[12].
Turn left: From the intersection, the walk follows the GNW arrow post[13] gently uphill along the management trail, away from the gate whilst keeping the power line poles on your left. After about 30m (just past the second power pole), this trail leads to an intersection with a track (on the left), marked with another set of NPWS & GNW arrow posts[14] (just under the high tension power lines[15]).
Turn left: From the intersection, this walk follows the GNW arrow post[16] south, downhill along the track and under the high tension power lines[17]. The track winds gently downhill for almost 150m until, just after passing close to the the high tension power line tower[18], this walk comes to a locked green shed[19] opposite a fenced-off pipe bridge[20] (down in the valley to your left).
Continue straight: From the green shed, this walk follows the track[21] along the side of the hill, keeping the valley to your left (running parallel with the high tension power lines, up to your right). After about 150m, this walk comes to an intersection with a faint track on your right (that leads a short distance to a management trail), marked with a GNW arrow post[22].
Continue straight: From the intersection, this walk follows the GNW arrow post along the mostly flat track, through the dense forest, and almost immediately passes a concrete sewerage access point[23]. After about 70m, this walk heads down a few timbers steps to cross a small gully[24], where the track continues for another 100m (passing close to a few houses[25]), then crosses two flat timber bridges[26] over Congham Creek. Here the walk veers left up onto the rock platform[27] and follows the track gently uphill for another 80m to come to a three-way intersection, marked with a GNW arrow post[28] (and a sign pointing left to ‘Marsfield’[29]).
(1.77km) Int of GNW and Christie Park track → Int of the Great North Walk and the West Pymble service trail link track
760 m
18 mins
42m
-36m
Hard track
Veer right: From the intersection, the walk follows the GNW arrow post[30] north, uphill for about 30m to come to a faint intersection with a track (on your right) marked with a GNW arrow post[31].
Veer left: From the intersection, this walk follows the GNW arrow post[32] gently uphill along the side of the hill (keeping the valley to your left) for about 100m to come to a small clearing and three way intersection, marked with yet another GNW arrow post[33] and a pile of rocks[34] (on your left).
Turn left : From the intersection, this walk follows the GNW arrow post[35] up the short rocky hill[36] and away from the high tension power lines[37]. The track (rocky early on[38]) leads along the side of the hill among some grass trees[39] for about 300m before passing under the power lines again. Here the track continues for another 300m along the side of the valley to come to a clear intersection with intersection with a wide management trail[40].
(2.53km) Int of the GNW and the West Pymble service trail link track → Int of the GNW and the South Turramurra High School trail
700 m
17 mins
51m
-19m
Moderate track
Continue straight: From the intersection, this walk follows the GNW arrow post[41] downhill along the management trail. The trail leads down for about 70m to cross a small gully[42] then runs closely beside the Lane Cove River[43] (on your left) for another 120m to come to an intersection marked with a GNW arrow post and a ‘Lane Cove Valley’ aluminum sign and map[44].
Turn left : From the intersection, this walk follows the GNW arrow post, directly away from the face of the ‘Lane Cove Valley’ aluminum sign and map[45], down the track and timber steps[46] to a sandy beach on the Lane Cove River[47]. Here the walk turns right to cross the weir and bridge[48] over Avondale Creek, (this may become impassable after heavy or prolonged rain) then climb gently uphill for about 120m to come to a faint intersection with a faint track (on your left – this faint track leads down to another old weir).
Continue straight: From the intersection, this walk heads gently uphill following the main track, whilst keeping the valley to your left for about 30m to come to a clear Y-intersection marked with a GNW arrow post[49].
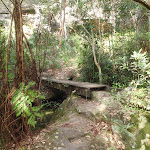
Veer left: From the intersection, this walk follows the GNW arrow post[50] along the track, keeping the Lane Cove River a short distance to your left[51]. After about 80m, the track steps up to and crosses a short section to timber boardwalk/bridge[52]. Here the walk climbs up the rocky hill following a series of concrete access points[53] and timber steps[54] for about 230m to come to a T-intersection with a management trail, marked with a GNW arrow post[55].
Turn left : From the intersection, this walk follows the GNW arrow post, directly away from the face of the ‘Lane Cove Valley’ aluminum sign and map[45], down the track and timber steps[46] to a sandy beach on the Lane Cove River[47]. Here the walk turns right to cross the weir and bridge[48] over Avondale Creek, (this may become impassable after heavy or prolonged rain) then climb gently uphill for about 120m to come to a faint intersection with a faint track (on your left – this faint track leads down to another old weir).
Continue straight: From the intersection, this walk heads gently uphill following the main track, whilst keeping the valley to your left for about 30m to come to a clear Y-intersection marked with a GNW arrow post[49].
Veer left: From the intersection, this walk follows the GNW arrow post[50] along the track, keeping the Lane Cove River a short distance to your left[51]. After about 80m, the track steps up to and crosses a short section to timber boardwalk/bridge[52]. Here the walk climbs up the rocky hill following a series of concrete access points[53] and timber steps[54] for about 230m to come to a T-intersection with a management trail, marked with a GNW arrow post[55].
(3.22km) Int of the GNW and the Turramurra High School service trail → Int of GNW and Kissing Point Road path
870 m
18 mins
24m
-35m
Moderate track
Veer left: From the intersection, this walk follows the GNW arrow post[56] gently downhill along the management trail for about 40m to come to an intersection with a short trail (on the right, which leads to the gate[57] at the end of Koombalah Ave).
Continue straight: From the intersection just below the Koombalah Ave gate, this walk follows the management trail gently downhill, whilst keeping the valley to your left. The trail initially leads over a rock platform, then about 50m later, leads down a steep hill[58]. The trail then heads gently down for about 400m before a short steep hill[59] leads down to a metal high tension power line tower[60]. Here the trail bends right and leads down and along the side of the hill for another 200m to pass another high tension power line tower[61] and head behind a few houses. Just behind the second house, this walk comes to ephemeral creek on a rock platform[62].
Continue straight: From here, this walk crosses the ephemeral creek[63] (keeping the houses up to your right) and continues along the trail for about 30m to come to a T-intersection with a wide, shared, concrete path, marked with several signposts[64].
(4.1km) Int of GNW and Kissing Point Road trail → Browns Waterhole int
260 m
5 mins
1m
-17m
Easy track
Turn left: From the intersection, this walk follows the GNW arrow post downhill[65] along the wide, shared, concrete path. After about 50m, this path leads under some high tension power lines[66] then bends right[67]. About 50m after passing under the power lines, this path leads to an intersection with a track[68] (on your left, that leads to an informal unfenced lookout), just before a GNW arrow post[69].
Continue straight: From the intersection, the walk heads fairly steeply downhill along the concrete path. The path passes a few signs[70] over about 100m, then comes to an intersection with a track (on your left), marked with a timber barricade and a GNW arrow post[71].
Veer right: From the intersection, this follows the concrete path downhill for just shy of 50m to come to a intersection with a dirt management trail[72]. This intersection is beside the Lane Cove River crossing[73] (on your left) and is marked with a ‘The Great North Walk’ sign here[74].
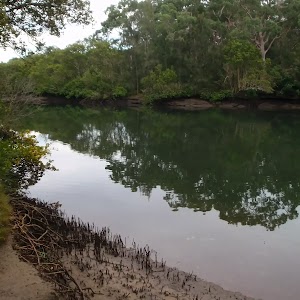
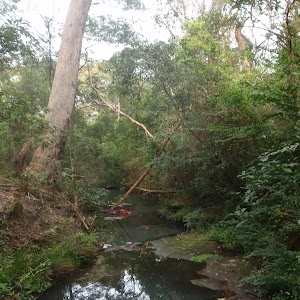
Browns Waterhole
Browns Waterhole is a wide, shallow section of the Lane Cove River, downstream of a concrete weir[75]. There is a concrete shared cycle/footpath crossing over the top of the weir, linking Kissing Point Road, South Turramurra to Vimiera Rd, Macquarie Park. On the western side of the waterhole, there is a picnic table[76] and small clearing with a view over this section of the river.
(4.36km) Browns Waterhole int → Int of GNW and the STEP track (east)
570 m
12 mins
24m
-14m
Easy track
Veer right: From the intersection, this walk follows the ‘The Great North Walk’ sign[77] along the dirt management trail, keeping the Lane Cove River to your left. After about 80m, the trail leads under some high tension power lines[78], where there is a mostly clear view over the river[79] (to your left). The trail then gently leads down through the valley[80] for about 400m to come to an intersection with Cove St trail, marked with a GNW arrow post[81].
Veer left: From the intersection, this walk follows the GNW arrow post[82] downhill along the management trail for about 30m to cross a small culverted creek[83]. The walk then follows the trail up the short hill to come to an intersection with the signposted ‘STEP track’[84][85] (on your right).
Veer left: From the intersection, this walk follows the GNW arrow post[82] downhill along the management trail for about 30m to cross a small culverted creek[83]. The walk then follows the trail up the short hill to come to an intersection with the signposted ‘STEP track’[84][85] (on your right).
(4.93km) Int of GNW and the STEP track (east) → Int of GNW and the STEP track (west)
580 m
10 mins
8m
-9m
Easy track
Continue straight: From the intersection, this walk follows the GNW arrow post[86] and STEP Track markers[87] along the management trail, whilst keeping the river to your left. The trail undulates through the valley (weedy in places[88]) and tall forest[89] for just shy of 600m, to come to a clear intersection at the bottom of a sealed management trail[90] (on your right). This intersection is marked with another ‘STEP Track’ map/sign[91] and a ‘The Great North Walk’ sign[92].
(5.51km) Int of GNW and the STEP track (west) → Int of GNW and the Pennant Hills Park track
1 km
18 mins
25m
-8m
Moderate track
Veer left: From the intersection, the walk follows the ‘The Great North Walk’ sign gently downhill along the management trail, directly away from the face of the ‘STEP Track’ map/sign[93]. Keeping the river to your left, the trail leads downhill for about 80m to come to a Y-intersection[94], where there is a ‘Lane Cove Valley’ map/sign[95] and a ‘Lane Cove River Park’ sign[96] pointing back along the trail.
Veer right: From the intersection, this walk follows the ‘Thornleigh Station’ sign[97] past the ‘Lane Cove Valley’ map, initially keeping the other trail and river to your left. The trail follows the valley floor, keeping the river just to your left, for a bit over 500m, to then cross the Lane Cove River at a rocky ford[98]. This crossing may become impassable after heavy or prolonged rain. On the other side of the river, this walk continues along the trail[99] for about 400m (with the river now close by on your right) to come to an intersection with a faint track[100] (on your left, that leads up towards Pennant Hills Park).
Veer right: From the intersection, this walk follows the ‘Thornleigh Station’ sign[97] past the ‘Lane Cove Valley’ map, initially keeping the other trail and river to your left. The trail follows the valley floor, keeping the river just to your left, for a bit over 500m, to then cross the Lane Cove River at a rocky ford[98]. This crossing may become impassable after heavy or prolonged rain. On the other side of the river, this walk continues along the trail[99] for about 400m (with the river now close by on your right) to come to an intersection with a faint track[100] (on your left, that leads up towards Pennant Hills Park).
(6.54km) Int of GNW and the Pennant Hills Park track → Int of the GNW and the Morona Ave trail
1.2 km
21 mins
29m
-15m
Moderate track
Continue straight: From the intersection, the walk follows the management trail, keeping the river just to your right. After about 60m, the trail bends right and crosses the Lane Cove River at a rocky ford[101], then continues along the valley floor among the fern trees (and concrete pipe access points[102]) for about 900m to cross the Lane Cove River again at another rocky ford[103]. (These crossings may become impassable after heavy or prolonged rain). The trail then continues along the valley floor[104] (with the river now on your left) for just over 150m to come to an intersection at the bottom of the sealed Morona Ave trail[105] (on your right), marked with a ‘Lane Cove Valley’ map/sign[106] and a GNW arrow post[107].
(7.71km) Int of the GNW and the Morona Ave trail → Conscript Pass
330 m
8 mins
24m
-8m
Moderate track
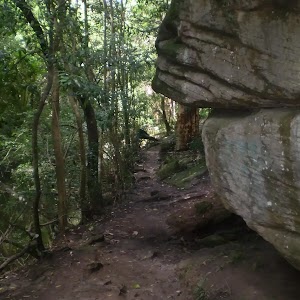
Veer left: From the intersection, this walk follows the GNW arrow post along the valley floor, away from the two trails, keeping the river just to your left. The track soon narrows, leading past a water depth indicator[108], and becomes rocky for about 150m before coming to a faint intersection, where GNW arrow post points left[109]. Here, the walk turns left and crosses the Lane Cove River using the concrete stepping stones[110] (this crossing may become impassable after heavy or prolonged rain) to follow the ‘Thornleigh Station’ sign[111] up the timber steps for about 40m and find a GNW registration box[112] (damaged at time of writing). The track bends sharply right[113] and zigzags up the rocky hill for another 30m, before bending sharply left to find the ‘Conscript Pass’ and ‘B Stevens’[114][115] engravings (at the third metal hand rail).
Conscript Pass
Conscript Pass is a small sandstone pass between the Lane Cove River and Thornleigh, on the Great North Walk. During the 1930s, some stone steps were built through a cleft in the rock[116] as part of a public works program, in response to the depression. The pass has two main engravings. Firstly ‘Conscript Pass’ is followed with a downwards pointing arrow[117] and a series of initials and numbers. On another wall (that you face when walking up) is engraved ‘B Stevens’ followed a surprisingly good caricature[118][119] of the then Premier of NSW, Bertram Stevens. Stevens (later knighted) replaced Jack Lang in 1932 as Premier of NSW, when Lang was dismissed by the Governor (just two months Lang after opening the Sydney Harbour Bridge).
(8.04km) Conscript Pass → Int of the GNW and Lorna Pass tracks
100 m
3 mins
19m
0m
Moderate track
(8.15km) Int of the GNW and Lorna Pass tracks → Int of GNW and BP scout camp tracks
230 m
7 mins
34m
0m
Hard track
Veer left: From the intersection, the walk follows the ‘Thornleigh’ sign[124] uphill along the rocky track, keeping the valley to your left. The track leads up a series of timber steps[125] for about 230m, becoming steeper as they go[126], to come to a clear T-intersection signposted with a large ‘The Great North Walk’ sign[127], and a stone ‘Lorna Pass’ arrow[128] pointing back down the track.
(8.37km) Int of GNW and BP scout camp tracks → Int of Handley and Ferguson Avenues
350 m
7 mins
16m
0m
Moderate track
Veer right: From the intersection, this walk follows the GNW arrow post and ‘Thornleigh Station’ sign[129] uphill along the wide rocky track[130]. After just over 150m, the track bends left (ignoring a faint track on your right[131]) and heads uphill for another 40m to come to the back (south-east corner) of Thornleigh Oval[132], marked with a ‘Lane Cove National Park’ signpost[133].
Turn right: From the intersection, this walk follows the GNW arrow post along the fence line around the oval, keeping the oval to your left. After about 100m, this walk passes in front of the clubhouse[134] (there are toilets[135] and a water tap[136] on your right) to pass a ‘Great North Walk’ sign[137] and come to the corner of ‘Handley’ and ‘Ferguson’ Avenues[138] in front of the ‘Thornleigh Oval’ sign[139].
Turn right: From the intersection, this walk follows the GNW arrow post along the fence line around the oval, keeping the oval to your left. After about 100m, this walk passes in front of the clubhouse[134] (there are toilets[135] and a water tap[136] on your right) to pass a ‘Great North Walk’ sign[137] and come to the corner of ‘Handley’ and ‘Ferguson’ Avenues[138] in front of the ‘Thornleigh Oval’ sign[139].
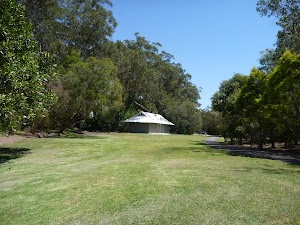
Thornleigh Oval
Thornleigh Oval is found at the intersection of Handley and Ferguson Avenues, Thornleigh. There is a large playing field[140], tap water[141], public toilets[142][143] and some shelter in the awning of the club house[144]. The oval has a car park, and a number io signs for the Great North walk[145] and other local tracks[146].
(8.73km) Int of Handley and Ferguson Avenues → Int of Railway Parade and Pennant Hills Road overpass steps
810 m
14 mins
18m
-4m
Very easy
Continue straight: From the intersection, this walk follows the ‘Thornleigh Station’ sign across the road to follow the footpath beside ‘Handley Ave’. After about 130m, the walk crosses Clifford Ave[147] then after about 250m, crosses ‘Orchard St’ to follow ‘Station St’ almost directly ahead[148]. About 190m along ‘Station St’, this walk continues straight across ‘Wood St’[149] (you can get to Parkway Plaza if you turn right here) and continues for just over 200m to find a footbridge[150] beside Pennant Hills Rd. Here the walk heads up the ramp and crosses over the busy road[151] then down the ramp (or steps) to find the intersection with Railway Parade[152].
(9.54km) Int of Railway Parade and Pennant Hills Road overpass steps → Thornleigh Train Station
110 m
2 mins
1m
-1m
Easy track
Veer left: From the base of the steps, this walk follows the GNW arrow across ‘Railway Pde’[153], heading towards the train line. At the fence, this walk veers left and leads along the pedestrian alley[154] for about 60m before turning right and climbing up the railway bridge steps[155], coming to the ‘Thornleigh’ Train Station[156].
Maps for the De Burgs Bridge to Thornleigh station walk
You can download the PDF for this walk to print a map.
These maps below cover the walk and the wider area around the walk, they are worth carrying for safety reasons.
| Hornsby | 1:25 000 Map Series | 91304S HORNSBY | NSW-91304S |
| Parramatta River | 1:25 000 Map Series | 91303N PARRAMATTA RIVER | NSW-91303N |
| Sydney | 1:100 000 Map Series | 9130 SYDNEY | 9130 |
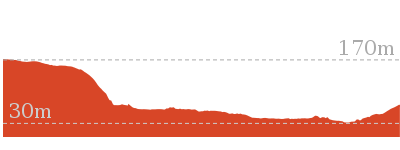
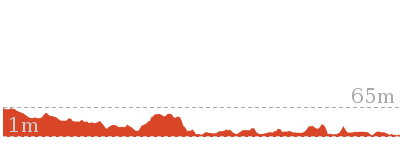
Cross sectional view of the De Burgs Bridge to Thornleigh station bushwalking track
Analysis and summary of the altitude variation on the De Burgs Bridge to Thornleigh station

Overview of this walks grade – based on the AS 2156.1 – 2001
Under this standard, a walk is graded based on the most difficult section of the walk.
| Length | 9.7 km | ||
| Time | 3 hrs 45 mins | ||
| . | |||
| Grade 4/6 Hard track |
AS 2156.1 | Gradient | Very steep (4/6) |
| Quality of track | Rough track, where fallen trees and other obstacles are likely (4/6) | ||
| Signs | Directional signs along the way (3/6) | ||
| Experience Required | Some bushwalking experience recommended (3/6) | ||
| Weather | Storms may impact on navigation and safety (3/6) | ||
| Infrastructure | Limited facilities, not all cliffs are fenced (3/6) |
Some more details of this walks Grading
Here is a bit more details explaining grading looking at sections of the walk
Gradient
5km of this walk has gentle hills with occasional steps and another 3.3km has short steep hills. Whilst another 1.1km is flat with no steps and the remaining 230m is very steep.
Quality of track
4.9km of this walk follows a clear and well formed track or trail and another 3km follows a formed track, with some branches and other obstacles. Whilst another 1.2km follows a smooth and hardened path and the remaining 620m follows a rough track, where fallen trees and other obstacles are likely.
Signs
Around 6km of this walk is clearly signposted, whilst the remaining 3.9km has directional signs at most intersection.
Experience Required
Around 6km of this walk requires no previous bushwalking experience, whilst the remaining 3.6km requires some bushwalking experience.
weather
Around 7km of this walk is not usually affected by severe weather events (that would unexpectedly impact safety and navigation), whilst the remaining 3.1km is affected by storms that may impact your navigation and safety.
Infrastructure
Around 5km of this walk has limited facilities (such as not all cliffs fenced), whilst the remaining 4.3km is close to useful facilities (such as fenced cliffs and seats).
Similar walks
A list of walks that share part of the track with the De Burgs Bridge to Thornleigh station walk.
1.3 km One way
30 mins
Moderate track
2.7 km Circuit
1 Hr
Moderate track

3.2 km Return
1 hr 30 mins
Moderate track
4.4 km One way
1 hr 45 mins
Hard track
5.1 km One way
2 hrs
Hard track
6 km One way
2 hrs 30 mins
Hard track

6.1 km One way
2 hrs 30 mins
Hard track
8 km One way
3 hrs
Hard track
8.4 km One way
3 hrs 15 mins
Hard track

8.4 km Circuit
3 hrs
Moderate track
10.2 km One way
3 hrs 45 mins
Moderate track
10.3 km One way
3 hrs 45 mins
Hard track
11.6 km One way
4 hrs 30 mins
Hard track
11.7 km One way
4 hrs 15 mins
Hard track
16.3 km One way
6 hrs
Hard track
17.5 km One way
6 hrs 45 mins
Hard track
18.1 km One way
6 hrs 45 mins
Hard track
20.6 km One way
8 hrs
Hard track

25.8 km One way
2 Days
Hard track
33 km One way
2 Days
Hard track
44.4 km One way
3 Days
Hard track
Other Nearby walks
A list of walks that start near the De Burgs Bridge to Thornleigh station walk.
5.5 km One way
2 hrs
Hard track
2.6 km One way
1 Hr
Moderate track
11.9 km Circuit
5 hrs
Hard track
3.4 km Return
1 hr 30 mins
Moderate track
5.9 km Return
2 hrs 30 mins
Moderate track
6.1 km One way
2 hrs 30 mins
Moderate track
6.9 km Circuit
2 hrs 30 mins
Hard track
6.7 km Circuit
2 hrs 45 mins
Moderate track

5.5 km Return
2 hrs
Moderate track
12.2 km One way
4 hrs 30 mins
Hard track
13.3 km One way
4 hrs 30 mins
Hard track
10.7 km One way
4 hrs 30 mins
Hard track
Plan your trip to and from the walk here
The De Burgs Bridge to Thornleigh station walk starts at the Int. Opposite the end of Lady Game Drive (gps: -33.77338, 151.1352)
Your transport options to Int. Opposite the end of Lady Game Drive are by;
![]() Bus. (get details)
Bus. (get details)
![]() Car. There is free parking available.
Car. There is free parking available.
(get details)
The De Burgs Bridge to Thornleigh station ends at the Thornleigh Train Station (gps: -33.731948, 151.07815)
Your transport options to Thornleigh Train Station are by;
![]() Train. (get details)
Train. (get details)
![]() Bus. (get details)
Bus. (get details)
![]() Car. There is free parking available.
Car. There is free parking available.
(get details)
Short URL = http://wild.tl/dbbtts
Gallery images
There are other downloads I am still working on.
You will probably need to login to access these — still all free.
* KML (google earth file)
* GPX (GPS file)
Special Maps/ brochures
* A3 topo maps
* PDF with Lands Topo map base
* PDF with arial image (and map overlay)
I wanted to get the main site live first, this extra stuff will come in time.
Happy walking
Matt 🙂
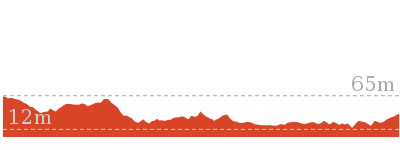
Circular Quay to Hornsby
And Walk
Circular Quay to Hornsby

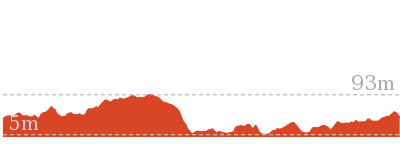
3 Days
44.4 km One way
1690 m
Hard track
This fun walk covers a large section of the Great North Walk, starting from the official start in Circular Quay. After a short ferry trip the walk follows the Lane Cove River through the Lane Cove National Park, to Thornleigh. Here, the walk enters Berowra Valley National Park, continuing along the Great North Walk to before following the popular Blue Gum Walk up out of the valley, to Hornsby train station. Camp overnight at Lane Cove tourist park and at the Scout camp in Thornleigh.
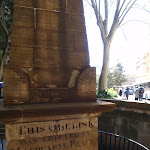


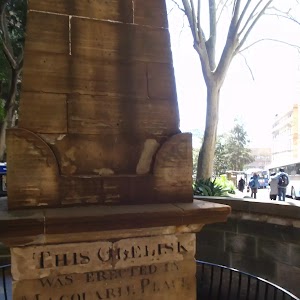
The Obelisk
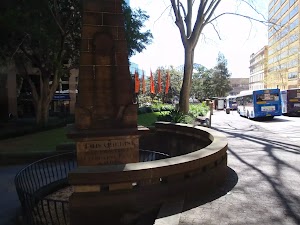
The Obelisk in Macquarie Place (Cnr of Bridge and Loftus Sts) is the original Mile Stone for 19th century roads in NSW. The surrounding park is the original town square built in 1810, while the Obelisk was erected by Governor Macquarie (well actually the Convicts did the heavy work) in 1818. For nearly 200 years this monument stood as the zero mile/km marker for all principal roads. There are a number of inscriptions including distance markers and “The Obelisk was erected in Macquarie Place A.D.1818, to Record that all the Public Roads Leading to the Interior of the Colony are measured from it. L.Macquarie Esq Governor”. The park has a number of other historic items worth exploring.
(0km) The Obelisk → Circular Quay
260 m
4 mins
1m
-5m
Very easy
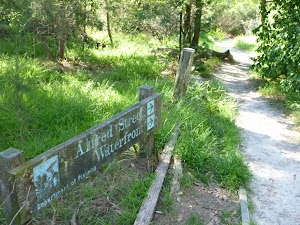
From the tall sandstone obelisk[1][2][3] (in Macquarie Place[4][5] at the intersection of Bridge and Loftus Sts, Sydney), this walk heads down along the footpath beside Loftus St[6], towards the view of the Harbour Bridge. After about 80m, the footpath leads past ‘Jessie Street Gardens’[7], which is ‘Dedicated to the achievements of Australian women’[8] – definitely worth the time to read the plaques[9][10][11].
From here, the walk continues down past McDonald’s[12] and across Alfred St to underneath the ‘Circular Quay Railway Station’ building[13].
From here, the walk continues down past McDonald’s[12] and across Alfred St to underneath the ‘Circular Quay Railway Station’ building[13].
(0.26km) Circular Quay → Woolwich Ferry Wharf, Valentia St
4.8 km
20 mins
2m
-2m
Very easy
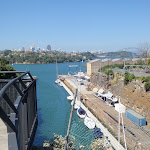
Continue straight: From Circular Quay ferry terminal[14], this walk heads over to Wharf 5[15] and catches a ferry (about $6) to Woolwich Ferry Wharf, Valentia St[16][17]. A ferry leaves every 30-60 mins during the day. The trip is very pleasant and passes the Opera House[18], travels the under the Harbour Bridge[19], around Garden Island[20], near Cockatoo Island[21] and on to Woolwich Ferry Wharf near the mouth of the Lane Cove River.
(5.07km) Woolwich Ferry Wharf, Valentia St → Goat Paddock
720 m
13 mins
23m
-6m
Very easy
Continue straight: From Woolwich Wharf[22] (at the end of Valentia Street[23]), this walk follows the footpath, past the toilets[24] and the large ‘Great North Walk’ sign[25] (and past the children’s playground[26] which is across the road) to the top of ‘Valentia St’[27]. The walk turns left and follows the tree-lined ‘The Point Rd’[28], which bends left and becomes ‘Gale St’[29]. Not far along Gale St, this walk comes to the front of the gates at the top of the signposted ‘Goat Paddock’ park[30][31] (on your left)
Goat Paddock

Goat Paddock is the open area north of Woolwich Dock. The park has a path winding down through the middle[32], providing access to the waters edge. In 1835, the Clarke family received a grant of the land at the eastern end of the peninsula, what we now call Woolwich. In 1898, Morts Dock and Engineering Company bought this land and commissioned the excavation of the dock. The area is well maintained and is used by many locals for their morning strolls.
(5.8km) Goat Paddock → Woolwich Lookout
80 m
1 mins
1m
-2m
Easy track
Continue straight: From the gates at the top of ‘Goat Paddock’[34][35], this walk follows the footpath uphill beside Gale St, which soon bends right. The walk passes ‘Woolwich Pier Hotel’[36] (on the opposite side of the road), then veers left across the grass on the signposted ‘Woolwich Lookout’ park[37], and soon comes to the fenced[38] lookout platform[39] on the left, about 80m from the lookout.
Woolwich Lookout
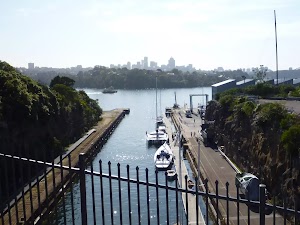
Woolwich Lookout is a fenced lookout[40] atop of the cliffs at the western end of Woolwich Dock[41]. There are great views down the sandstone cutting[42], through the dock at the mouth of the Lane Cove River and to North Sydney. In December 1901, the W. Solomon & Sons company (commissioned by Morts Dock and Engineering Company) completed the excavation of 85,000 cubic metres of sandstone to construct this dry dock. At the time, this 188 metres long, and 27 metres wide, pit was the largest dry dock in Australia. In 1963, the Army purchased the site and now it is managed by the Sydney Harbour Federation Trust.
(5.87km) Woolwich Lookout → Bottom of Kellys Bush
360 m
7 mins
10m
-11m
Easy track
Continue straight: From ‘Woolwich Lookout’[44], this walk winds down the concrete footpath[45], initially keeping the water view to your left. Crossing the road[46], this walk then follows the GNW arrow post[47] downhill along Edgecliff Rd[48][49], which soon bends right (enjoying the water views across to Cockatoo Island[50]), then crosses Margaret St[51] to become Alfred St. Continuing to the end of Alfred St[52], this walk comes to a short sandstone wall and a ‘Kellys Bush’ sign[53]
(6.23km) Bottom of Kellys Bush → Top of Kellys Bush
230 m
6 mins
25m
0m
Easy track
Continue straight: From the end of Alfred St[54], this walk follows the ‘Nelson Parade’ sign[55] up the sandstone steps[56]. At the top of the steps, this walk turns right, following the ‘Picnic Area’ sign[57] along the dirt track[58] for about 80m to a three-way intersection just past a bench seat[59]. This walk veers right, following the ‘Nelson Parade’ sign[60] up the steps[61], passing a ‘Kellys bush’ information sign[62] at the top of the hill, then leaves the park through a gap in the timber fence[63] to come to a road[64] beside Weil Park[65] (a large playing field[66]).
Kellys Bush
In the late 1880s, pocket of bushland between Prince George Parade and Alfred St, Woolwich was set aside to to act as a buffer zone between the Parramatta River and the Sydney Smelting Company. The area was named after the owner of the land and smelting company, T.H. Kelly [67]. From the passion of the local people who fought to protect this area, Kelly’s Bush is now owned by the Hunters Hill Council and cared for by a team of local bush regenerators[68].
(6.46km) Top of Kellys Bush → Int of Gladstone Ave and Woolwich Rd
220 m
4 mins
4m
-4m
Very easy
Continue straight: From the top of Kellys Bush, this walk follows the GNW arrow[69] gently uphill along Prince George Parade[70] (directly away from the park). Soon after passing a set of swings[71] (on the central reservation), this walk turns right[72] (crossing over the other part Prince George Parade) to follow another GNW arrow post along ‘Gladstone Ave’[73] until coming to an intersection with ‘Woolwich Rd’[74].
(6.68km) Int of Gladstone Ave and Woolwich Rd → End of Serpentine Rd
190 m
3 mins
1m
-10m
Very easy
(6.87km) End of Serpentine Rd → Int of Brookes and Vernon Sts
420 m
10 mins
22m
-32m
Moderate track
Continue straight: From the end of Serpentine Rd[79], this walk follows the GNW arrows down a few steps[80], then downhill along the footpath[81]. The path soon leads down to Vernon St to turn left[82], following the street for about 30m. Here the walk turns right[83], leading down a pedestrian lane-way[84] and steps[85][86] between two house, coming to ‘Mornington Reserve’, beside Alexandra Bay on the Lane Cove River[87][88]. Here the walk turns left, leading up along the grassy track reserve behind some houses[89] for about 180m to turn left at a GNW post[90] marking another pedestrian lane-way. The walk heads up this lane-way[91] then up the steps to turn right on Vernon St[92], coming almost immediately to an intersection with Brookes St[93] (on your right).
(7.29km) Int of Brookes and Vernon Sts → Hunters Hill Shops
1.2 km
22 mins
31m
-24m
Easy track
Continue straight: From the intersection, this walk heads uphill along Vernon St[94] which soon bends left. At the top of the hill, this walk turns right to follow the footpath beside Woolwich Rd[95] for about 150m, then turns right down Futuna Lane[96]. At the T-intersection, this walk turns left to follow Futuna St past the grand ‘St. Peter Chanel Catholic Church’ building[97] and then come to another T-intersection[99]. Here the walk crosses Crescent St and turns right a short distance and then left into Garrick Ave[100]. At the end of Garrick Ave[101], this walk follows the GNW arrow along the zigzagging pedestrian lane way[102][103] for about 170m to come to Passy Ave[104]. Here the walk crosses the road and turns right, following the footpath for about 150m to then turn left onto Ambrose St[105]. After a further 100m, the walk turns right at Ferry St to pass in front of the large sandstone ‘All Saints Anglican Church’ building[106]. Just past this church, the walk passes a few shops[108] to cross Alexandra St, then turns left. Just after crossing Ady St, this walk comes to to ‘Jaspers Restaurant’[109], opposite more cafes and shops[111][112].
Hunters Hill Shops
Just opposite the intersection of Alexandra and Ady Streets is a community shopping village in Hunters Hill. There are a few cafes and small restaurants[113] set among a lovely series of sandstone buildings[114]. You could even get your hair cut if so desired. The Ricciotti Deli Cafe open 7 days 0800-1700 (weekends 0800-1500) ph: (02) 9817-7388.[116]
(8.5km) Hunters Hill Shops → End of Mount St
770 m
15 mins
15m
-43m
Easy track
Continue straight: From in front of ‘Jaspers Restaurant’[117], this walk heads gently downhill along Alexandra St[119] almost immediately passing ‘Vienna’ Cottage[120][121] (an artisan’s home built in 1871). This walk continues along beside Alexandra St[123] for about 500m, passing the post office[124], Masonic Centre[125], town hall[126], Congregational Church[127], a tiny and very old-looking pharmacy[128] to come to a four-way intersection with Mount St[129] (on your right), opposite a children’s playground[130]. Here the walk follows the GNW post right[131] and downhill along Mount St[132] to come to a waterfront[133] intersection[134] at the end of the street.
(9.27km) End of Mount St → Joubert Street Reserve
620 m
11 mins
17m
-2m
Easy track
Turn left : From the northern end of Mount St[135], this walk follows the asphalt footpath[136] behind Hunters Hill High School[137], whilst keeping the Lane Cover River[138] to your right. The path leads past a few information signs[139][140], then bends left at the grassy clearing[141] to head up the side of the school. The path leads up a small set of stairs[142] and turns right on Reiby Rd, where the walk follows the road[143] for 100m until the road bends right. Here, the walk crosses the road[144] to follow the GNW arrow[145] up to the right and along the concrete footpath, which leads under under Burns Bay Rd (Fig Tree Bridge)[146]. Just after passing under the bridge, the walk heads left, diagonally up through Joubert Street Reserve to Joubert St[147] (just downhill from the intersection with Figtree Rd).
(9.89km) Joubert Street Reserve → Boronia Park
930 m
17 mins
26m
-3m
Very easy
Continue straight: From Joubert Street Reserve, this walk crosses Joubert St and heads uphill to then turn right into Figtree Rd. The walk leads along the footpath beside Figtree Rd[148] for about 350m, then turns right onto Ryde Rd[149] (there is a Coles Express service station to your left[150], if you want a cold drink). Following the footpath alongside Ryde Rd for about 500m (passing St Joseph’s College[151] along the way), this walk comes to Boronia Ave, just beside Boronia Park[152].
Boronia Park

Boronia Park is found at the intersection of Ryde Rd and Boronia Ave[153]. The park is centered around a couple of large playing fields[154] and a grand stand[155]. Here you will find public toilets[156], tap water, electric BBQs[157] and a children’s playground[158]. There is also shade from the trees and rain shelter to provide some relief on the hot or wet days.
(11.09km) End of Boronia Ave → Int of Great North Walk and Meyers Avenue track
840 m
17 mins
24m
-38m
Moderate track
Continue straight: From the end of Boronia Avenue[161], this walk follows the GNW arrow post[162] up along the rocky track. The track leads over a small rise then bends right (ignoring the track to your left), to head down a few stone steps[163], then a series of timber steps[164]. The track then continues along the bank of the Lane Cove River[165][166] (to your right) for about 100m to come to a T-intersection with Princes St[167]. Here the walk turns left and heads up the road[168] (away from the water view[169]) for about 50m, coming to an intersection with another track and a large green ‘The Great North Walk’ signpost[170] (on your right).
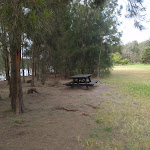
Turn right: From the intersection, this walk follows the ‘Buffalo Ck. Park’ arrow[171] down along track. Veering right after about 50m, this wide track then leads through the casuarina forest[172] for a short time, coming to an intersection and a small clearing with a picnic table[173], the informally named Brickmakers Creek picnic area.
Turn right: From the picnic area, this walk follows the GNW arrow post across the rocky Brickmakers Creek[174] and up the steps[175]. The walk continues along the short timber boardwalk[176], then leads up the timber steps[177] for about 100m where the track flattens out, veering right at another GNW arrow post[178]. Here the track leads down between the rocks[179], with a filtered view to the water, and a short distance later, the track veers right again at another GNW arrow post[180], heading gently down between some more rocks. For another 150m , the mostly flat track leads over some rock platforms[181][182] then along a short section of timber boarding[183] to come to a three-way intersection marked with a GNW arrow, and a larger unfenced rock platform[184] (to the right).
(11.93km) Int of Great North Walk and Meyers Avenue track → Mangrove viewing platform
1 km
20 mins
29m
-30m
Moderate track
Veer right: From the intersection, this walk heads along the rock platform[185], keeping the river down to your right. The walk soon heads down some steps carved in the rock[186], then follows the rocky and sandy track gently downhill, passing some interesting rock formations[187][188] over about 140m then climbing over some rocks with a metal handrail[189]. The track leads up a series of steps[190] for about 200m, then goes up some carved steps (also with a handrail[191]). From here, the rocky track heads down the steps[192] then leads alongside the mangroves[193] for just shy of 100m, coming to a T-intersection marked with a GNW arrow[194].
Turn left: From the intersection, this walk follows the GNW arrow up the steps[195]. The track bends right and comes to an intersection with the signposted ‘Access to Barons Cres’[196] track on your left, just below the large concrete building[197].
Continue straight: From the intersection, this walk follows the GNW arrow post[198] along the clear track, leading gently uphill (initially keeping the concrete building and Barton Cres track on your left[199]). The fairly flat, rocky track leads through the forest, keeping the Lane Cove River[200] not far to your right. After about 300m, the track leads up some steps[201] to a boulder outcrop[202] with good views over the river. The track continues for another 100m to a small clearing and a timber viewing platform[203] (on your right).
Mangrove viewing platform
This timber viewing platform[204] is found on bank on south-west of the confluence of the Lane Cove River and Buffalo Creek. This area is affected by the tides so the view is constantly changing. The lookout platform provides an opportunity to view the mangroves community[205] and the eroded sandstone ruins[206]
(12.97km) Mangrove viewing platform → Int of Great North Walk and Pains Road (south)
540 m
10 mins
15m
-15m
Easy track
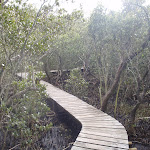
Turn left: From the timber platform[207], this walk heads directly away from the Lane Cove River[208] and follows the track up the valley, keeping the Buffalo Creek mangroves to your right. The track soon leads under a fallen tree[209] and meanders along the flat[210] for about 120m, then follows a short section of timber boardwalk[211]. The track then leads up some steps to pass under a small sandstone overhang[212], then continues along the base of a sandstone wall[213], from where the track leads over another shorter section of timber boardwalk[214]. The track then comes to another section of boardwalk which leads through the wetlands[215], over a small creek[216] and past the information sign about the ‘Friends of Buffalo Creek’[217]. The boardwalk then leads past some paperbark trees[218] and turns right onto the dirt track[219]. The walk follows this track for about 50m before heading up the timber ramp[220] and steps[221] to Pains Rd.
(13.51km) Int of Great North Walk and Pains Road (south) → Buffalo Creek track head
240 m
3 mins
2m
-1m
Easy track
Turn right: From the intersection[222], this walk follows GNW arrow up along Pains Rd[223] for about 20m to the intersection with a wide track, marked with another GNW arrow post[224], just where the road bends left[225].
Continue straight: From the bend in Pains Rd (near house number 4), this walk follows GNW arrow[226] along the wide track, whilst keeping a few houses up to your left[227]. After about 120m, the track leads up a grassy hill[228] to find a large open parkland, Buffalo Creek Reserve[229][230]. Here, the walk turns right and follows the ‘Great North Walk’ sign[231] across the grass, passing a picnic table[232] and fireplace[233], and coming to the large ‘Buffalo Creek Track Head’ signpost[234][235] (on your right).
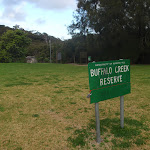
Continue straight: From the bend in Pains Rd (near house number 4), this walk follows GNW arrow[226] along the wide track, whilst keeping a few houses up to your left[227]. After about 120m, the track leads up a grassy hill[228] to find a large open parkland, Buffalo Creek Reserve[229][230]. Here, the walk turns right and follows the ‘Great North Walk’ sign[231] across the grass, passing a picnic table[232] and fireplace[233], and coming to the large ‘Buffalo Creek Track Head’ signpost[234][235] (on your right).
Buffalo Creek Reserve
The Buffalo Creek Reserve is found off the side of Pittwater Rd, just south of Buffalo Creek. The reserve is home to a large wetland, car park, large children’s playground [236], picnic shelters [237], BBQ’s [238], toilets [239] and town water on tap [240]. The children’s play area, on the western side of the reserve, is very popular. There is a large playing field and a second smaller picnic area on the eastern side (where the Buffalo Creek boardwalk starts [241]).
(13.75km) Buffalo creek track head → Int of Great North Walk and Sugarloaf Point tracks
540 m
13 mins
33m
-27m
Moderate track
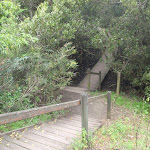
Turn right: From the ‘Buffalo Creek Track Head’, this walk follows the ‘Newcastle’ sign[242] down three sets of timber stairs[243]. Here the walk follows the timber boardwalk[244] as it winds through the mangroves to a hand-railed viewing area[245], just before a bridge.
From here, the walk crosses Buffalo Creek[246] on the bridge[247] then climbs up the stone steps[248] to veer left at a faint intersection (at the top of the steep climb), marked with a GNW arrow post[249]. The rocky track leads more gently up past the ‘Lane Cove River National Park – Sugarloaf Point’ sign[250] to a signposted T-intersection, where another GNW arrow[251] points back down the track.
Turn right: From the intersection, this walk follows the ‘Sugarloaf Point’ sign[252] along the flat rocky and sandy track, keeping the valley to your right. The track generally bends left around the side of the hill, passing a few interesting rock platforms[253] along the way. Soon after heading down some stone steps[254], this track comes to a signposted T-intersection with a wide sandy trail[255]. There is a ‘Buffalo Ck Reserve’ sign[256] pointing back up the steps.
(14.29km) Int of Great North Walk and Sugarloaf Point tracks → Sugarloaf Point
280 m
5 mins
2m
-9m
Easy track
Turn right: From the intersection, this walk follows the ‘Sugarloaf Point’ sign down the hill and along the service trail to the open waterfront clearing at Sugarloaf Point, which extends all the way along to the end of the grass clearing.
At the end of this side trip, retrace your steps back to the main walk then Continue straight.
At the end of this side trip, retrace your steps back to the main walk then Continue straight.
Sugarloaf Point

Sugarloaf Point is a large grassy clearing with a picnic area on the edge of the Lane Cove River, just north of the Buffalo Creek junction. The riverside picnic area has a couple of picnic benches and a small beach, making it possible to pull a boat up to the point.
(14.29km) Int of Great North Walk and Sugarloaf Point tracks → Int of Great North Walk and Pittwater Road carpark path
200 m
4 mins
9m
-5m
Easy track
Turn left: From the intersection, this walk follows the ‘Pittwater Road 0.25km’ sign[257] up along the wide management trail, which soon becomes sealed[258]. The trail winds up beside a large, fenced, high-tension power line concrete tower[259][260]. The trail soon leads around a locked gate[261] and comes to an intersection[262] just before Pittwater Rd, with a ‘Great North Walk’ track sign[263] (on the right).
(14.49km) Int of Great North Walk and Pittwater Road carpark path → Magdala Park carpark
1.3 km
24 mins
25m
-29m
Moderate track
Turn right: From the intersection, this walk follows the ‘Great North Walk’ sign[264] past the picnic table[265] and down the timber steps, whilst keeping Pittwater Rd through the trees to your left. The track soon passes a ‘Lane Cove National Park’ sign[266] then heads down some timber stairs[267]. The track continues just below the road (on your left) and beside the mangroves (on your right) for a little over 400m, crossing several timber platforms[268] and going up and down a few steps to come to a ‘Coastal Wetlands’ information sign[269]. Having moved away from the road, the track now heads along a timber boardwalk[270] that winds through the mangroves and wetlands to cross Kitty Creek[271] on a bridge[272]. Just on the other side of the bridge, this walk comes to a T-intersection with a sign pointing back to ‘Sugarloaf Point’[273].
Turn right: From the intersection, this walk follows the GNW arrow[274] along the wide track, initially keeping Kittys Creek to your right. The track almost immediately bends left (ignoring the side track on the left[275]) and follows the bank of the Lane Cove River[276] (on your right) through the casuarina forest[277] for just shy of 200m. Here, the track starts edging away from the river and enters more dense vegetation[278] for just over 200m, before the track opens up and comes to a ‘Lane Cove National Park – Sugarloaf Point’ sign[279]. From the sign, the walk leads up along the grass[280], keeping the playing fields[281] to your right and coming to a GNW arrow post[282] in front of the toilet block[283] beside Magdala Park car park[284].
Turn right: From the intersection, this walk follows the GNW arrow[274] along the wide track, initially keeping Kittys Creek to your right. The track almost immediately bends left (ignoring the side track on the left[275]) and follows the bank of the Lane Cove River[276] (on your right) through the casuarina forest[277] for just shy of 200m. Here, the track starts edging away from the river and enters more dense vegetation[278] for just over 200m, before the track opens up and comes to a ‘Lane Cove National Park – Sugarloaf Point’ sign[279]. From the sign, the walk leads up along the grass[280], keeping the playing fields[281] to your right and coming to a GNW arrow post[282] in front of the toilet block[283] beside Magdala Park car park[284].
Magdala Park
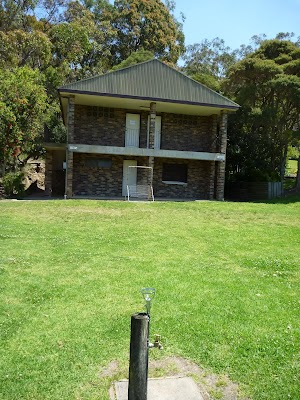
Magdala Park, found at the end of Magdala Rd, North Ryde, is home to a large playing field with a baseball diamond in the corner and a smaller playing field to the north. There is a car park [285], public toilets[286], sheltered picnic tables [287], childrens playground[288], garbage bins[289], and town water on tap[290]. There are a few Great North Walk signs highlighting the direction of the walk as it winds across the open grassy area.
(15.8km) Magdala Park carpark → Int on NW side of Epping Rd bridge
740 m
14 mins
16m
-20m
Easy track
Turn right: From the front of the toilet block[291], this walk follows the GNW arrow across the car park[292]. The walk then heads through the gap in the fence[293] and turns left, heading over the grass to the intersection with a concrete footpath at the base of the large transmissions tower[294], where a sign points back to ‘Sydney Cove’[295].
Turn right: From the transmissions tower[296], this walk follows the ‘Newcastle’ sign[297] downhill along the concrete footpath away from Magdala Park. The path soon turns right[298] and leads over the ‘Clifford Love’ footbridge[300]. The 150m-long bridge leads over Lane Cove River[301][302] and then over the ‘National Starch’ factory[303], to find a footpath on the other side. The footpath leads around the edge of the fenced car park[304] and comes to the footpath beside Epping Rd, just beside the traffic lights[305] at Mowbray Rd.
Continue straight: From the traffic lights, this walk heads downhill towards the bridge, crossing the factory driveway[306]. Just over 100m past the driveway, the shared footpath[307] leads to an intersection marked with a GNW arrow post, and a set of steps[308] (on the left).
Continue straight: From the intersection[309], this walk follows the GNW arrow post down across the main bridge span, keeping the traffic to your right. After almost 100m, this walk comes to the other side of the bridge, where there is an intersection with another set of stairs[310] (on your left) and another GNW arrow[311].
Turn left: From the intersection[312], this walk follows the GNW arrow post down the stairs[313][314] and towards the water. At the bottom of the stairs, the walk turns left and follows the footpath under the bridge[315][316] then up a few steps to a signposted intersection[317], just on the other side of the bridge.
(16.53km) Int on NW side of Epping Rd bridge → Fairyland
820 m
19 mins
41m
-42m
Moderate track
Veer right: From the intersection, this walk follows the ‘Lane Cove National Park – Fairyland Track’ sign[318] down along the dirt track, keeping the filtered view of Lane Cove River to your right[319]. The track soon leads down some timber steps[320], past a short rock wall[321] and across two short flat timber bridges[322][323]. The walk continues up some steps and across a timber bridge with a hand rail[324]. The rocky track then leads downhill[325] for about 100m before going gently uphill past the high tension transmission tower[326], to then come to a signposted intersection[327], just after passing under the power lines.
Continue straight: From the intersection, this walk heads away from the buildings and the high tension power line tower, following the GNW arrow post downhill[328] and almost immediately crosses a small flat timber bridge[329]. The rocky track leads up a short hill then the track starts to leads down for about 70m, where the track bends sharply right. Then the walk leads down a series of timber steps[330] into the lusher forest[331] and a ‘Site of Fairyland Pleasure Grounds’ information sign[332].
Here the walk heads along the timber boardwalk[333], then follows the track past the ‘Take Yourself Back to Fairyland’ photo sign[334], and then onto an intersection beside a large palm tree[335]. There is a ‘Fairyland Pleasure Grounds’ sign[336] and short track on the right that leads to a seat[337] beside Lane Cove River.
Fairyland
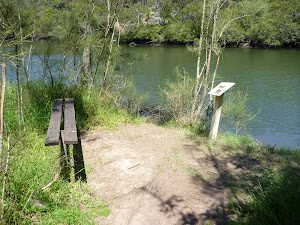
Once formally known as ‘Fairyland Pleasure Grounds’, and casually as ‘The Rest’, this site was similar to several others in Sydney. The land was purchased by Robert Swan in 1896 and encompassed about 17 acres in total[338]. Part of the land was cleared for a market garden, growing strawberries and melons. By the early 1900s, the market garden had closed and the area had become a popular picnic and play ground, for people arriving mostly by boat[339]. This was a very popular spot to visit for a special day out. Today, the buildings have (mostly) gone and the cleared area has grown back, but it still can offer a relaxing picnic and lunch spot by the river.
(17.35km) Fairyland → River view
360 m
7 mins
14m
-6m
Easy track
Continue straight: From the intersection at the centre of Fairylands, this walk follows the clear track whilst keeping the Lane Cove River through the trees to your right, past the ‘Fairyland Pleasure Grounds’ sign[340]. The mostly flat track winds gently through the ferns to pass the ‘Site of Fairyland Pleasure Grounds’ information sign[341], then continues along the short timber boardwalk[342] and up a series of timber steps[343]. The now mostly-flat track[344] leads along the side of the hill for about 150m, coming to a short track which takes this walk to an unfenced rock platform[345][346] with river views (on your right).
Lookout

This small, informal and unfenced viewpoint is atop a large natural rock platform, between Fairyland and River Ave. There are a few in the area, but this is the most distinct. From here, there are nice views down the Lane Cove River[347]. The area is unfenced and there is a significant drop off the side.
(17.71km) River view → Int of Quebec Rd and Fairyland Track
130 m
3 mins
5m
-6m
Easy track
Continue straight: From the view point, this walk heads along the flat track[348] whilst keeping the river below to your right. After about 100m, the track crosses a short section of timber boardwalk[349] then leads past a series of National Park signs[350][351][352] to come to a T-intersection with Quebec Rd (opposite number 101).
(17.84km) Int. of Quebec Rd and Fairyland Track → End of Quebec Ave
550 m
12 mins
38m
-1m
Easy track
Turn left: From the intersection, this walk heads uphill following the GNW arrow post along Quebec Rd[353]. At the top of the hill, the road bends right and comes to a signposted intersection[354], where this walk turn left to follow the GNW arrow post up what looks like a long sealed driveway[355]. The walk follows Quebec Ave for about 300m past a couple of driveways[356] (on your right) then below the fenced Northern Suburbs Memorial Gardens[357][358] (on your left), coming to a turning circle[359] and a locked gate[360] at the end of the road.
(18.39km) End of Quebec Ave → Corner of Delhi Rd and River Ave
330 m
7 mins
1m
-42m
Hard track
Continue straight: From the end of Quebec Ave, this walk follows the GNW arrow post around the locked gate and along the fairly flat, rocky track. After about 170m, this track leads to the edge of a large rock platform[361]. From here, the walk tends right, going down through a gap in the rock[362] then leading along the base of a short rock wall. The track then starts to lead more steeply downhill when, just after passing a small bench seat[363], the track leads down a steep stone staircase[364] and then comes to a signposted T-intersection with River Rd[365] (near Delhi Rd). Here, a ‘Sydney Cove’ sign[366] points back up the hill.
(18.71km) Corner of Delhi Rd and River Ave → Riverside Cafe
70 m
1 mins
0m
-4m
Easy track
Riverside Cafe Bar & Grill
The Riverside Cafe[371] is found at the end of service road on the south-west corner of Fullers Bridge. The nicely renovated building looks over the Lane Cove River and is open 7 days, serving breakfast, lunch and dinner. The food is cafe-style and meals are priced upwards from $13. Ph: (02) 9412 3773.
(18.78km) Riverside Cafe → Koonjeree Middle Trk
230 m
4 mins
6m
-7m
Easy track
Turn left: From in front of ‘Riverside Cafe Bar AND Grill’[374], this walk follows the GNW arrow post and footpath[375] under Fullers Bridge[376] to an intersection with a set of steps[377] just on the other side.
Turn left: From the intersection[378] (on the north-west corner of Fullers Bridge), this walk heads up the steps[379] to come to another footpath beside Dehli Rd[380].
Turn right: From the bus stop, this walk heads along the footpath, away from Fullers Bridge. The walk soon crosses the entrance road to Lane Cove National Park before winding right, through the low bushes, to come to the toilet block.
Turn right: From the toilet blocks, this walk heads across the road to follow the footpath through the middle of the Koonjeree picnic area, to the intersection near the water’s edge.
Koonjeree Picnic Area
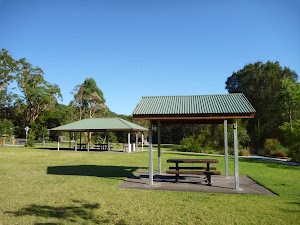
Koonjeree Picnic Area[381] is at the southern end of Lane Cove National Park, just near Fullers Bridge. The picnic area boasts free gas barbecues, flushing toilets[382][383][384], town tap water, picnic tables and shelters[385], a large open area[386] and car parking[387]. On the bank of the Lane Cove River[388], this is a pleasant spot to enjoy the park.
(19.01km) Koonjeree Middle Trk → Lane Cove Weir South
100 m
2 mins
1m
-1m
Very easy
(19.11km) Lane Cove Weir South → Lane Cove River Lookout
50 m
1 mins
0m
0m
Very easy
Turn left: From the southern side of the weir[393], this walk follows the sealed trail up (away from the weir) for about 10m to turn right and follow the ‘Riverside walking track’ sign[394] along the concrete footpath[395]. The path soon leads to and follows a timber boardwalk for 40m to come to a fenced lookout with a few seats

(and a stepped seating area[396]) and great views over the Lane Cove River[397].
(19.16km) Lane Cove River Lookout → Illoura Picnic Area
310 m
6 mins
7m
-7m
Easy track
Continue straight: From the lookout, this walk heads along the timber boardwalk for about 80m (enjoying more river views to the right) to then head down a timber ramp at the edge of a grassy clearing. The walk now follows the ‘Riverside walking track’ sign[398] along the wide dirt track between the river and ‘Spoonbill’[399] picnic area


for about about 80m. The walk then leads past a grove of trees to the far side of the next picnic area, ‘Illoura’[400] picnic area


, to find an intersection at the ‘Riverside Walking Track’ sign (pointing back to ‘Lane Cove River weir 0.35km’[401]).
(19.47km) Illoura Picnic Area → Boat Shed
160 m
3 mins
1m
-1m
Moderate track
Continue straight: From the picnic area, this walk follows the ‘Boatshed 0.15km’ arrow[402] on the ‘Riverside Walking Track’ sign along the track keeping the river to the right. After 50m this walk leads below a large brick picnic area[403] then about 15m later leads through an acacia grove with a short rough steep

section then a narrow

section of track. After another 60m the track leads to a grassy clearing with a large picnic table[404]

then continues to head along the concrete path[405] on the river side of the sandstone building[406] coming to the hire and kiosk area of the boatshed[407].
Lane Cove Boatshed
Lane Cove Boatshed, in Lane Cove National Park, is situated on the bank of the (you guessed it) Lane Cove River. You can hire rowboats, kayaks, pedal boats, bikes and canoes[408], for different ways to enjoy the river. The shop also sells ice-creams, chips and drinks. The shed is open on weekend from 10am – 5pm. During summer school holidays, the shop is also open from 12-5pm. For more info, call Greg on 0418600695.
(19.63km) Boat Shed → 8 Ironbarks
470 m
9 mins
12m
-8m
Moderate track
Continue straight: From the shop-front side of the boatshed, this walk follows the riverside track upstream, keeping the river just to your right. The track soon narrows and after about 80m, comes to a large clearing, the ‘7 Moola’ picnic area (with toilets[411] and water). The track leads over a small flat timber bridge[412] in the middle of the picnic area to then find a NPWS arrow post[413] on the far side. Here this walk follows the arrow along the track for about 70m to then climb up the metal staircase[414], where the track continues for another 180m, first up and over a rocky outcrop[415] then along a flat track to find another large clearing. On the far side of this picnic area, just past the ‘8 Ironbarks’ sign[416], this walk comes to a three-way intersection[417] (with a concrete path on your left).
(20.1km) 8 Ironbarks → 9 Carters Creek
220 m
4 mins
5m
-6m
Easy track
Continue straight: From the intersection, this walk follows the NPWS arrow post[418] along the narrow management trail, keeping the river to your right. After about 60m, this walk heads around a locked gate[419], then heads up over the grass to find a picnic area[420]. Here the walk heads over the timber bridge[421], past the ‘9 Carters Creek’ sign[422] and into the picnic area. The walk veers left across the picnic area[423] to come back to the car park, just below the toilet block[424] on the far side of the picnic area.
9 Carters Creek
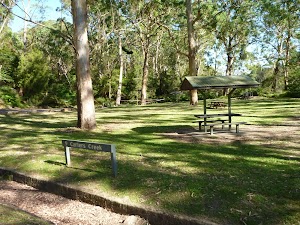
Carters Creek Picnic Area is the ninth formal picnic space along this stretch of the Lane Cove River. This picnic area is home to a couple of sheltered picnic tables[425], a gas BBQ[426] a large open grassy area[427], garbage bins, toilets[428] and a car park[429]. There is some limited access to the river view[430]. A pleasant spot among the tall gums.
(20.31km) 9 Carters Creek → 13 Cottonwood Glen
360 m
6 mins
2m
-5m
Moderate track
Continue straight: From the picnic area, this walk follows the NPWS arrow post[431] across a small creek and up the footpath, away from the picnic area. From the the top of the small hill, the track now leads (keeping the river on your right) for almost 300m, passing through a re-vegetating tall gum forest[432] then a pleasant she-oak stand[433], to come to a large gravel car park[434] just before Cottonwood Glen picnic area.
13 Cottonwood Glen
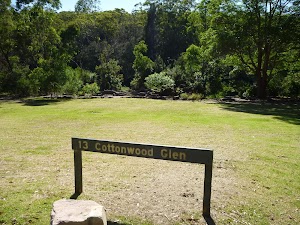
Cottonwood Glen picnic area is a large open grassy spot on the bank of the Lane Cove River. There is a grove of trees along the edge of the river, but you can still get clear views across the water from the car park area. There are several picnic tables[435] and a small toilet block[436][437] just up the hill.
(20.68km) 13 Cottonwood Glen → Riverside Dr
130 m
3 mins
11m
0m
Easy track
Turn left: From car park beside ’13 Cottonwood Glen’ picnic area[438], this walk follows the ‘Lane Cove Tourist Park’ arrow post[439] up the road. This walk soon veers left[440] to head up beside the ’12 Blackbutt’ picnic area[441], then up some steps[442] to come to a signposted intersection with Riverside Drive[443].
(20.81km) Riverside Dr → Lane Cove Tourist Park
540 m
11 mins
43m
-6m
Moderate track
Continue straight: From the intersection, this walk follows the ‘Tourist Park’ sign[444] gently up the track (away from the road) for about 30m to pass a ‘Native Fauna’ information sign[445] and cross a small metal bridge[446] beside the tall fern trees[447]. Here the walk continues gently up through the forest for another 30m to pass the ‘Bush Regeneration’ information sign[448], then the track continues to wind gently uphill for almost 180m, passing the ‘Native Flora’[449] information sign and coming to a three-way intersection beside a large gum, where a sign points back down to ‘Lane Cove River Weir’ sign[450].
Turn left: From the intersection, the walk heads uphill directly away from the face of the ‘Scribbly Gums picnic area’ sign[451] and past the large scribbly gum[452]. The track leads under a banksia tree[453] and after about 40m starts to climb a series of stone steps[454]. After climbing these steps for about 60m, this walk heads through a gap in a fence[455] to come to the edge of the Lane Cove Tourist Park[456].
From here, this walk head directly away from the face of the ‘Lane Cove National Park’ sign[457] and straight up the internal road[458]. This road soon bends left then leads though the campsite for about 100m before bending right just past the laundry[459]. Here the walk heads up this road for about 50m, past the boom gates[460], to come to the front of the the ‘Lane Cove Tourist Park’ office[461].
Lane Cove River tourist park
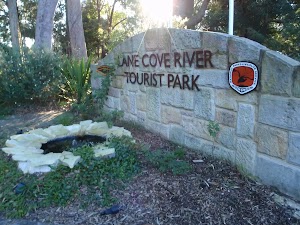
This is a well-established caravan park on the edge of Lane Cove National Park, offering a variety of camp sites from tent to powered sites for caravans and even en suite cabins. The campsite is a great point to access many wonderful walks in Lane Cove Valley. There are many facilities including a laundry, toilets, showers (including facilities for people with disabilities and with infants), recreation room, Internet kiosk (with free access to Wildwalks.com), wireless Internet, BBQ’s and a pool. There is bike hire available and the reception has basic supplies for sale (bread, milk, snacks, newspapers).
End of day 1
This is the planned overnight stay for the end of day 1, happy camping.
(21.35km) Lane Cove Tourist Park → Illoura Picnic Area
1.9 km
36 mins
26m
-74m
Moderate track
Turn around: From the office of the ‘Lane Cove Tourist Park’[462], this walk heads down the internal road, past the boom gates[463] for about 50m to turn left just past the laundry[464]. The walk then continues along this road as it bends right after about 100m, then leads down to a T-intersection[465]. Just on the other side (and to the left) of this intersection, there is a set of steps beside the large ‘Lane Cove National Park’ sign[466].
From this concreted section between sites 152 and 151, this walk follows the sign[467] down the stone steps[468] for about 60m, where the track then leads gently down to a T-intersection marked with a timber signpost[469] (beside a large scribbly gum).
Turn right: From the intersection, the walk follows ‘Lane Cove River Weir’ sign[470] south down the hill. The track leads gently down the side of the hill for about 80m to pass a ‘Native Flora’ information sign[471][472], then about 90m later passes a ‘Bush Regeneration’ information sign[473] among the ferns. Just 30m past this sign, the track leads over a small metal bridge[474] beside the tall fern trees[475] and ‘Native Fauna’ information sign[476]. Here the track continues for a short distance to come to an intersection with Riverside Drive, where a ‘Tourist Park’ sign[477] points back up the hill.
Continue straight: From the intersection, this walk follows the ‘Riverside walk’ arrow post down the steps[478] and then follows the road down past the ’12 Blackbutt’ picnic area[479]. Soon the road leads to a Y-intersection[480] and veers right down to the car park[481] beside ’13 Cottonwood Glen’ picnic area[482] and the Lane Cove River.
Turn right: From the car park on the south side of ‘Cottonwood Glen’, this walk follows the NPWS arrow post[483] along the track into the bush, keeping the river to your left. The track leads along side the river for about 300m, first through a lovely she-oak stand[484], then through a re-vegetating tall gum forest[485] before heading down a sealed footpath[486] to come to a car park (beside the toilet block[487]) at Carters Creek picnic area.
Continue straight: From in front of the toilets at Carters Creek picnic area, this walk heads across the grass clearing[488] and across the small timber bridge[489] to come to the car park[490]. After crossing the car park, this walk continues over the grass[491], beside the road, keeping the river to your left, and then veers left and follows the NPWS arrow post[492] down around the locked gate. Here the walk follows the narrow trail for about 60m to come to an intersection[493] with a footpath on your right, just before the ‘8 Ironbarks’ sign[494] and picnic area.
Continue straight: From the intersection[495] just west of ‘8 Ironbarks’[496], this walk follows the track through the picnic area, keeping the river on the left. On the far side of the picnic area, this walk follows the NPWS arrow post[497] for about 180m up over a rocky outcrop[498] to then head down a metal staircase[499]. The track winds down alongside the river for another 70m to come to the edge of another large grassy clearing. Here, this walk heads across ‘7 Moola’ picnic area (with toilets[500] and water), crossing a small flat timber bridge[501] in the middle. The track soon leaves this clearing and continues for another 80m to come to the shop-front side of the sandstone boatshed building[502].
Continue straight: From the shop front of the boatshed[503], this walk follows the concrete path keeping the river to the left to walk to the end of the building. Here, the walk follows the wide dirt track, past the large picnic table[504]
, keeping to the lower main (but narrowing) track for about 60m to pass through a notably narrow
then short rough steep
section of track in the acacia grove. About 15m later the walk leads below a large brick picnic shelter[505] and 50m later comes to a ‘Riverside Walking Track’ sign[506] at the edge of the ‘Illoura’[507] picnic area.
(23.23km) Illoura Picnic Area → Lane Cove River Lookout
310 m
6 mins
7m
-7m
Easy track
Continue straight: From the picnic area, this walk follows the ‘Lane Cove River weir 0.35km’ arrow[508] on the ‘Riverside Walking Track’ sign along the track keeping the river to the left to head alongside the ‘Illoura’[509] picnic area. The walk then leads past a grove of trees to then head to the far end of the next picnic area, the ‘Spoonbill’[510] picnic area
. Here the walk leads past the ‘Riverside walking track’ sign[511] up the concrete then timber ramp and along the boardwalk for about 80m (enjoying more river views) to come to a fenced lookout with a few seats
(and a stepped seating area[512]) and great views over the Lane Cove River[513].
(23.53km) Lane Cove River Lookout → Lane Cove Weir South
50 m
1 mins
0m
0m
Very easy
Continue straight: From the lookout, this walk follows the timber boardwalk, keeping the river to the left. After about 40m the boardwalk ends and the walk follows a concrete footpath[514] to come to a t-intersection with an asphalt trail marked with a large ‘Riverside walking track’ sign[515] just above the weir[516] (to the left).
(23.58km) Lane Cove Weir South → Lane Cove Weir North
50 m
1 mins
0m
0m
Moderate track
Continue straight: From the intersection, this walk follows the GNW arrow post[517] over the concrete ford

(top of the weir wall[518]) to the other side of the river (past a seat

on the left) to find an intersection marked with another GNW arrow post[519] (up the steps/ramp to the right). After heavy or prolonged rain, this crossing may be closed. It is unsafe to cross if water is flowing over the top.
Lane Cove Weir
The Lane Cove River Weir was built in 1938 during the depression. The motivation for building the lake was to make the area more appealing for visitors’ picnics. The weir created environmental issues such as silting and a decline in native fish populations. In more recent years, a ‘fish ladder’[521] has been constructed to allow fish to undertake their natural migration route for breeding. The weir proves an easy way for walkers to cross the Lane Cove River whilst enjoying the views up[523] and downstream[524].
(23.64km) Lane Cove Weir North → Int. National Parks Office Trk and Max Allen Dr
70 m
2 mins
3m
0m
Very easy
Continue straight: From the weir, this walk follows the footpath straight up the hill for approximately 20m to the large concrete area of the intersection.
Turn right: From the intersection, this walk heads along the footpath to the road.
Turn right: From the intersection, this walk heads along the footpath to the road.
(23.7km) Int. National Parks Office Trk and Max Allen Dr → Int. Great North Walk near Naamaroo
170 m
4 mins
12m
0m
Easy track
Veer left: From the intersection, this walk follows the road uphill, keeping the short sandstone wall and National Parks office on your left[525]. The road soon bends left and leads up past the staff parking[526], to an intersection (with a track on your right) marked with a large ‘Great North Walk’ sign[527].
(23.87km) Int. Great North Walk near Naamaroo → Int. Great North Walk and Naamaroo Service Trail
20 m
1m
0m
Moderate track
(23.89km) Int. Great North Walk and Naamaroo Service Trail → Int. Great North Walk and Bradfield Rd Access Trk
300 m
8 mins
31m
-1m
Moderate track
Veer left: From the intersection, this walk follows the wide trail uphill[531], initially keeping the cliff line to your right[532]. The trail bends right then leads uphill for about 130m, coming to an intersection (just below the power lines) where a ‘Park Visitors Centre’ sign[533] points back down the hill.
Turn left: From the intersection, this walk follow the ‘Blue Hole – Fiddens Wharf’ sign[534] and power line[535] up along the wide management trail. Just as the trail flattens out, this walk comes to an signposted intersection with a narrower track[536] (on your left).
Turn left: From the intersection, this walk follow the ‘Blue Hole – Fiddens Wharf’ sign[534] and power line[535] up along the wide management trail. Just as the trail flattens out, this walk comes to an signposted intersection with a narrower track[536] (on your left).
(24.19km) Int. Great North Walk and Bradfield Rd Access Trk → Northern Int. Bradfield Rd and Great North Walk
110 m
2 mins
4m
-1m
Moderate track
(24.3km) Northern Int. Bradfield Rd and Great North Walk → Southern Int. Bradfield Rd and Great North Walk
30 m
0m
-1m
Easy track
(24.33km) Southern Int. Bradfield Rd and Great North Walk → Int. Great North Walk and Thistlethwaytes Picnic Area Trk
430 m
9 mins
8m
-28m
Moderate track
Turn right: From the intersection, this walk follows the NPWS arrow[542] up the timber steps, away from the road. The track soon leads down[543] a longer set of timber steps where the track meanders[544] through the bush, passing a few rocky outcrops[545][546] before heading down the another series of timber stairs. Just beyond these steps, the track leads to a T-intersection[547] with a wide management trail, marked with a ‘Sandstone Hillslope Community’ information sign[548][549].
(24.75km) Int. Great North Walk and Thistlethwaytes Picnic Area Trk → Bottom of Fiddens Wharf Oval Trk
800 m
16 mins
23m
-44m
Moderate track
Turn right: From the intersection, this walk follows the upper arrow on the historic walk sign post[550], gently uphill along the wide trail. The trail leads through the casuarina forest[551] for about 30m then passes the ‘Scribbly Gum’ information sign[552]. The trail then bends left and leads downhill, narrowing significantly[553]. Here the track heads down a series of timber steps[554] to pass a ‘Sydney Red Gum’ information sign[555]. The track then crosses the ferny gully and passes the ‘Sandstone Gully Community’[556] and then the ‘Sydney Peppermint’[557] information signs. From here, the track leads across another gully[558] then up and along the side of a steep hill (with an unfenced cliff to your left[559]) for about 70m, coming to a rock platform with a ‘Blackbutts’ information sign[560]. Here the walk leads down the staircase[561] and stone path for a short time and crosses the ‘weedy’[562][563] creek on a short timber boardwalk[564]. The now flat track leads for another 50m to a signposted intersection (with some steps on your right), where a ‘Visitor Centre Loop’ sign[565] points back along the track.
(25.55km) Fiddens Wharf Oval Trk → Sandstone caves
1.6 km
32 mins
62m
-49m
Moderate track
Continue straight: From the intersection, this walk follows the ‘Blue Hole’ sign[566] across the flat timber boardwalk bridge[567], keeping the river to your left. After about 60m, the track passes a small sandstone overhang[568] then crosses a section of timber boardwalk[569], heading over the rock[570] to a small beach beside the Lane Cove River[571].
The track then continues along the river bank[572] for about 120m to then turn right up a side gully, crossing the creek on a timber footbridge[573]. The track then leads up a short but steep set of timber steps[574], where the track flattens out to come to a signposted intersection. Here the walk continues straight, following the ‘Blue Hole’ sign[575] over the small rise then back down to the bank of the river[576]. The rocky track follows the bank for about 250m, where the track climbs the hill[577] for a short time to follow the side of the hill around through the eucalypt and grass tree forest[578]. After about 230m, the track passes along the top of an unfenced cliff[579] (to your left). The track continues for just shy of 400m, passing a series of rock walls[580][581]. At the end of the clearest (and longest) rock wall[582], the track turns sharply right[583][584] and comes to the top of this rock wall.
From here, the walk turns left to lead over a rise, then crosses a small flat timber bridge[585]. The rocky track then continues to climb for 100m to come to an unfenced rock platform[586]. Turning right here, this walk climbs up[587] a little further to pass through a sandstone overhang[588], coming immediately to a second overhang which provides a bit more shelter[589].
Sandstone caves
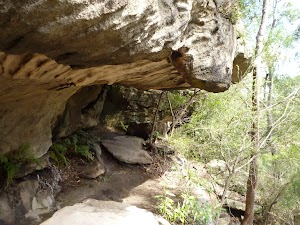
This fairly large sandstone overhang is found on the eastern side of the Lane Cove Valley. The walking track leads through the two caves that run in series, with the northern cave being larger. The lip of the overhang hangs down a bit, providing some extra protection from wind and rain. The cave also provide some shade and a cooler spot on hot days, and there are also a couple of well placed boulders forming nice seats[590].
(27.11km) Sandstone caves → Int. Great North Walk and Blaxland Rd Service Trail
340 m
10 mins
34m
-24m
Hard track
Continue straight: From the cave[591], this walk follows the track along the side of the hill, keeping the valley down to your left. The track soon follows along the base of long sandstone wall[592] (on your right) for about 130m and passes around the right-hand side of a large cube boulder[593] (know as ‘The Block’). The track leads across a mossy and rocky gully[595] then uphill to pass through a long tunnel-like sandstone overhang[596][597], and along the base of another long sandstone wall[598]. At the end of this wall, the track leads up some rocky steps[599] and then leads gently through the open forest[600] for about 50m before passing under some power lines[601]. The track soon leads up some steps[602], coming to a signposted T-intersection with a management trail[603], where a GNW arrow points back along the track[604].
(27.45km) Int. Great North Walk and Blaxland Rd Service Trail → Int. Great North Walk and Blue Hole Trk
320 m
6 mins
0m
-20m
Moderate track
Veer left: From the intersection, the walk follows the ‘Great North Walk – Deburghs Bridge’ sign[605] downhill along the wide management trail. The trail soon bends right and follows the power lines[606] down, stepping over a partially buried, green metal pipeline[607] (sometimes hissing[608]). After this, the trail follows a GNW arrow[609] left as the trail significantly narrows and leads down a series of timbers steps[610] then across the rocky Blackbutt Creek[611][612]. Here, the walk follows the GNW arrow up onto the rock platform[613], where the track turns left then leads along the flat to a T-intersection with a GNW arrow post[614], and a set of steps[615] (up to your right AND down to your left).
(27.77km) Int. Great North Walk and Blue Hole Trk → Blue Hole
30 m
0m
0m
Moderate track
Veer left: From the intersection, this walk heads straight down the timber steps[616]. Partway down the hill, metal steps[617] lead between a couple of rocks, where the track then comes to a sandy beach[618] and water hole, ‘Blue Hole’ on the Lane Cover River, in view of Deburghs Bridge[619]. At the end of this side trip, retrace your steps back to the main walk then Veer left.
Blue Hole
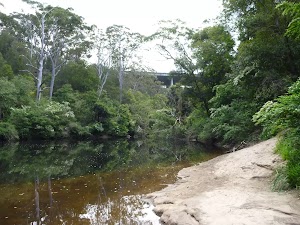
Blue Hole[620] is found in the Lane Cove River, downstream of De Burghs Bridge[621]. Within Lane Cove National Park this small pleasent waterhole has a flat rock and small sandy beach[622] on the north side of the river. The water is polluted by run-off and rubbish, especially after rain, so it is not suitable for swimming. It is still a pleasent place to relax and enjoy the valley.
(27.77km) Int. Great North Walk and Blue Hole Trk → Int of GNW and Gloucester Ave fire trail
1.5 km
31 mins
57m
-44m
Moderate track
Turn right: From the intersection, the walk follows the GNW arrow post up the timber steps[623]. The track then leads up some stone steps[624] and comes to a three-way intersection, where a sign points back to ‘Lane Cove River Weir via Great North Walk’[625].
Continue straight: From the intersection, this walk follows the ‘Thornleigh via Great North Walk’ sign[626] down a couple of steps[627] and along the track towards Deburghs Bridge, keeping the valley to your left. After about 50m, the track leads under the large concrete Deburghs Bridge[628], with some graffiti[629]. On the other side of the bridge, the track bends right to head up over some rocks, following two sections of hand railing[630][631]. From the end of these handrails, the track leads gently up among the grass trees[632] for about 400m (and a weedy section of track) to come to a clear T-intersection[633] with a management trail, where a ‘Great North Walk’ sign[634] points back down the track.
Continue straight: From the intersection, this walk follows the ‘The Great North Walk’ sign[635] north, gently downhill along the management trail. After about 80m, this trail crosses a concrete bridge[636] over Rudder Creek (beside a concrete sewerage pipe[637]). From here, the trail leads uphill for just shy of 200m to come to an intersection with the GNW track (on your left), where a ‘Lane Cove Weir’ sign[638] points back down along the trail.
Turn left: From the intersection, this walk follows the ‘Thornleigh Oval’ sign[639] west, gently down the track, away from the management trail. The track almost immediately passes the large metal pipe (crossing the Lane Cove River[640]) then winds down the rocky track[641] for about 200m, through open eucalypt forest[642] with some limited views left over the valley, to come to a weedy section of track marked with a concrete sewerage access point[643]. Here the track mostly flattens out and leads along the side of the hill for about 400m to head down a few steps and cross Quarry Creek[644]. The walk then heads up some steps and follows the track for another 30m to come to a T-intersection[645] with the Gloucester Ave fire trail, marked with a GNW and NPWS arrow post[646].
(29.3km) Int of GNW and Gloucester Ave fire trail (east) → Int of GNW and Gloucester Ave service trail (sth)
30 m
1 mins
0m
-1m
Moderate track
Turn left: From the intersection, the walk follows the GNW arrow post[647] gently uphill along the management trail, away from the gate whilst keeping the power line poles on your left. After about 30m (just past the second power pole), this trail leads to an intersection with a track (on the left), marked with another set of NPWS & GNW arrow posts[648] (just under the high tension power lines[649]).
(29.33km) Int of GNW and Gloucester Ave service trail (sth) → Int of GNW and Christie Park track
550 m
11 mins
9m
-11m
Moderate track
Turn left: From the intersection, this walk follows the GNW arrow post[650] south, downhill along the track and under the high tension power lines[651]. The track winds gently downhill for almost 150m until, just after passing close to the the high tension power line tower[652], this walk comes to a locked green shed[653] opposite a fenced-off pipe bridge[654] (down in the valley to your left).
Continue straight: From the green shed, this walk follows the track[655] along the side of the hill, keeping the valley to your left (running parallel with the high tension power lines, up to your right). After about 150m, this walk comes to an intersection with a faint track on your right (that leads a short distance to a management trail), marked with a GNW arrow post[656].
Continue straight: From the intersection, this walk follows the GNW arrow post along the mostly flat track, through the dense forest, and almost immediately passes a concrete sewerage access point[657]. After about 70m, this walk heads down a few timbers steps to cross a small gully[658], where the track continues for another 100m (passing close to a few houses[659]), then crosses two flat timber bridges[660] over Congham Creek. Here the walk veers left up onto the rock platform[661] and follows the track gently uphill for another 80m to come to a three-way intersection, marked with a GNW arrow post[662] (and a sign pointing left to ‘Marsfield’[663]).
(29.88km) Int of GNW and Christie Park track → Int of the Great North Walk and the West Pymble service trail link track
760 m
18 mins
42m
-36m
Hard track
Veer right: From the intersection, the walk follows the GNW arrow post[664] north, uphill for about 30m to come to a faint intersection with a track (on your right) marked with a GNW arrow post[665].
Veer left: From the intersection, this walk follows the GNW arrow post[666] gently uphill along the side of the hill (keeping the valley to your left) for about 100m to come to a small clearing and three way intersection, marked with yet another GNW arrow post[667] and a pile of rocks[668] (on your left).
Turn left : From the intersection, this walk follows the GNW arrow post[669] up the short rocky hill[670] and away from the high tension power lines[671]. The track (rocky early on[672]) leads along the side of the hill among some grass trees[673] for about 300m before passing under the power lines again. Here the track continues for another 300m along the side of the valley to come to a clear intersection with intersection with a wide management trail[674].
(30.64km) Int of the GNW and the West Pymble service trail link track → Int of the GNW and the Avondale creek service trail
210 m
4 mins
5m
-7m
Moderate track
Continue straight: From the intersection, this walk follows the GNW arrow post[675] downhill along the management trail. The trail leads down for about 70m to cross a small gully[676] then runs closely beside the Lane Cove River[677] (on your left) for another 120m to come to an intersection marked with a GNW arrow post and a ‘Lane Cove Valley’ aluminum sign and map[678].
(30.85km) Int of the GNW and the Avondale creek service trail → Int of the GNW and the South Turramurra High School trail
490 m
13 mins
46m
-12m
Moderate track
Turn left : From the intersection, this walk follows the GNW arrow post, directly away from the face of the ‘Lane Cove Valley’ aluminum sign and map[679], down the track and timber steps[680] to a sandy beach on the Lane Cove River[681]. Here the walk turns right to cross the weir and bridge[682] over Avondale Creek, (this may become impassable after heavy or prolonged rain) then climb gently uphill for about 120m to come to a faint intersection with a faint track (on your left – this faint track leads down to another old weir).
Continue straight: From the intersection, this walk heads gently uphill following the main track, whilst keeping the valley to your left for about 30m to come to a clear Y-intersection marked with a GNW arrow post[683].
Veer left: From the intersection, this walk follows the GNW arrow post[684] along the track, keeping the Lane Cove River a short distance to your left[685]. After about 80m, the track steps up to and crosses a short section to timber boardwalk/bridge[686]. Here the walk climbs up the rocky hill following a series of concrete access points[687] and timber steps[688] for about 230m to come to a T-intersection with a management trail, marked with a GNW arrow post[689].
(31.34km) Int of the GNW and the Turramurra High School service trail → Int of GNW and Kissing Point Road path
870 m
18 mins
24m
-35m
Moderate track
Veer left: From the intersection, this walk follows the GNW arrow post[690] gently downhill along the management trail for about 40m to come to an intersection with a short trail (on the right, which leads to the gate[691] at the end of Koombalah Ave).
Continue straight: From the intersection just below the Koombalah Ave gate, this walk follows the management trail gently downhill, whilst keeping the valley to your left. The trail initially leads over a rock platform, then about 50m later, leads down a steep hill[692]. The trail then heads gently down for about 400m before a short steep hill[693] leads down to a metal high tension power line tower[694]. Here the trail bends right and leads down and along the side of the hill for another 200m to pass another high tension power line tower[695] and head behind a few houses. Just behind the second house, this walk comes to ephemeral creek on a rock platform[696].
Continue straight: From here, this walk crosses the ephemeral creek[697] (keeping the houses up to your right) and continues along the trail for about 30m to come to a T-intersection with a wide, shared, concrete path, marked with several signposts[698].
(32.21km) Int of GNW and Kissing Point Road trail → Browns Waterhole int
260 m
5 mins
1m
-17m
Easy track
Turn left: From the intersection, this walk follows the GNW arrow post downhill[699] along the wide, shared, concrete path. After about 50m, this path leads under some high tension power lines[700] then bends right[701]. About 50m after passing under the power lines, this path leads to an intersection with a track[702] (on your left, that leads to an informal unfenced lookout), just before a GNW arrow post[703].
Continue straight: From the intersection, the walk heads fairly steeply downhill along the concrete path. The path passes a few signs[704] over about 100m, then comes to an intersection with a track (on your left), marked with a timber barricade and a GNW arrow post[705].
Veer right: From the intersection, this follows the concrete path downhill for just shy of 50m to come to a intersection with a dirt management trail[706]. This intersection is beside the Lane Cove River crossing[707] (on your left) and is marked with a ‘The Great North Walk’ sign here[708].
Browns Waterhole
Browns Waterhole is a wide, shallow section of the Lane Cove River, downstream of a concrete weir[709]. There is a concrete shared cycle/footpath crossing over the top of the weir, linking Kissing Point Road, South Turramurra to Vimiera Rd, Macquarie Park. On the western side of the waterhole, there is a picnic table[710] and small clearing with a view over this section of the river.
(32.47km) Browns Waterhole int → Int of GNW and the STEP track (west)
1.2 km
22 mins
32m
-23m
Easy track
Veer right: From the intersection, this walk follows the ‘The Great North Walk’ sign[711] along the dirt management trail, keeping the Lane Cove River to your left. After about 80m, the trail leads under some high tension power lines[712], where there is a mostly clear view over the river[713] (to your left). The trail then gently leads down through the valley[714] for about 400m to come to an intersection with Cove St trail, marked with a GNW arrow post[715].
Veer left: From the intersection, this walk follows the GNW arrow post[716] downhill along the management trail for about 30m to cross a small culverted creek[717]. The walk then follows the trail up the short hill to come to an intersection with the signposted ‘STEP track’[718][719] (on your right).
Continue straight: From the intersection, this walk follows the GNW arrow post[720] and STEP Track markers[721] along the management trail, whilst keeping the river to your left. The trail undulates through the valley (weedy in places[722]) and tall forest[723] for just shy of 600m, to come to a clear intersection at the bottom of a sealed management trail[724] (on your right). This intersection is marked with another ‘STEP Track’ map/sign[725] and a ‘The Great North Walk’ sign[726].
(33.63km) Int of GNW and the STEP track (west) → Int of GNW and the Pennant Hills Park track
1 km
18 mins
25m
-8m
Moderate track
Veer left: From the intersection, the walk follows the ‘The Great North Walk’ sign gently downhill along the management trail, directly away from the face of the ‘STEP Track’ map/sign[727]. Keeping the river to your left, the trail leads downhill for about 80m to come to a Y-intersection[728], where there is a ‘Lane Cove Valley’ map/sign[729] and a ‘Lane Cove River Park’ sign[730] pointing back along the trail.
Veer right: From the intersection, this walk follows the ‘Thornleigh Station’ sign[731] past the ‘Lane Cove Valley’ map, initially keeping the other trail and river to your left. The trail follows the valley floor, keeping the river just to your left, for a bit over 500m, to then cross the Lane Cove River at a rocky ford[732]. This crossing may become impassable after heavy or prolonged rain. On the other side of the river, this walk continues along the trail[733] for about 400m (with the river now close by on your right) to come to an intersection with a faint track[734] (on your left, that leads up towards Pennant Hills Park).
Veer right: From the intersection, this walk follows the ‘Thornleigh Station’ sign[731] past the ‘Lane Cove Valley’ map, initially keeping the other trail and river to your left. The trail follows the valley floor, keeping the river just to your left, for a bit over 500m, to then cross the Lane Cove River at a rocky ford[732]. This crossing may become impassable after heavy or prolonged rain. On the other side of the river, this walk continues along the trail[733] for about 400m (with the river now close by on your right) to come to an intersection with a faint track[734] (on your left, that leads up towards Pennant Hills Park).
(34.66km) Int of GNW and the Pennant Hills Park track → Conscript Pass
1.5 km
29 mins
53m
-23m
Moderate track
Continue straight: From the intersection, the walk follows the management trail, keeping the river just to your right. After about 60m, the trail bends right and crosses the Lane Cove River at a rocky ford[735], then continues along the valley floor among the fern trees (and concrete pipe access points[736]) for about 900m to cross the Lane Cove River again at another rocky ford[737]. (These crossings may become impassable after heavy or prolonged rain). The trail then continues along the valley floor[738] (with the river now on your left) for just over 150m to come to an intersection at the bottom of the sealed Morona Ave trail[739] (on your right), marked with a ‘Lane Cove Valley’ map/sign[740] and a GNW arrow post[741].
Veer left: From the intersection, this walk follows the GNW arrow post along the valley floor, away from the two trails, keeping the river just to your left. The track soon narrows, leading past a water depth indicator[742], and becomes rocky for about 150m before coming to a faint intersection, where GNW arrow post points left[743]. Here, the walk turns left and crosses the Lane Cove River using the concrete stepping stones[744] (this crossing may become impassable after heavy or prolonged rain) to follow the ‘Thornleigh Station’ sign[745] up the timber steps for about 40m and find a GNW registration box[746] (damaged at time of writing). The track bends sharply right[747] and zigzags up the rocky hill for another 30m, before bending sharply left to find the ‘Conscript Pass’ and ‘B Stevens’[748][749] engravings (at the third metal hand rail).
Veer left: From the intersection, this walk follows the GNW arrow post along the valley floor, away from the two trails, keeping the river just to your left. The track soon narrows, leading past a water depth indicator[742], and becomes rocky for about 150m before coming to a faint intersection, where GNW arrow post points left[743]. Here, the walk turns left and crosses the Lane Cove River using the concrete stepping stones[744] (this crossing may become impassable after heavy or prolonged rain) to follow the ‘Thornleigh Station’ sign[745] up the timber steps for about 40m and find a GNW registration box[746] (damaged at time of writing). The track bends sharply right[747] and zigzags up the rocky hill for another 30m, before bending sharply left to find the ‘Conscript Pass’ and ‘B Stevens’[748][749] engravings (at the third metal hand rail).
Conscript Pass
Conscript Pass is a small sandstone pass between the Lane Cove River and Thornleigh, on the Great North Walk. During the 1930s, some stone steps were built through a cleft in the rock[750] as part of a public works program, in response to the depression. The pass has two main engravings. Firstly ‘Conscript Pass’ is followed with a downwards pointing arrow[751] and a series of initials and numbers. On another wall (that you face when walking up) is engraved ‘B Stevens’ followed a surprisingly good caricature[752][753] of the then Premier of NSW, Bertram Stevens. Stevens (later knighted) replaced Jack Lang in 1932 as Premier of NSW, when Lang was dismissed by the Governor (just two months Lang after opening the Sydney Harbour Bridge).
(36.16km) Conscript Pass → Int of the GNW and Lorna Pass tracks
100 m
3 mins
19m
0m
Moderate track
(36.26km) Int of the GNW and Lorna Pass tracks → Int of GNW and BP scout camp tracks
230 m
7 mins
34m
0m
Hard track
Veer left: From the intersection, the walk follows the ‘Thornleigh’ sign[758] uphill along the rocky track, keeping the valley to your left. The track leads up a series of timber steps[759] for about 230m, becoming steeper as they go[760], to come to a clear T-intersection signposted with a large ‘The Great North Walk’ sign[761], and a stone ‘Lorna Pass’ arrow[762] pointing back down the track.
(36.49km) Int of GNW and BP camp track → BP camping area
620 m
13 mins
21m
-34m
Hard track
Turn left : From the intersection, this walk follows the ‘Baden Powell Scout Centre’ sign[763] gently down along the side of the hill for just shy of 40m to come to a four-way intersection, where a ‘Thornleigh Oval’ sign[764] points back along the track.
Continue straight: From the intersection, this walk follows the ‘Baden-Powell Scout Centre’ sign[765] and the GNW arrow post[766] west along the narrow track. The track leads through the dense heath[767] for about 120m to come to an intersection and clearing at a rocky outcrop[768], marked with a GNW arrow post[769].
Turn right: From the clearing, this walk follows the GNW arrow post north, downhill along the narrow track. After about 120m the rocky track leads to a small flat clearing[770] where this walk turn left (following the GNW arrow post) passing through about 20m of heath to come to another clearing (with a campfire scar[771]). Following the GNW arrow post, this walk soon bends right to step down to the edge of a creek[772]. Here the walk turns left and follows the creek downstream for about 20m to then bend right and cross Scout Creek[773]. The walk then heads uphill along the widening track for about 130m (passing a few scout constructions[774], and a track on the left[775]) then walks up under the high ropes course[776]. About 20m after the ropes course, this walk comes to an intersection with a dirt driveway[777], beside the green Pioneer Hut[778] (shed on the left). There is also a tap and drinking fountain here[779].
Turn right: From the intersection, this walk follows the gravel driveway[780] east, away from the Pioneer Hut[781] and towards the picnic shelters. After about 30m (just after the left bend), this walk comes to some of these picnic shelters[782] and several tiered platforms (on your right) – this is the camping area (there is a stone building up to your right).
Baden Powell Scout Centre
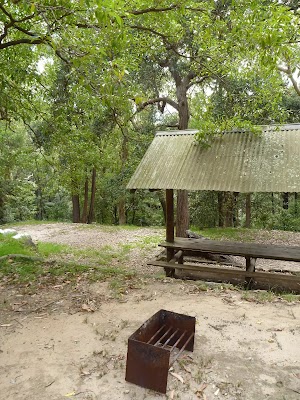
The Baden Powell Scout Centre is a large camping and training area on the edge of Pennant Hills and Thornleigh[783] (at the end of Pomona St). There are several large buildings including dining and training halls[784].
For walkers, there is dorm/hostel style accommodation and several bush camping areas[785].
Bush camping – is found near the lower (south-eastern) end of the grounds for $9 per person per night. Facilities include tap water[786], picnic shelters[787], toilets[788] and even a shower block[789]. They also provide an indoor area in case the weather turns during the night and you need to retreat.
There are kitchen facilities available for an extra $5.
Dorm-style accommodation – at $29 per person per night, you can share a room with other campers in a bunk room, you will need to bring a sleeping bag and towel.
Hostel-style accommodation – at $35 per person per night, you will be provided a smaller room (still shared) with bedding (sheets and blankets) as well as access to a kitchen.
The friendly staff here are also happy to put together a food hamper for your meals, or organise a delivery meal, just chat with them when booking.
Pre-booking is essential, phone Michael New (02) 9484 2278 (weekdays).
End of day 2
This is the planned overnight stay for the end of day 2, happy camping.
(37.1km) BP camping area → Int of BP camp and unnamed track
450 m
10 mins
20m
-21m
Hard track
Turn around: From the camping area, this walk follows the gravel driveway south, whilst keeping the valley to your left. The driveway bends right and, after about 30m, comes to an intersection with a wide track (on your left) just before a green shed – the ‘Pioneer Hut’[790].
Turn left: From the intersection, this walk follows the track downhill, initially keeping the green Pioneer Hut[791] (shed) on your right. After about 20m, the track begins to narrow and heads under the high ropes course[792]. The walk continues downhill for about 130m (passing a track on the right[793] and a few scout constructions[794]) to cross Scout Creek[795]. Here the walk bends left and follows the creek for about 20m before turning right, and stepping up, at a faint intersection. The track then veers left to find a clearing (with a campfire scar[796]) then about 20m through the heath on the other side, this walk finds another flat clearing[797]. Here the walk turns right and follows the GNW arrow post up along the rocky track for about 120m to come to a rocky outcrop and clearing marked with another GNW arrow post[798].
Turn left: From the intersection, this walk follows the track downhill, initially keeping the green Pioneer Hut[791] (shed) on your right. After about 20m, the track begins to narrow and heads under the high ropes course[792]. The walk continues downhill for about 130m (passing a track on the right[793] and a few scout constructions[794]) to cross Scout Creek[795]. Here the walk bends left and follows the creek for about 20m before turning right, and stepping up, at a faint intersection. The track then veers left to find a clearing (with a campfire scar[796]) then about 20m through the heath on the other side, this walk finds another flat clearing[797]. Here the walk turns right and follows the GNW arrow post up along the rocky track for about 120m to come to a rocky outcrop and clearing marked with another GNW arrow post[798].
(37.55km) Int of BP camp and unnamed track → Int of GNW and BP camp track
170 m
3 mins
14m
0m
Moderate track
Turn left: From the intersection, this walk follows the GNW arrow post[799] up over the rocky outcrop to head east (ignoring the faint track on your right). This narrow track leads through the dense heath[800] for about 120m to come to a four-way intersection, where a ‘Baden-Powell Scout Centre’ sign[801] points back along the track.
Continue straight: From the intersection, this walk follows the ‘Thornleigh Oval’ sign[802] gently up along the side for the hill for about 40m to come to an intersection with ‘Lorna Pass’ (on your right), and a large Great North Walk sign pointing back to the ‘Baden Powell Scout Centre’[803].
Continue straight: From the intersection, this walk follows the ‘Thornleigh Oval’ sign[802] gently up along the side for the hill for about 40m to come to an intersection with ‘Lorna Pass’ (on your right), and a large Great North Walk sign pointing back to the ‘Baden Powell Scout Centre’[803].
(37.72km) Int of GNW and BP scout camp tracks → Back of Thornleigh Oval
200 m
4 mins
13m
0m
Moderate track
Continue straight: From the intersection, this walk follows the GNW arrow post and ‘Thornleigh Station’ sign[804] uphill along the wide rocky track[805]. After just over 150m, the track bends left (ignoring a faint track on your right[806]) and heads uphill for another 40m to come to the back (south-east corner) of Thornleigh Oval[807], marked with a ‘Lane Cove National Park’ signpost[808].
(37.92km) Back of Thornleigh Oval → Int of Handley and Ferguson Avenues
160 m
3 mins
3m
0m
Easy track
Turn right: From the intersection, this walk follows the GNW arrow post along the fence line around the oval, keeping the oval to your left. After about 100m, this walk passes in front of the clubhouse[809] (there are toilets[810] and a water tap[811] on your right) to pass a ‘Great North Walk’ sign[812] and come to the corner of ‘Handley’ and ‘Ferguson’ Avenues[813] in front of the ‘Thornleigh Oval’ sign[814].
Thornleigh Oval
Thornleigh Oval is found at the intersection of Handley and Ferguson Avenues, Thornleigh. There is a large playing field[815], tap water[816], public toilets[817][818] and some shelter in the awning of the club house[819]. The oval has a car park, and a number io signs for the Great North walk[820] and other local tracks[821].
(38.07km) Int of Handley and Ferguson Avenues → Morgan Rd
1.9 km
34 mins
26m
-52m
Easy track
Continue straight: From the intersection, this walk follows the ‘Thornleigh Station’ sign across the road to follow the footpath beside ‘Handley Ave’. After about 130m, the walk crosses Clifford Ave[822] then after about 250m, crosses ‘Orchard St’ to follow ‘Station St’ almost directly ahead[823]. About 190m along ‘Station St’, this walk continues straight across ‘Wood St’[824] (you can get to Parkway Plaza if you turn right here) and continues for just over 200m to find a footbridge[825] beside Pennant Hills Rd. Here the walk heads up the ramp and crosses over the busy road[826] then down the ramp (or steps) to find the intersection with Railway Parade[827].
Veer left: From the base of the steps, this walk follows the GNW arrow across ‘Railway Pde’[828], heading towards the train line. At the fence, this walk veers left and leads along the pedestrian alley[829] for about 60m before turning right and climbing up the railway bridge steps[830], coming to the ‘Thornleigh’ Train Station[831].
Continue straight: From the western (north bound) side of Thornleigh Station[832], this walk follows the ‘Jungo Rest Area’ sign[833] along the footpath towards the car park and The Esplanade[834]. The walk then heads down a short distance further to turn left and cross ‘The Esplanade’ at the traffic lights[835], then continue straight along the footpath down along Eddy Rd[836]. Following a couple of GNW arrows[837] down Eddy Rd as it then bends left[838], turning into Tilock St, and shortly later this walk then turns right into Morgan St[839]. Continuing down till just before the end of this street[840][841], this walk comes to an intersection marked with a GNW arrow[842] and the ‘Elouera Bushland Natural Park’ sign[843] (on the right).
(39.98km) Morgan Rd → Int of Bike Trail and Morgan Rd tracks
230 m
4 mins
3m
-7m
Moderate track
Turn right: From the end of Morgan Street, the walk follows the GNW arrow[844] and the ‘Elouera Bushland Natural Park’ sign[845] between houses[846] no. 28 and 26. Once behind the houses at a small clearing[847], the track turns left and follows down the rocky side of Zig Zag Creek[848]. Soon after passing behind the third house, the track comes to an intersection with a wide concrete trail[849], where a sign points back along the track to ‘Sydney Cove’[850].
(40.21km) Int of Bellamy trail and Morgan Rd tracks → Zig Zag Creek Bridge int.
130 m
2 mins
0m
-6m
Easy track
Turn right: From the intersection, this walk follows the ‘The Jungo’ arrow[851] downhill along the wide concrete trail for 25m to cross over the culverted creek[852] (with a green rail[853] on one side)

. The walk continues down into the valley[854] along the concrete trail for another 110m to come to a signposted intersection marked with a ‘Great North Walk’ sign[855][856] (on your left), just before ‘Zig Zag Creek’[857] and the long bridge[858].
Thornleigh zigzag railway
The Thornleigh zigzag railway originally ran from the main rail line near Thornleigh to a historic quarry, near present day De Saxe Cl, Thornleigh. There are only minor fragments still visible today. The ‘Heritage Trail’ in Thornleigh has interpretive signs for the railway and the old Thornleigh Quarry. A book is available with some detail on railway and associated quarry: ‘Sydney’s Forgotten Quarry Railways’ by John Oakes, ISBN 0 9757870 3 9
(40.34km) Zig Zag Creek Bridge intersection → The Jungo
1.4 km
25 mins
16m
-37m
Moderate track
Turn left: From the intersection, this walk follows the ‘Great North Walk’ sign[859] along the narrower track, keeping the gully to your right. The pleasant track leads into, then through, the ferny forest[860] with tall trees for about 700m, before crossing a side creek on a timber bridge[861]. The track then continues in a similar manner for another 700m, coming to a large clearing and campsite[862], The Jungo. On the far side of this clearing is a well-signposted intersection with a ‘Bellamy Street’ sign[863] pointing back through the campsite.
The Jungo
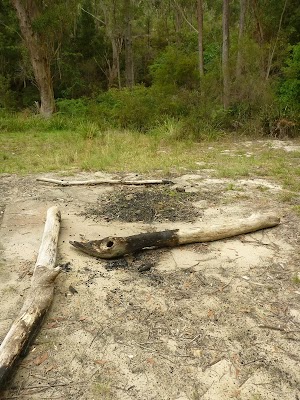
The Jungo is a relatively small clearing and campsite near the junction of Berowra and ZigZag Creeks at a well signposted intersection[864]. There is often water in the creeks (treat well before drinking) but there are no facilities[865]. Speculation on the source of the name ‘Jungo’ includes the Aussie tendency to abbreviate words (‘Junction’ gets corrupted to ‘jung-o’ etc) as well as a possible derivation from one of a few similar sounding aboriginal words.
(41.77km) Jungo campsite → Int of GNW and Stringybark Ridge trail
100 m
2 mins
1m
0m
Moderate track
Veer right: From the campsite, this walk follows the ‘Fishponds’ sign[866] down across the concrete ford, over the usually small creek[867]. Here, the concrete management trail[868] leads uphill, becoming dirt as it starts to flatten out[869]. This walk then comes to a signposted intersection[870] of the ‘Great North Walk’[871] and the Stringybark Ridge management trail (signposted ‘Cherrybrook Lakes’ trail[872]).
(41.87km) Int of GNW and Stringybark Ridge trail → Elouera Lookout
1 km
27 mins
81m
-58m
Moderate track
Turn right: From the intersection, this walk follows the ‘Great North Walk’ sign[873] down the narrower track. The track leads downhill for about 70m, getting steeper[874] as it goes, and then crosses Berowra Creek[875] – this creek may become impassable after rain. On the other side, the walk comes to an intersection on a small sandy beach. Here, the walk turns left, following the GNW arrows downstream for about 250m among the grass trees and crossing a flat timber bridge[876]. The rocky track then continues for just shy of 250m and crosses a mossy gully on a large flat rock[877]. The track then continues, staying fairly flat[878] for another 170m before bending right and heading steeply uphill[879]. At the top of this climb, the track soon leads to a section of fenced cliff[880]. At the end of the fence, the walk passes through casuarina forest[881] for a short distance before passing alongside another (longer) fenced cliff and coming to the Elouera Lookout[882], where there is an intersection with the ‘Westleigh’ track[883] (on your right).
Elouera Lookout
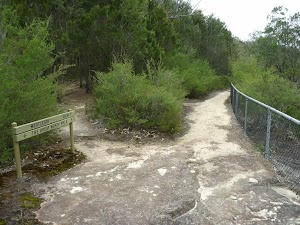
This fenced lookout is on the Benowie Track close to Westleigh. There are uninterrupted views from the clifftop across the Berowra Creek valley, which is rare for the area[884]. As well as being on the Great North Walk, this lookout can be accessed by a short walk from Elouera Rd, Westleigh. This section of fenced rock platform is about 100m long[885], and there is some limited shade[886] from the casuarina near the lookout if you want to take a rest.
(42.92km) Elouera Lookout → Int of the Great North Walk and the Quarter Sessions Road track
2.2 km
54 mins
152m
-130m
Moderate track
Continue straight: From Elouera Lookout[887], this walk follows the ‘Great North Walk’ sign[888] along the track, keeping the fence and valley to your left[889]. At the end of the fence, the walk bends left following the rocky flat track for about 200m, where the track then becomes progressively steeper for about 250m, winding steeply down then across a flat timber bridge[890]. From here, the track leads beside Berowra Creek[891] for a short time before crossing another flat timber bridge[892]. The track then passes among the pleasant grass trees for about 200m (crossing a couple of small creeks with timber plank spans[893]) to then climb a few sets of timber steps and cross a small (often dry) creek[894]. From here, the track gently winds up along the side of the hill for about 800m, passing through a pleasant casuarina forest[895] then heading across a rocky creek on another small, flat, timber bridge[896]. Just over 100m later, the track crosses a smaller (often dry) creek[897] to then wind uphill for about 100m to a three-way intersection with the signposted ‘Quarter Sessions Rd’ track[898] (on your right).
(45.07km) Int of the Great North Walk and the Quarter Sessions Road track → Int of the Great North Walk and the Blue Gum Walk (SW)
690 m
18 mins
43m
-73m
Moderate track
Veer left: From the intersection, this walk heads north along the main rocky track, keeping the valley down to your left. The track leads along beside a rock wall (which is on your right) and through a rock outcrop[899], where the track soon heads quite steeply uphill along the eroded track[900] for a short time. At the top of this steep section, the rocky track continues to meander much more gently up along the side of the hill[901] for about 300m, then crosses a small, rocky gully[902], just below some houses[903]. The track then continues gently uphill for about 100m to an intersection with the unsignposted Blackfellows Head track[904] (on your right).
Continue straight: From the intersection, this walk heads north along the clear track, keeping the valley down to your left for about 100m, where the walk comes to a three-way intersection and ‘The Jungo’ sign[905] points back along the track.
Continue straight: From the intersection, this walk heads north along the clear track, keeping the valley down to your left for about 100m, where the walk comes to a three-way intersection and ‘The Jungo’ sign[905] points back along the track.
(45.77km) Int of the Great North Walk and the Blue Gum Walk (SW) → Fishponds Lookout
990 m
21 mins
21m
-87m
Hard track
Veer left: From the intersection, this walk follows the ‘Fishponds’ sign[906] past the ‘Berowra Valley Regional Park’ sign[907], gently uphill along the narrow ridge[908]. The track is mostly flat for about 200m before it starts to head fairly steeply down over some rocks[909] and down a set of rock steps[910]. This area comes alive with Patersonia lilies and pink wax flowers in early spring. The track then continues fairly gently down along the narrow ridge[911] for another 200m before leading through a crack in a rock, then down a bit further to climb down through a particularly steep rocky section[912]. Near the bottom of this descent, this walk passes a couple of arrow posts[913], where the track bends right to pass below a large rock overhang[914]. Just beyond this overhang, the track bends left and leads across Waitara Creek at the interesting holes in the rock know as ‘the spa’[915]. This creek may become impassable after heavy rain, the rocks can also be slippery. Across the creek, the walk comes to a large rock platform and a Blue Gum Track post[916].
After stopping to enjoy cool spot, this walk continues left along the unfenced rock platform[917] (keeping the creek down to your left). The walk soon steps off this large rock (at the far right-hand corner, through the fork in a tree[918]). This walk heads over another rock platform[919], then along a notably flat section of track[920] (now with Berowra Creek on your left), passing beside some cascades[921] for about 100m before climbing up and over some rocks and under a sandstone overhang[922]. The track leads around the side of the hill for about 100m, then down to cross a small creek using the small flat timber bridge[923]. The walk then climbs up some timber steps[924] to a fenced lookout[925] over Fishponds, at a well-signposted intersection[926]. A sign points back along the track to ‘Thornleigh Station’[927].
After stopping to enjoy cool spot, this walk continues left along the unfenced rock platform[917] (keeping the creek down to your left). The walk soon steps off this large rock (at the far right-hand corner, through the fork in a tree[918]). This walk heads over another rock platform[919], then along a notably flat section of track[920] (now with Berowra Creek on your left), passing beside some cascades[921] for about 100m before climbing up and over some rocks and under a sandstone overhang[922]. The track leads around the side of the hill for about 100m, then down to cross a small creek using the small flat timber bridge[923]. The walk then climbs up some timber steps[924] to a fenced lookout[925] over Fishponds, at a well-signposted intersection[926]. A sign points back along the track to ‘Thornleigh Station’[927].
Fishponds Lookout
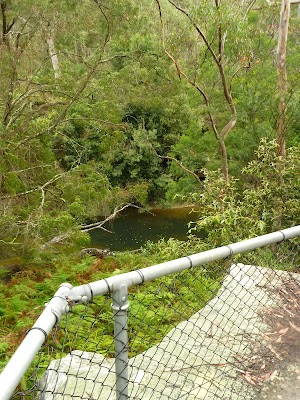
Fishponds Lookout is a fenced rock platform at the intersection of the Benowie walking track and the Rosemead trackhead. It is marked with a number of Great North Walk signs. This informally named lookout has good views down over Fishponds, a large waterhole on Berowra Creek. Looking north across the creek, there are views to the upper waterhole and the cliffs on the other side.
(46.75km) Fishponds Lookout → Int of Blue Gum Walk and Joes Mountain Service Trail
300 m
7 mins
39m
0m
Moderate track
Turn right: From the lookout, this walk follows the ‘Rosemead Rd Trackhead’ sign[928] directly away from the view over Berowra Creek. After about 70m, the track leads over a timber footbridge[929], then leads up the side of the valley for about 100m to climb up the steep carved rock steps (with a hand rail)[930]. Here the track leads along the top of this unfenced cliff and soon comes to a well signposted three-way intersection, where a ‘Fishponds’ sign[931] points back along the track.
Continue straight: From the intersection, the walk follows the ‘Hornsby Station’ sign up[932] along the track a short distance to come to an intersection with a wide management trail[933].
Continue straight: From the intersection, the walk follows the ‘Hornsby Station’ sign up[932] along the track a short distance to come to an intersection with a wide management trail[933].
(47.05km) Int of Blue Gum Walk and Joes Mountain Service Trail → Int of Great North Walk and Rosemead Rd service trail
850 m
19 mins
35m
-45m
Moderate track
Veer left: From the intersection, this walk follows the Great North Walk arrow south along the wide management trail, keeping the gully to your left[934]. The walk climbs up the gentle hill for just over 300m, passing through the turpentine forest[935] to a saddle and small clearing. Here the walk continues along the trail as it bends right[936] (ignoring the track to the left) to leads downhill through the blue gum and bracken fern forest[937]. The trail continues moderately steeply down until it bends left to cross Old Mans Creek at the concrete stepping stones[938]. The trail leads left and gently up the hill, passing some houses (on your right) and soon comes to an intersection with a narrower track (on your left) after about 150m.
(47.9km) Int of Great North Walk and Rosemead Rd service trail → Berowra Valley Bushland Park
30 m
1 mins
4m
0m
Easy track
Berowra Valley Bushland Park

‘Berowra Valley Bushland Park’[943] is also known as Rosemead Rd Park and is found at the bottom end of Rosemead Rd[944], Hornsby. This is an open area park surrounded by shady eucalyptus trees[945], making a pleasant spot to rest on a walk. It has a picnic table with bench seats[946], and a sheltered free electric BBQ[947]. There is a water tap[948] in the park, near the road. There is also a ‘Welcome to Old Mans Valley’ information sign with information about the traditional country of the Darug and Guringai peoples[949].
(47.94km) Berowra Valley Bushland Park → Int of Quarry Road and Great North Walk
540 m
14 mins
89m
-12m
Hard track
Veer left: From the lower side of ‘Berowra Valley Bushland Park’[950], this walk follows the ‘Hornsby Station’ sign[951] across the park, then follows the GNW arrow[952] up the stone steps, keeping the houses to your right. The walk winds steeply up the steps[953], leaving the view of the house and finding a welcome flat section of track[954] midway up. The steps then lead more steeply up[955] the side of the valley, along the sheer rock walls for about 100m, and come to an intersection with the Quarry Road management trail, where a ‘Great North Walk’ sign[956] points back down the the hill.
Continue straight: From the intersection, this walk follows the GNW arrow post up a couple of timber steps[957] and then follows the track as it winds up over the gentle rise. Once over the rise, the track then leads down to the intersection with Quarry Rd, where a ‘Great North Walk’ sign[958] points back up the track.
Continue straight: From the intersection, this walk follows the GNW arrow post up a couple of timber steps[957] and then follows the track as it winds up over the gentle rise. Once over the rise, the track then leads down to the intersection with Quarry Rd, where a ‘Great North Walk’ sign[958] points back up the track.
(48.48km) Int of Quarry Road and Great North Walk → Hornsby Train Station
720 m
14 mins
34m
-8m
Easy track
Turn right: From the intersection, this walk follows Quarry Road gently uphill away from the face of the ‘Great North Walk’ sign[959] until just past a couple of house, this walk comes to an intersection with the gated ‘Old Mans Valley’ management trail[960] (on your left).
Continue straight: From the intersection, this walk follows Quarry Rd up the gentle hill[961] for about 180m, then follows the GNW arrow[962] left onto Dural St[963]. The footpath leads past the unit block, then past a few shops to come to an intersection with the Pacific Hwy. Following the GNW arrow, this walk turns right across ‘Dural St’[964], passes a few more shops, then crosses ‘Dural Lane’[965] before turning left across the Pacific Hwy at the traffic lights[966]. Here the walk continues straight across the ‘Station St’ pedestrian crossing[967], past the large ‘Great North Walk’ sign[968] and across the bus lane to the western entrance of Hornsby Station[969].
Continue straight: From the intersection, this walk follows Quarry Rd up the gentle hill[961] for about 180m, then follows the GNW arrow[962] left onto Dural St[963]. The footpath leads past the unit block, then past a few shops to come to an intersection with the Pacific Hwy. Following the GNW arrow, this walk turns right across ‘Dural St’[964], passes a few more shops, then crosses ‘Dural Lane’[965] before turning left across the Pacific Hwy at the traffic lights[966]. Here the walk continues straight across the ‘Station St’ pedestrian crossing[967], past the large ‘Great North Walk’ sign[968] and across the bus lane to the western entrance of Hornsby Station[969].
Maps for the Circular Quay to Hornsby walk
You can download the PDF for this walk to print a map.
These maps below cover the walk and the wider area around the walk, they are worth carrying for safety reasons.
| Hornsby | 1:25 000 Map Series | 91304S HORNSBY | NSW-91304S |
| Parramatta River | 1:25 000 Map Series | 91303N PARRAMATTA RIVER | NSW-91303N |
| Sydney | 1:100 000 Map Series | 9130 SYDNEY | 9130 |
Cross sectional view of the Circular Quay to Hornsby bushwalking track

Analysis and summary of the altitude variation on the Circular Quay to Hornsby
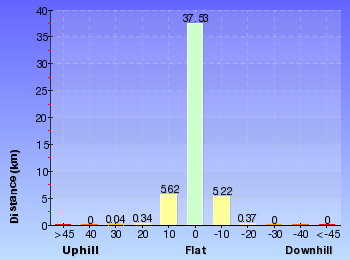
Daily actual walking time estimates
| Day | Walking Time | Length |
|---|---|---|
| 1 | 5 hrs 46 mins | 21.6 km |
| 2 | 5 hrs 26 mins | 15.8 km |
| 3 | 4 hrs 22 mins | 12.1 km |
Overview of this walks grade – based on the AS 2156.1 – 2001
Under this standard, a walk is graded based on the most difficult section of the walk.
| Length | 44.4 km | ||
| Time | 3 Days | ||
| . | |||
| Grade 4/6 Hard track |
AS 2156.1 | Gradient | Very steep (4/6) |
| Quality of track | Rough track, where fallen trees and other obstacles are likely (4/6) | ||
| Signs | Minimal directional signs (4/6) | ||
| Experience Required | Moderate level of bushwalking experience recommended (4/6) | ||
| Weather | Storms may impact on navigation and safety (3/6) | ||
| Infrastructure | Limited facilities, not all cliffs are fenced (3/6) |
Some more details of this walks Grading
Here is a bit more details explaining grading looking at sections of the walk
Gradient
17km of this walk has gentle hills with occasional steps and another 16km has short steep hills. Whilst another 14km is flat with no steps and the remaining 1.9km is very steep.
Quality of track
18km of this walk follows a formed track, with some branches and other obstacles and another 18km follows a clear and well formed track or trail. Whilst another 11km follows a smooth and hardened path and the remaining 2.1km follows a rough track, where fallen trees and other obstacles are likely.
Signs
30km of this walk is clearly signposted and another 19km has directional signs at most intersection. The remaining (800m) has minimal directional signs.
Experience Required
37km of this walk requires no previous bushwalking experience and another 12km requires some bushwalking experience. The remaining (990m) requires a leader a with moderate level of bushwalking experience.
weather
Around 45km of this walk is not usually affected by severe weather events (that would unexpectedly impact safety and navigation), whilst the remaining 4.1km is affected by storms that may impact your navigation and safety.
Infrastructure
Around 31km of this walk is close to useful facilities (such as fenced cliffs and seats), whilst the remaining 18km has limited facilities (such as not all cliffs fenced).
Similar walks
A list of walks that share part of the track with the Circular Quay to Hornsby walk.
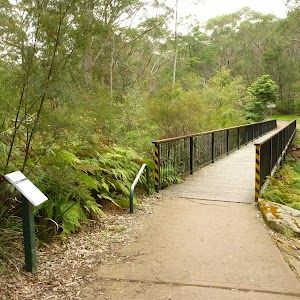
529 m One way
15 mins
Moderate track

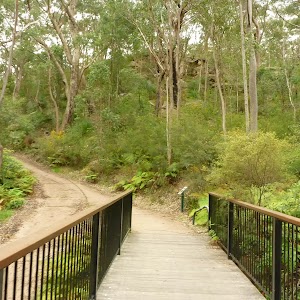
619 m One way
30 mins
Moderate track
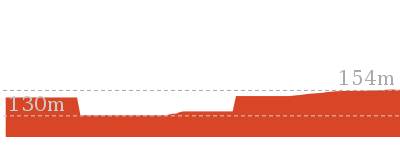
978 m Return
30 mins
Easy track
1.3 km Return
1 Hr
Moderate track
1.3 km One way
30 mins
Moderate track
1.5 km Return
45 mins
Moderate track
2.6 km One way
1 Hr
Moderate track
2.6 km One way
1 Hr
Hard track
2.7 km Circuit
1 Hr
Moderate track
3.2 km Return
1 hr 30 mins
Moderate track
3.4 km Return
1 hr 30 mins
Moderate track
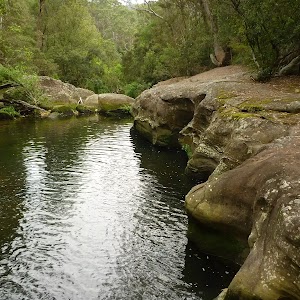
4.2 km Circuit
2 hrs
Hard track
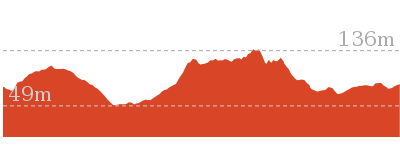
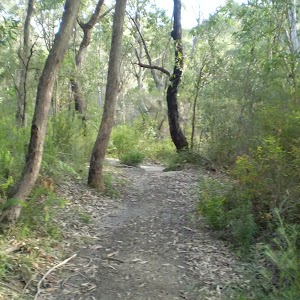
4.2 km Circuit
1 hr 45 mins
Hard track
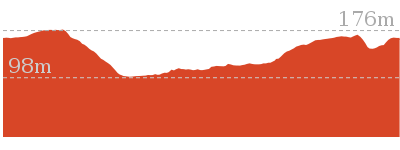
4.3 km Circuit
1 hr 27 mins
Moderate track
4.4 km One way
1 hr 45 mins
Hard track

4.4 km One way
1 hr 45 mins
Moderate track

5.1 km One way
2 hrs
Hard track
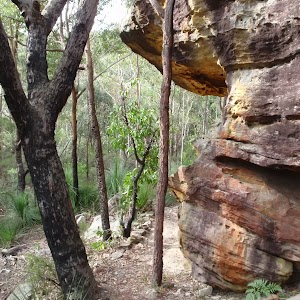
5.1 km Circuit
2 hrs
Hard track

5.3 km One way
2 hrs
Hard track
5.3 km Circuit
2 hrs 30 mins
Hard track
5.5 km One way
2 hrs
Hard track
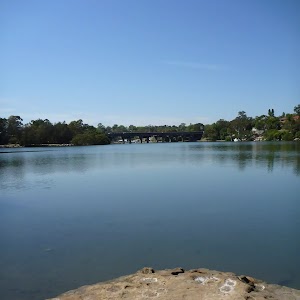
5.5 km One way
2 hrs 30 mins
Moderate track
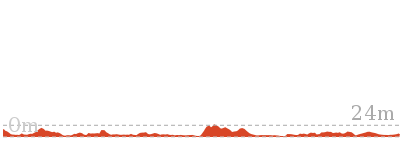
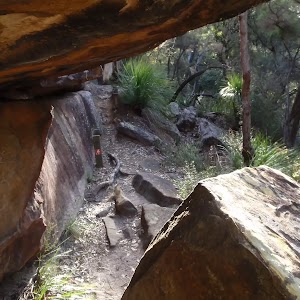
5.6 km Return
2 hrs 30 mins
Hard track
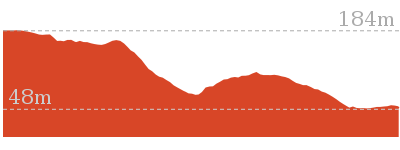
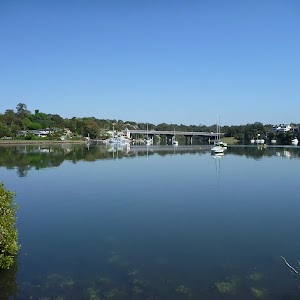
5.8 km One way
2 hrs
Moderate track
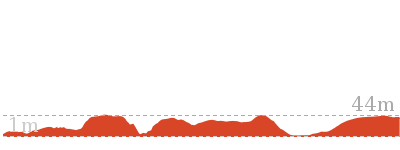
5.9 km Return
2 hrs 30 mins
Moderate track
6 km One way
2 hrs 30 mins
Hard track
6 km One way
2 hrs 30 mins
Hard track
6 km One way
2 hrs 30 mins
Moderate track

6.1 km One way
2 hrs 30 mins
Hard track
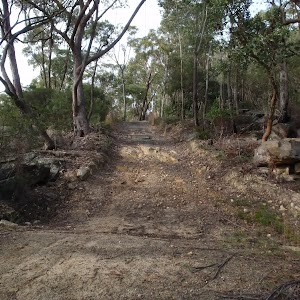
6.6 km Circuit
2 hrs 30 mins
Hard track


6.7 km Circuit
3 hrs
Hard track
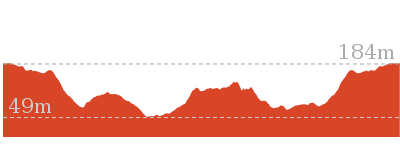
6.9 km Circuit
2 hrs 30 mins
Hard track

7.2 km One way
2 hrs 45 mins
Moderate track
8 km One way
3 hrs
Hard track
8.4 km One way
3 hrs 15 mins
Hard track
8.4 km Circuit
3 hrs
Moderate track
8.6 km One way
3 hrs 45 mins
Hard track

8.9 km One way
3 hrs 30 mins
Hard track
9 km One way
3 hrs 45 mins
Hard track
9.7 km One way
3 hrs 45 mins
Hard track
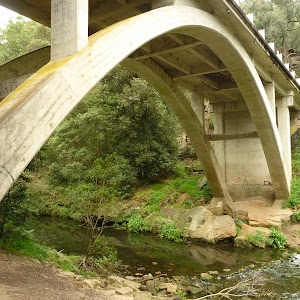
9.7 km One way
4 hrs
Hard track
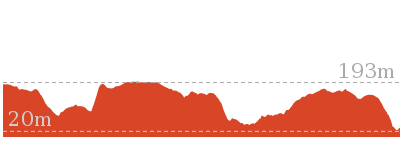
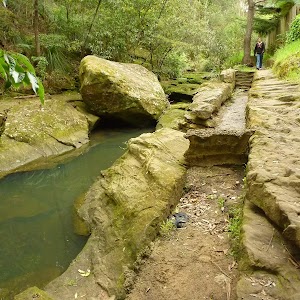
10.2 km One way
4 hrs
Hard track
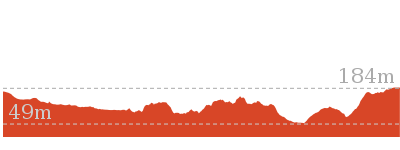
10.2 km One way
3 hrs 45 mins
Moderate track
10.3 km One way
3 hrs 45 mins
Hard track
10.7 km One way
4 hrs 30 mins
Hard track
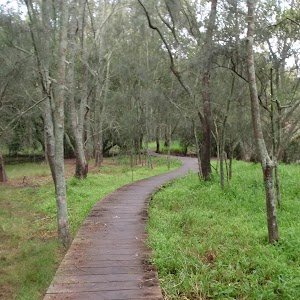
11.2 km Circuit
4 hrs
Hard track

11.6 km One way
4 hrs 30 mins
Hard track
11.7 km One way
4 hrs 15 mins
Hard track
11.9 km Circuit
5 hrs
Hard track
12.2 km One way
4 hrs 30 mins
Hard track
13.3 km One way
4 hrs 30 mins
Hard track

15.5 km One way
6 hrs
Hard track
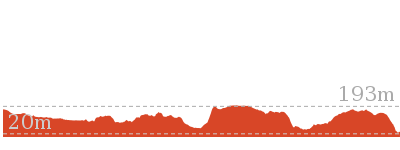
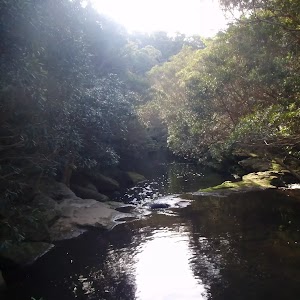
16.1 km One way
6 hrs 45 mins
Hard track
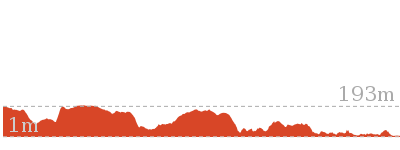
16.3 km One way
6 hrs
Hard track
17.5 km One way
6 hrs 45 mins
Hard track
18.1 km One way
6 hrs 45 mins
Hard track
20.6 km One way
8 hrs
Hard track
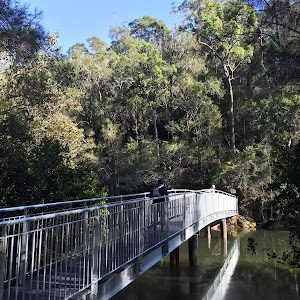
22.3 km One way
9 hrs
Hard track
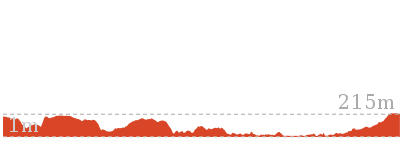
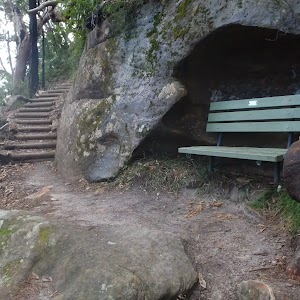
22.6 km One way
9 hrs 18 mins
Hard track
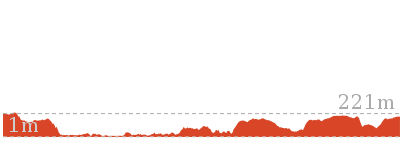
25.8 km One way
2 Days
Hard track
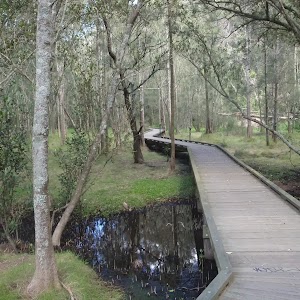
28.1 km One way
2 Days
Hard track

33 km One way
2 Days
Hard track
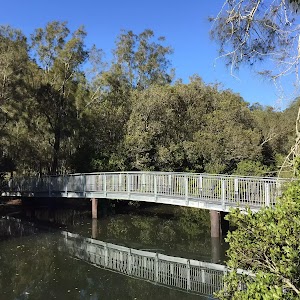
35.9 km One way
2 Days
Hard track
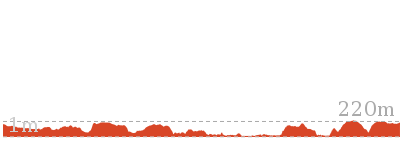
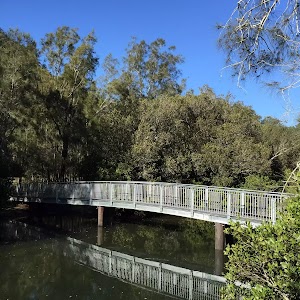
43.1 km One way
3 Days
Hard track
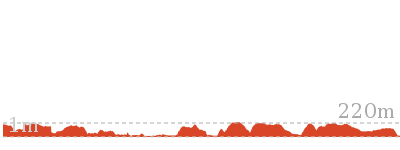
Other Nearby walks
A list of walks that start near the Circular Quay to Hornsby walk.
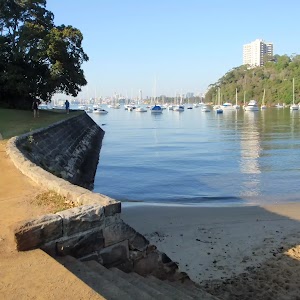
9.8 km One way
4 hrs
Moderate track
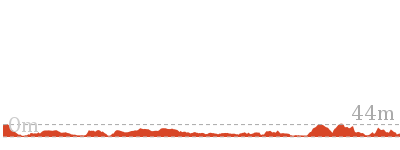
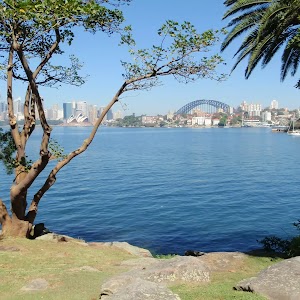
2.7 km Circuit
1 hr 15 mins
Easy track
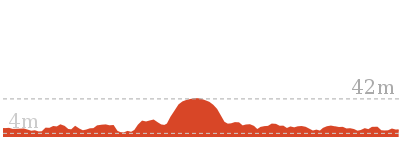
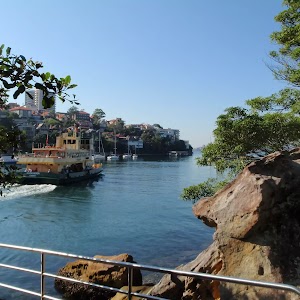
2 km One way
45 mins
Easy track

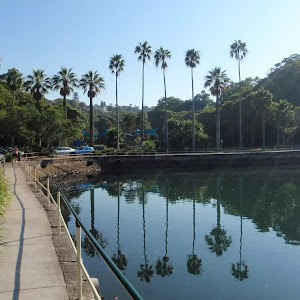
4.2 km One way
1 hr 45 mins
Moderate track
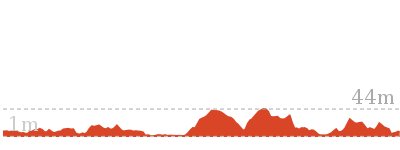
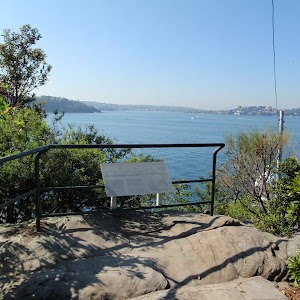
478 m Return
15 mins
Easy track
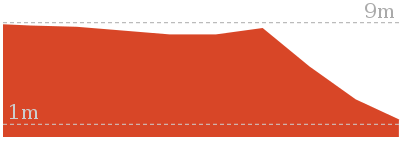
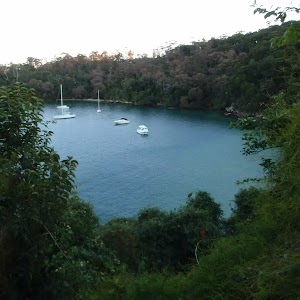
2.8 km One way
1 hr 30 mins
Moderate track
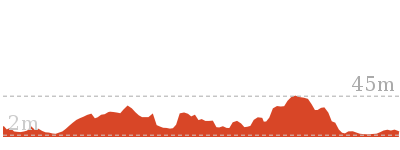

1.7 km Circuit
1 Hr
Moderate track
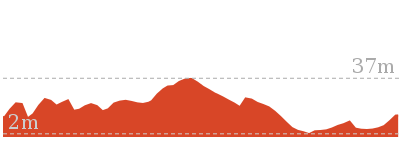
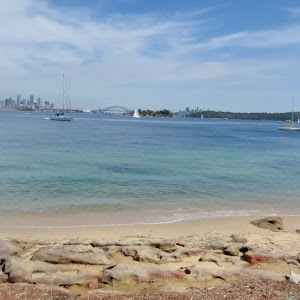
108 m Return
10 mins
Moderate track
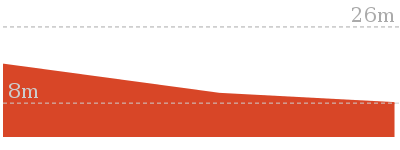
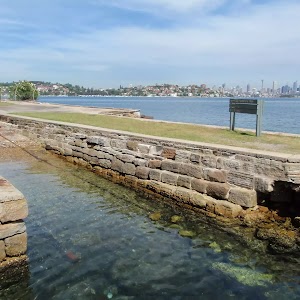
552 m Return
20 mins
Moderate track

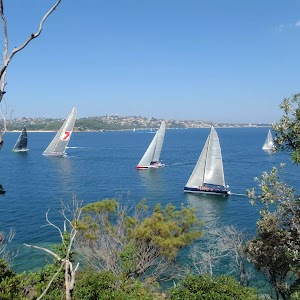
3.7 km One way
1 hr 45 mins
Moderate track
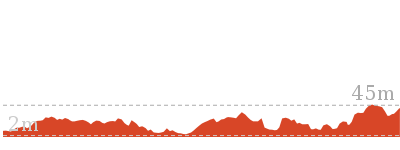
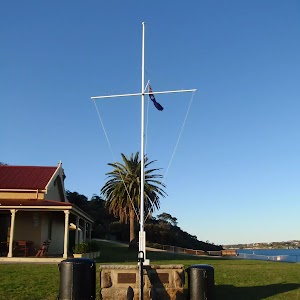
4.4 km One way
2 hrs
Moderate track
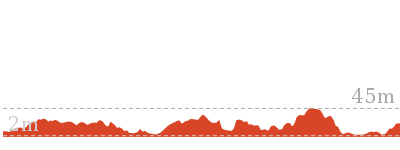
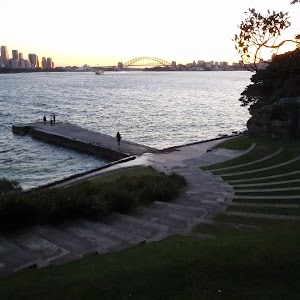
3 km Circuit
1 hr 30 mins
Moderate track
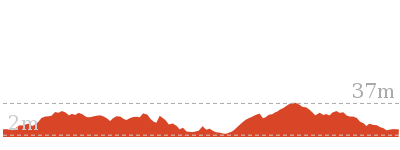
Plan your trip to and from the walk here
The Circular Quay to Hornsby walk starts at the The Obelisk (gps: -33.863268, 151.21023)
Your transport options to The Obelisk are by;
![]() Train. (get details)
Train. (get details)
![]() Ferry. (get details)
Ferry. (get details)
![]() Car. There is free parking available.
Car. There is free parking available.
(get details)
The Circular Quay to Hornsby ends at the Hornsby Train Station (gps: -33.703509, 151.09801)
Your transport options to Hornsby Train Station are by;
![]() Train. (get details)
Train. (get details)
![]() Bus. (get details)
Bus. (get details)
![]() Car. There is free parking available.
Car. There is free parking available.
(get details)
Short URL = http://wild.tl/cqth
Gallery images
There are other downloads I am still working on.
You will probably need to login to access these — still all free.
* KML (google earth file)
* GPX (GPS file)
Special Maps/ brochures
* A3 topo maps
* PDF with Lands Topo map base
* PDF with arial image (and map overlay)
I wanted to get the main site live first, this extra stuff will come in time.
Happy walking
Matt 🙂
Fullers Bridge to Epping Rd
And Walk
Fullers Bridge to Epping Rd

1 Hr
2.6 km One way
105 m
Hard track
For the most part, this walk follows a section of the Great North Walk through “Fairylands” and past a few waterfalls, then across Lane Cove River (via Epping rd) to Mowbray Park. Starting and ending on two busy roads, it is a pleasant surprise to visitors how nice the bushland can be. Allow some time to enjoy Fairylands and the views of Lane Cove river along the way.
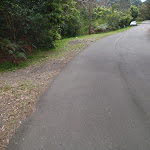

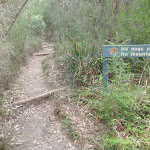


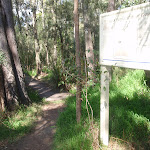
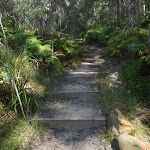


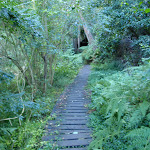
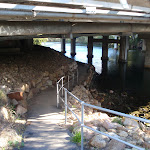


(0km) Corner of Delhi Rd and River Ave → Int. of Quebec Rd and Fairyland Track
880 m
19 mins
43m
-39m
Hard track
From the intersection on River Ave (near Delhi Rd), this walk follows the ‘Great North Walk – Sydney Cove’ sign[1] up along the rocky track. The track soon leads up a steep rock staircase[2] and past a small bench seat[3]. The track continues to wind quite steeply up, passing a few GNW arrow posts and winding among some large boulders to climb up onto a large, flat rock platform[4]. Here, the walk veers left and follows a mostly flat narrow track through the bush for about 170m, then heads around a locked gate[5] to find the end of Quebec Rd[6].
Continue straight: From the locked gate, this walk follows the sealed Quebec Rd[7], keeping the fenced Northern Suburbs Memorial Gardens on your right. The narrow road continues for about 300m passing a couple of driveways[8] (to your left) to come to a T-intersection with Quebec Rd and Fairylands Ave[9][10]. Here the walk turns right and follows the now wider Quebec Rd as it bends left and leads downhill[11]. Just before the road bends left again (near the bottom of this hill) this walk comes to an intersection with a track[12] (on your right), marked with a GNW arrow post.
Continue straight: From the locked gate, this walk follows the sealed Quebec Rd[7], keeping the fenced Northern Suburbs Memorial Gardens on your right. The narrow road continues for about 300m passing a couple of driveways[8] (to your left) to come to a T-intersection with Quebec Rd and Fairylands Ave[9][10]. Here the walk turns right and follows the now wider Quebec Rd as it bends left and leads downhill[11]. Just before the road bends left again (near the bottom of this hill) this walk comes to an intersection with a track[12] (on your right), marked with a GNW arrow post.
(0.88km) Int of Quebec Rd and Fairyland Track → River view
130 m
3 mins
6m
-5m
Easy track
Turn right: From the opposite number 101 Quebec Rd, this walk follows the GNW arrow post[13], under the power lines and down the track[14] past the ‘Dogs Strictly Prohibited’[15] and ‘Lane Cove National Park – Fairlyland Track’[16] signs. The track soon leads over a short section of timber boardwalk[17] and along the track for a bit over 100m to an unfenced rock platform[18][19], with river views (on your left).
Lookout
This small, informal and unfenced viewpoint is atop a large natural rock platform, between Fairyland and River Ave. There are a few in the area, but this is the most distinct. From here, there are nice views down the Lane Cove River[20]. The area is unfenced and there is a significant drop off the side.
(1.01km) River view → Fairyland
360 m
7 mins
6m
-14m
Easy track
Continue straight: From the view point, this walk heads along the flat track[21] whilst keeping the river below to your left. After about 150m, this walk starts to lead down a set of timber steps[22], winding down then along short timber boardwalk[23] to come to a ‘Site of Fairyland Pleasure Grounds’ information sign[24]. The walk continues along the track through the ferns to an intersection beside a large palm tree[25], just past the ‘Fairyland Pleasure Grounds’ sign[26] where a short track on the left leads to a seat[27] beside Lane Cove River.
Fairyland
Once formally known as ‘Fairyland Pleasure Grounds’, and casually as ‘The Rest’, this site was similar to several others in Sydney. The land was purchased by Robert Swan in 1896 and encompassed about 17 acres in total[28]. Part of the land was cleared for a market garden, growing strawberries and melons. By the early 1900s, the market garden had closed and the area had become a popular picnic and play ground, for people arriving mostly by boat[29]. This was a very popular spot to visit for a special day out. Today, the buildings have (mostly) gone and the cleared area has grown back, but it still can offer a relaxing picnic and lunch spot by the river.
(1.37km) Fairyland → Int on NW side of Epping Rd bridge
820 m
19 mins
42m
-41m
Moderate track
Continue straight: From the centre of Fairylands, this walk follows the GNW arrow post[30], keeping the Lane Cove River through the trees to your left and soon passing the ‘Take Yourself Back to Fairyland’ photo sign[31]. The walk then follows the timber boardwalk through the moist forest to the ‘Site of Fairyland Pleasure Grounds’ information sign[32], where the track then leads up a series of timber and dirt steps out of the old pleasure grounds. At the top of the steps, the track bends sharply left then continues uphill for another 70m or so. Here, the track leads down and over a small flat timber bridge[33] then up to a signposted intersection in view of a concrete building[34] (up to your right) and a high tension transmission tower[35] (to your left).
Continue straight: From the intersection[36][37], this walk follows the GNW arrow downhill along the track, passing under the power lines[38] whilst keeping the transmission tower to your left. Soon after passing closer to this tower[39], the rocky track leads uphill[40] for about 100m and crosses a timber bridge with a hand rail[41]. From here, the walk crosses two short flat timber bridges[42][43] then leads past a short rock wall[44]. Soon after this, the track leads up a series of timber steps[45] and just after flattening out, this walk comes to a signposted intersection with a concrete footpath, beside Epping Road bridge[46].
Continue straight: From the intersection[36][37], this walk follows the GNW arrow downhill along the track, passing under the power lines[38] whilst keeping the transmission tower to your left. Soon after passing closer to this tower[39], the rocky track leads uphill[40] for about 100m and crosses a timber bridge with a hand rail[41]. From here, the walk crosses two short flat timber bridges[42][43] then leads past a short rock wall[44]. Soon after this, the track leads up a series of timber steps[45] and just after flattening out, this walk comes to a signposted intersection with a concrete footpath, beside Epping Road bridge[46].
(2.18km) Int on NW side of Epping Rd bridge → Mowbray car park (near oval)
460 m
9 mins
8m
-4m
Moderate track
Veer left: From the intersection, this walk follows the ‘Great North Walk’ sign[47] down a few steps and along the footpath under the bridge[48][49]. On the other side of the bridge[50], this walk turns right and heads up the stairs[51] to an intersection with a wide shared footpath beside Epping Rd[52].
Turn right: From the intersection, this walk follows the GNW arrow post[53] down across the main bridge span, keeping the traffic to your left. After almost 100m, this walk comes to the other side of the bridge, where there is an intersection[54] with another set of stairs[55] (on your right) and another GNW arrow[56].
Turn right: From the intersection, this walk heads down the stairs away from the main road, to turn right under the bridge. The track heads under the bridge to come out the other side, continuing along the river bank for approximately 50m to the car park.
Maps for the Fullers Bridge to Epping Rd walk
You can download the PDF for this walk to print a map.
These maps below cover the walk and the wider area around the walk, they are worth carrying for safety reasons.
| Parramatta River | 1:25 000 Map Series | 91303N PARRAMATTA RIVER | NSW-91303N |
| Sydney | 1:100 000 Map Series | 9130 SYDNEY | 9130 |
Cross sectional view of the Fullers Bridge to Epping Rd bushwalking track
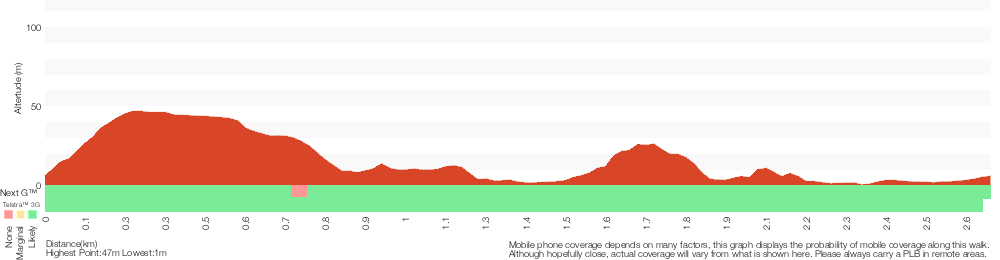
Analysis and summary of the altitude variation on the Fullers Bridge to Epping Rd
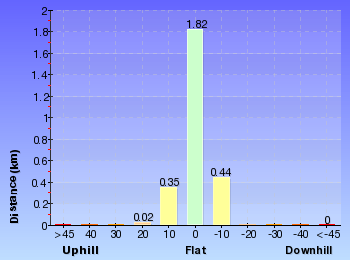
Overview of this walks grade – based on the AS 2156.1 – 2001
Under this standard, a walk is graded based on the most difficult section of the walk.
| Length | 2.6 km | ||
| Time | 1 Hr | ||
| . | |||
| Grade 4/6 Hard track |
AS 2156.1 | Gradient | Very steep (4/6) |
| Quality of track | Rough track, where fallen trees and other obstacles are likely (4/6) | ||
| Signs | Directional signs along the way (3/6) | ||
| Experience Required | Some bushwalking experience recommended (3/6) | ||
| Weather | Weather generally has little impact on safety (1/6) | ||
| Infrastructure | Limited facilities, not all cliffs are fenced (3/6) |
Some more details of this walks Grading
Here is a bit more details explaining grading looking at sections of the walk
Gradient
1.5km of this walk has gentle hills with occasional steps and another 680m has short steep hills. Whilst another 330m is very steep and the remaining 95m is flat with no steps.
Quality of track
1.7km of this walk follows a clear and well formed track or trail and another 400m follows a formed track, with some branches and other obstacles. Whilst another 330m follows a rough track, where fallen trees and other obstacles are likely and the remaining 180m follows a smooth and hardened path.
Signs
Around 1.6km of this walk is clearly signposted, whilst the remaining 1km has directional signs at most intersection.
Experience Required
Around 2.3km of this walk requires no previous bushwalking experience, whilst the remaining 330m requires some bushwalking experience.
weather
This whole walk, 2.6km is not usually affected by severe weather events (that would unexpectedly impact safety and navigation).
Infrastructure
Around 2.2km of this walk is close to useful facilities (such as fenced cliffs and seats), whilst the remaining 400m has limited facilities (such as not all cliffs fenced).
Similar walks
A list of walks that share part of the track with the Fullers Bridge to Epping Rd walk.
978 m Return
30 mins
Easy track
5.3 km Circuit
2 hrs 30 mins
Hard track
5.5 km One way
2 hrs 30 mins
Moderate track
6.9 km Circuit
2 hrs 30 mins
Hard track
7.2 km One way
2 hrs 45 mins
Moderate track
11.2 km Circuit
4 hrs
Hard track
33 km One way
2 Days
Hard track
44.4 km One way
3 Days
Hard track
Other Nearby walks
A list of walks that start near the Fullers Bridge to Epping Rd walk.
4.3 km Circuit
1 hr 27 mins
Moderate track
1.5 km Return
45 mins
Moderate track
1.3 km Return
1 Hr
Moderate track
5.3 km One way
2 hrs
Hard track
11.9 km Circuit
5 hrs
Hard track
3.4 km Return
1 hr 30 mins
Moderate track
5.9 km Return
2 hrs 30 mins
Moderate track
1.5 km Circuit
1 Hr
Moderate track
2.6 km One way
1 Hr
Moderate track
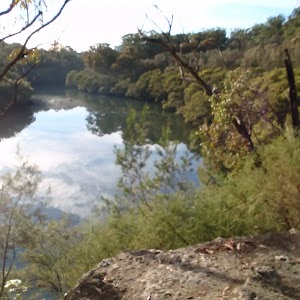
5.4 km One way
2 hrs
Hard track
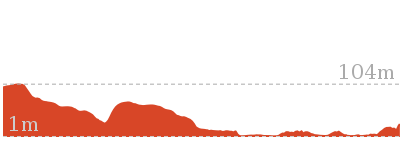
16.3 km One way
6 hrs
Hard track
18.1 km One way
6 hrs 45 mins
Hard track
Plan your trip to and from the walk here
The Fullers Bridge to Epping Rd walk starts at the Corner of Delhi Rd and River Ave (gps: -33.793026, 151.15614)
Your transport options to Corner of Delhi Rd and River Ave are by;
![]() Bus. (get details)
Bus. (get details)
![]() Car. There is free parking available.
Car. There is free parking available.
(get details)
The Fullers Bridge to Epping Rd ends at the Mowbray car park (near oval) (gps: -33.800466, 151.14654)
Your transport options to Mowbray car park (near oval) are by;
![]() Bus. (get details)
Bus. (get details)
![]() Car. There is free parking available.
Car. There is free parking available.
(get details)
Short URL = http://wild.tl/fbter
Gallery images
There are other downloads I am still working on.
You will probably need to login to access these — still all free.
* KML (google earth file)
* GPX (GPS file)
Special Maps/ brochures
* A3 topo maps
* PDF with Lands Topo map base
* PDF with arial image (and map overlay)
I wanted to get the main site live first, this extra stuff will come in time.
Happy walking
Matt 🙂
Hunters Hill to Epping Road
And Walk
Hunters Hill to Epping Road

2 hrs 30 mins
5.5 km One way
154 m
Moderate track
An enjoyable walk through lower sections of the Lane Cove National Park, this walk features plenty of mangroves next to the Lane Cove River, particularly in the section between Boronia Av and Buffalo Creek Reserve. Sugarloaf Point is well worth going the 200m for as its a good spot for a rest (or lunch) with views of the river. The walk has a number of contrasts where you think you are a long way from the city, with the occasional stark reminder.
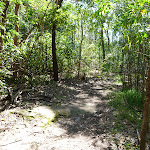
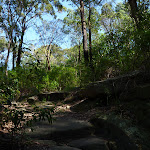

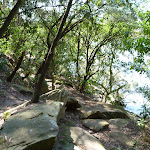

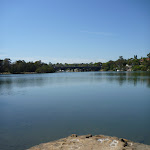


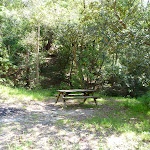

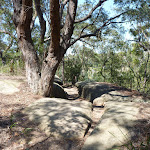
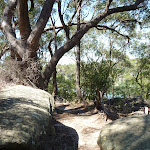


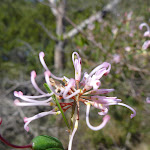

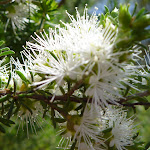

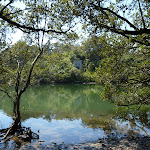
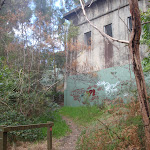

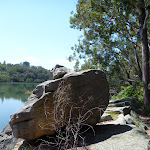
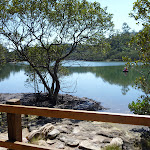


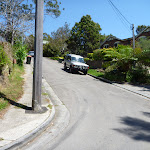
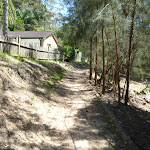
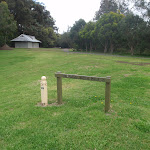
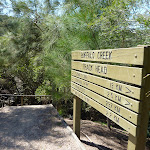

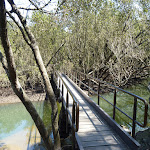
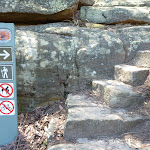
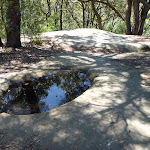

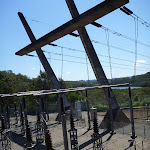
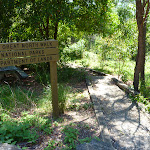
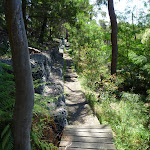


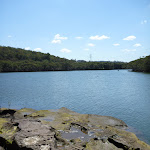
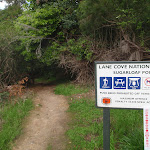

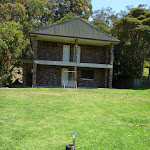
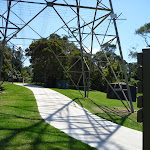
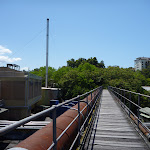


(0km) End of Boronia Ave → Int of Great North Walk and the Lane Cove River track
1.4 km
27 mins
39m
-50m
Moderate track
From the end of Boronia Avenue[1], this walk follows the GNW arrow post[2] up along the rocky track. The track leads over a small rise then bends right (ignoring the track to your left), to head down a few stone steps[3], then a series of timber steps[4]. The track then continues along the bank of the Lane Cove River[5][6] (to your right) for about 100m to come to a T-intersection with Princes St[7]. Here the walk turns left and heads up the road[8] (away from the water view[9]) for about 50m, coming to an intersection with another track and a large green ‘The Great North Walk’ signpost[10] (on your right).
Turn right: From the intersection, this walk follows the ‘Buffalo Ck. Park’ arrow[11] down along track. Veering right after about 50m, this wide track then leads through the casuarina forest[12] for a short time, coming to an intersection and a small clearing with a picnic table[13], the informally named Brickmakers Creek picnic area.
Turn right: From the picnic area, this walk follows the GNW arrow post across the rocky Brickmakers Creek[14] and up the steps[15]. The walk continues along the short timber boardwalk[16], then leads up the timber steps[17] for about 100m where the track flattens out, veering right at another GNW arrow post[18]. Here the track leads down between the rocks[19], with a filtered view to the water, and a short distance later, the track veers right again at another GNW arrow post[20], heading gently down between some more rocks. For another 150m , the mostly flat track leads over some rock platforms[21][22] then along a short section of timber boarding[23] to come to a three-way intersection marked with a GNW arrow, and a larger unfenced rock platform[24] (to the right).
Veer right: From the intersection, this walk heads along the rock platform[25], keeping the river down to your right. The walk soon heads down some steps carved in the rock[26], then follows the rocky and sandy track gently downhill, passing some interesting rock formations[27][28] over about 140m then climbing over some rocks with a metal handrail[29]. The track leads up a series of steps[30] for about 200m, then goes up some carved steps (also with a handrail[31]). From here, the rocky track heads down the steps[32] then leads alongside the mangroves[33] for just shy of 100m, coming to a T-intersection marked with a GNW arrow[34].
(1.38km) Int of Great North Walk and the Lane Cove River track → End of Lane Cove River track
90 m
2 mins
0m
-6m
Moderate track
Turn right: From the intersection, this walk steps down off the main track[35] and leads along the raised mound through the tunnel of mangroves[36]. This track is covered by water at higher tides, but at lower tides it leads to the edge of the open Lane Cover River[37][38]. At the end of this side trip, retrace your steps back to the main walk then Continue straight.
(1.38km) Int of Great North Walk and the Lane Cove River track → Mangrove viewing platform
510 m
10 mins
14m
-18m
Moderate track
Turn left: From the intersection, this walk follows the GNW arrow up the steps[39]. The track bends right and comes to an intersection with the signposted ‘Access to Barons Cres’[40] track on your left, just below the large concrete building[41].
Continue straight: From the intersection, this walk follows the GNW arrow post[42] along the clear track, leading gently uphill (initially keeping the concrete building and Barton Cres track on your left[43]). The fairly flat, rocky track leads through the forest, keeping the Lane Cove River[44] not far to your right. After about 300m, the track leads up some steps[45] to a boulder outcrop[46] with good views over the river. The track continues for another 100m to a small clearing and a timber viewing platform[47] (on your right).
Continue straight: From the intersection, this walk follows the GNW arrow post[42] along the clear track, leading gently uphill (initially keeping the concrete building and Barton Cres track on your left[43]). The fairly flat, rocky track leads through the forest, keeping the Lane Cove River[44] not far to your right. After about 300m, the track leads up some steps[45] to a boulder outcrop[46] with good views over the river. The track continues for another 100m to a small clearing and a timber viewing platform[47] (on your right).
Mangrove viewing platform
This timber viewing platform[48] is found on bank on south-west of the confluence of the Lane Cove River and Buffalo Creek. This area is affected by the tides so the view is constantly changing. The lookout platform provides an opportunity to view the mangroves community[49] and the eroded sandstone ruins[50]
(1.89km) Mangrove viewing platform → Int of Great North Walk and Pains Road (south)
540 m
10 mins
15m
-15m
Easy track
Turn left: From the timber platform[51], this walk heads directly away from the Lane Cove River[52] and follows the track up the valley, keeping the Buffalo Creek mangroves to your right. The track soon leads under a fallen tree[53] and meanders along the flat[54] for about 120m, then follows a short section of timber boardwalk[55]. The track then leads up some steps to pass under a small sandstone overhang[56], then continues along the base of a sandstone wall[57], from where the track leads over another shorter section of timber boardwalk[58]. The track then comes to another section of boardwalk which leads through the wetlands[59], over a small creek[60] and past the information sign about the ‘Friends of Buffalo Creek’[61]. The boardwalk then leads past some paperbark trees[62] and turns right onto the dirt track[63]. The walk follows this track for about 50m before heading up the timber ramp[64] and steps[65] to Pains Rd.
(2.42km) Int of Great North Walk and Pains Road (south) → Buffalo Creek track head
240 m
3 mins
2m
-1m
Easy track
Turn right: From the intersection[66], this walk follows GNW arrow up along Pains Rd[67] for about 20m to the intersection with a wide track, marked with another GNW arrow post[68], just where the road bends left[69].
Continue straight: From the bend in Pains Rd (near house number 4), this walk follows GNW arrow[70] along the wide track, whilst keeping a few houses up to your left[71]. After about 120m, the track leads up a grassy hill[72] to find a large open parkland, Buffalo Creek Reserve[73][74]. Here, the walk turns right and follows the ‘Great North Walk’ sign[75] across the grass, passing a picnic table[76] and fireplace[77], and coming to the large ‘Buffalo Creek Track Head’ signpost[78][79] (on your right).
Continue straight: From the bend in Pains Rd (near house number 4), this walk follows GNW arrow[70] along the wide track, whilst keeping a few houses up to your left[71]. After about 120m, the track leads up a grassy hill[72] to find a large open parkland, Buffalo Creek Reserve[73][74]. Here, the walk turns right and follows the ‘Great North Walk’ sign[75] across the grass, passing a picnic table[76] and fireplace[77], and coming to the large ‘Buffalo Creek Track Head’ signpost[78][79] (on your right).
(2.66km) Buffalo creek track head → Int of Sugarloaf and Great North Walk tracks
180 m
4 mins
14m
-2m
Moderate track
Turn right: From the ‘Buffalo Creek Track Head’, this walk follows the ‘Newcastle’ sign[80] down three sets of timber stairs[81]. Here the walk follows the timber boardwalk[82] as it winds through the mangroves to a hand-railed viewing area[83], just before a bridge.
From here, the walk crosses Buffalo Creek[84] on the bridge[85] then climbs up the stone steps[86] to veer left at a faint intersection (at the top of the steep climb), marked with a GNW arrow post[87]. The rocky track leads more gently up past the ‘Lane Cove River National Park – Sugarloaf Point’ sign[88] to a signposted T-intersection, where another GNW arrow[89] points back down the track.
From here, the walk crosses Buffalo Creek[84] on the bridge[85] then climbs up the stone steps[86] to veer left at a faint intersection (at the top of the steep climb), marked with a GNW arrow post[87]. The rocky track leads more gently up past the ‘Lane Cove River National Park – Sugarloaf Point’ sign[88] to a signposted T-intersection, where another GNW arrow[89] points back down the track.
(2.84km) Int of Sugarloaf and Great North Walk tracks → Int of Great North Walk and Sugarloaf Point tracks
360 m
9 mins
19m
-25m
Easy track
Turn right: From the intersection, this walk follows the ‘Sugarloaf Point’ sign[90] along the flat rocky and sandy track, keeping the valley to your right. The track generally bends left around the side of the hill, passing a few interesting rock platforms[91] along the way. Soon after heading down some stone steps[92], this track comes to a signposted T-intersection with a wide sandy trail[93]. There is a ‘Buffalo Ck Reserve’ sign[94] pointing back up the steps.
(3.2km) Int of Great North Walk and Sugarloaf Point tracks → Sugarloaf Point
280 m
5 mins
2m
-9m
Easy track
Turn right: From the intersection, this walk follows the ‘Sugarloaf Point’ sign down the hill and along the service trail to the open waterfront clearing at Sugarloaf Point, which extends all the way along to the end of the grass clearing.
At the end of this side trip, retrace your steps back to the main walk then Continue straight.
At the end of this side trip, retrace your steps back to the main walk then Continue straight.
Sugarloaf Point
Sugarloaf Point is a large grassy clearing with a picnic area on the edge of the Lane Cove River, just north of the Buffalo Creek junction. The riverside picnic area has a couple of picnic benches and a small beach, making it possible to pull a boat up to the point.
(3.2km) Int of Great North Walk and Sugarloaf Point tracks → Int of Great North Walk and Pittwater Road carpark path
200 m
4 mins
9m
-5m
Easy track
Turn left: From the intersection, this walk follows the ‘Pittwater Road 0.25km’ sign[95] up along the wide management trail, which soon becomes sealed[96]. The trail winds up beside a large, fenced, high-tension power line concrete tower[97][98]. The trail soon leads around a locked gate[99] and comes to an intersection[100] just before Pittwater Rd, with a ‘Great North Walk’ track sign[101] (on the right).
(3.4km) Int of Great North Walk and Pittwater Road carpark path → Kittys Creek bridge int
580 m
10 mins
6m
-13m
Easy track
Turn right: From the intersection, this walk follows the ‘Great North Walk’ sign[102] past the picnic table[103] and down the timber steps, whilst keeping Pittwater Rd through the trees to your left. The track soon passes a ‘Lane Cove National Park’ sign[104] then heads down some timber stairs[105]. The track continues just below the road (on your left) and beside the mangroves (on your right) for a little over 400m, crossing several timber platforms[106] and going up and down a few steps to come to a ‘Coastal Wetlands’ information sign[107]. Having moved away from the road, the track now heads along a timber boardwalk[108] that winds through the mangroves and wetlands to cross Kitty Creek[109] on a bridge[110]. Just on the other side of the bridge, this walk comes to a T-intersection with a sign pointing back to ‘Sugarloaf Point’[111].
(3.98km) Kittys Creek bridge int → Magdala Park carpark
720 m
14 mins
19m
-16m
Moderate track
Turn right: From the intersection, this walk follows the GNW arrow[112] along the wide track, initially keeping Kittys Creek to your right. The track almost immediately bends left (ignoring the side track on the left[113]) and follows the bank of the Lane Cove River[114] (on your right) through the casuarina forest[115] for just shy of 200m. Here, the track starts edging away from the river and enters more dense vegetation[116] for just over 200m, before the track opens up and comes to a ‘Lane Cove National Park – Sugarloaf Point’ sign[117]. From the sign, the walk leads up along the grass[118], keeping the playing fields[119] to your right and coming to a GNW arrow post[120] in front of the toilet block[121] beside Magdala Park car park[122].
Magdala Park
Magdala Park, found at the end of Magdala Rd, North Ryde, is home to a large playing field with a baseball diamond in the corner and a smaller playing field to the north. There is a car park [123], public toilets[124], sheltered picnic tables [125], childrens playground[126], garbage bins[127], and town water on tap[128]. There are a few Great North Walk signs highlighting the direction of the walk as it winds across the open grassy area.
(4.71km) Magdala Park carpark → Int. opposite end of Mowbray Rd
420 m
8 mins
13m
-11m
Easy track
Turn right: From the front of the toilet block[129], this walk follows the GNW arrow across the car park[130]. The walk then heads through the gap in the fence[131] and turns left, heading over the grass to the intersection with a concrete footpath at the base of the large transmissions tower[132], where a sign points back to ‘Sydney Cove’[133].
Turn right: From the transmissions tower[134], this walk follows the ‘Newcastle’ sign[135] downhill along the concrete footpath away from Magdala Park. The path soon turns right[136] and leads over the ‘Clifford Love’ footbridge[138]. The 150m-long bridge leads over Lane Cove River[139][140] and then over the ‘National Starch’ factory[141], to find a footpath on the other side. The footpath leads around the edge of the fenced car park[142] and comes to the footpath beside Epping Rd, just beside the traffic lights[143] at Mowbray Rd.
Turn right: From the transmissions tower[134], this walk follows the ‘Newcastle’ sign[135] downhill along the concrete footpath away from Magdala Park. The path soon turns right[136] and leads over the ‘Clifford Love’ footbridge[138]. The 150m-long bridge leads over Lane Cove River[139][140] and then over the ‘National Starch’ factory[141], to find a footpath on the other side. The footpath leads around the edge of the fenced car park[142] and comes to the footpath beside Epping Rd, just beside the traffic lights[143] at Mowbray Rd.
(5.12km) Int. opposite end of Mowbray Rd → Mowbray car park (near oval)
420 m
7 mins
4m
-6m
Moderate track
Continue straight: From the traffic lights, this walk heads downhill towards the bridge, crossing the factory driveway[144]. Just over 100m past the driveway, the shared footpath[145] leads to an intersection marked with a GNW arrow post, and a set of steps[146] (on the left).
Turn left: From the intersection, this walk heads down the stairs away from the main road, to turn right under the bridge. The track heads under the bridge to come out the other side, continuing along the river bank for approximately 50m to the car park.
Turn left: From the intersection, this walk heads down the stairs away from the main road, to turn right under the bridge. The track heads under the bridge to come out the other side, continuing along the river bank for approximately 50m to the car park.
Maps for the Hunters Hill to Epping Road walk
You can download the PDF for this walk to print a map.
These maps below cover the walk and the wider area around the walk, they are worth carrying for safety reasons.
| Parramatta River | 1:25 000 Map Series | 91303N PARRAMATTA RIVER | NSW-91303N |
| Sydney | 1:100 000 Map Series | 9130 SYDNEY | 9130 |
Cross sectional view of the Hunters Hill to Epping Road bushwalking track
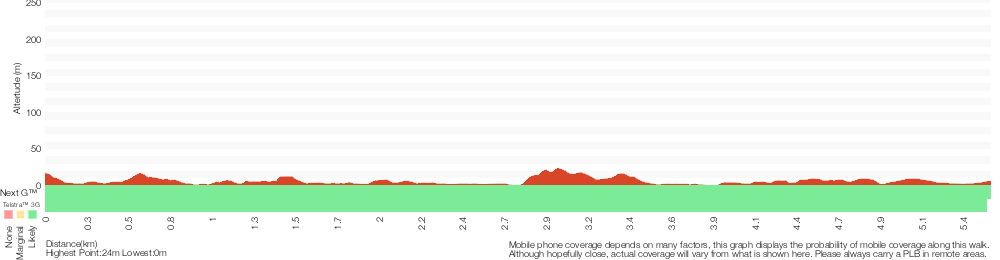
Analysis and summary of the altitude variation on the Hunters Hill to Epping Road
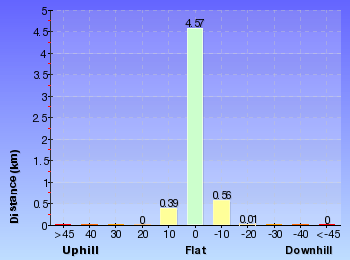
Overview of this walks grade – based on the AS 2156.1 – 2001
Under this standard, a walk is graded based on the most difficult section of the walk.
| Length | 5.5 km | ||
| Time | 2 hrs 30 mins | ||
| . | |||
| Grade 3/6 Moderate track |
AS 2156.1 | Gradient | Short steep hills (3/6) |
| Quality of track | Formed track, with some branches and other obstacles (3/6) | ||
| Signs | Directional signs along the way (3/6) | ||
| Experience Required | Some bushwalking experience recommended (3/6) | ||
| Weather | Weather generally has little impact on safety (1/6) | ||
| Infrastructure | Limited facilities, not all cliffs are fenced (3/6) |
Some more details of this walks Grading
Here is a bit more details explaining grading looking at sections of the walk
Gradient
3.9km of this walk has gentle hills with occasional steps and another 990m has short steep hills. The remaining (680m) is flat with no steps.
Quality of track
3.4km of this walk follows a clear and well formed track or trail and another 1.9km follows a formed track, with some branches and other obstacles. The remaining (160m) follows a smooth and hardened path.
Signs
Around 3.1km of this walk is clearly signposted, whilst the remaining 2.5km has directional signs at most intersection.
Experience Required
Around 5km of this walk requires no previous bushwalking experience, whilst the remaining 480m requires some bushwalking experience.
weather
This whole walk, 6km is not usually affected by severe weather events (that would unexpectedly impact safety and navigation).
Infrastructure
Around 4.6km of this walk is close to useful facilities (such as fenced cliffs and seats), whilst the remaining 970m has limited facilities (such as not all cliffs fenced).
Similar walks
A list of walks that share part of the track with the Hunters Hill to Epping Road walk.
2.6 km One way
1 Hr
Hard track
5.3 km Circuit
2 hrs 30 mins
Hard track
7.2 km One way
2 hrs 45 mins
Moderate track
11.2 km Circuit
4 hrs
Hard track
33 km One way
2 Days
Hard track
44.4 km One way
3 Days
Hard track
Other Nearby walks
A list of walks that start near the Hunters Hill to Epping Road walk.
5.8 km One way
2 hrs
Moderate track
1.5 km Circuit
1 Hr
Moderate track
6.9 km Circuit
2 hrs 30 mins
Hard track
978 m Return
30 mins
Easy track
11.9 km Circuit
5 hrs
Hard track
3.4 km Return
1 hr 30 mins
Moderate track
5.9 km Return
2 hrs 30 mins
Moderate track
4.3 km Circuit
1 hr 27 mins
Moderate track
1.5 km Return
45 mins
Moderate track
1.3 km Return
1 Hr
Moderate track
5.3 km One way
2 hrs
Hard track
2.6 km One way
1 Hr
Moderate track
Plan your trip to and from the walk here
The Hunters Hill to Epping Road walk starts at the End of Boronia Ave (gps: -33.826899, 151.14099)
Your transport options to End of Boronia Ave are by;
![]() Bus. (get details)
Bus. (get details)
![]() Car. There is free parking available.
Car. There is free parking available.
(get details)
The Hunters Hill to Epping Road ends at the Mowbray car park (near oval) (gps: -33.800466, 151.14654)
Your transport options to Mowbray car park (near oval) are by;
![]() Bus. (get details)
Bus. (get details)
![]() Car. There is free parking available.
Car. There is free parking available.
(get details)
Short URL = http://wild.tl/hhter
Gallery images
There are other downloads I am still working on.
You will probably need to login to access these — still all free.
* KML (google earth file)
* GPX (GPS file)
Special Maps/ brochures
* A3 topo maps
* PDF with Lands Topo map base
* PDF with arial image (and map overlay)
I wanted to get the main site live first, this extra stuff will come in time.
Happy walking
Matt 🙂
Epping to Eastwood Station (via Lane Cove River)

3 hrs 45 mins
10.2 km One way
189 m
Moderate track
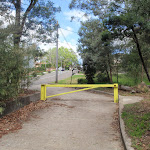
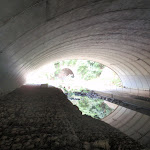
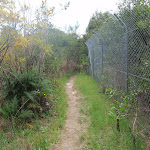
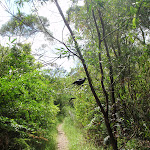
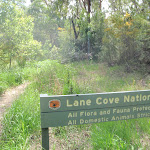
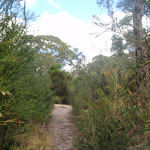
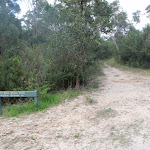
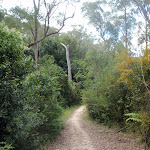
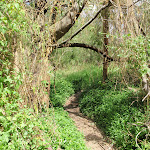
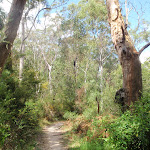
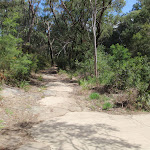
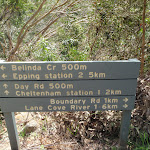


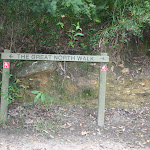
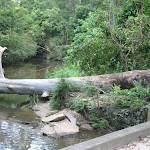
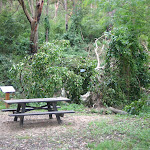
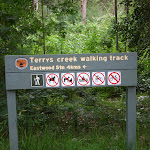

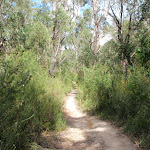

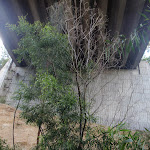
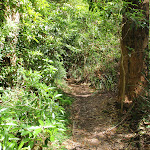

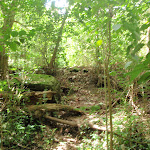
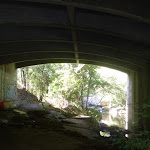

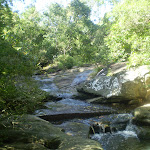
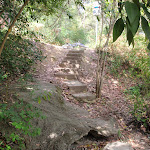


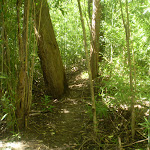

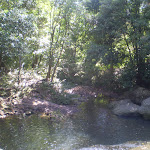


(0km) Epping Station → Int of Derby street service trail
940 m
18 mins
3m
-33m
Very easy
The walk exits Epping Station on the Oxford St side. The walk then crosses Cambridge St and continues down Oxford St. The walk follows the footpath past the shops down Oxford St passing Chester St, Surrey St. Just after Surry St the walk turns left onto Derby St to the end. Nearing the end of Derby St the walk tends left around the yellow gate and onto the concrete driveway which veers left off the road. The walk continues towards the tunnel to come to an intersection just before the tunnel entrance.
(0.94km) Int of Derby street service trail → Int of Epping Trk and Malton Rd Trail
1.5 km
25 mins
7m
-21m
Moderate track
Veer right: From the intersection this walk follows the Great North Walk arrow up the couple of steps then down along the footpath through the tunnel under the M2 (keeping the creek and wider management trail to your left). Out of the tunnel this walk follows the track as it winds up and around the fenced sewage vent and then continues through the dense bushland in the gully passing a sign marking the entrance to Lane Cove National Park. A little while later the track leads to a signposted intersection with the ‘Belinda Crs’ management trail.
Turn left: From the intersection the track follows the Whale Rock sign down the service trail which narrows into a bushtrack and follows Devlin creek through the gully all the way along until it widens out into a rocky service trail again and comes to the intersection of the Cheltenham service trail.
Turn left: From the intersection the track follows the Whale Rock sign down the service trail which narrows into a bushtrack and follows Devlin creek through the gully all the way along until it widens out into a rocky service trail again and comes to the intersection of the Cheltenham service trail.
(2.43km) Int of Epping Trk and Malton Rd Trail → Big Ducky Waterhole
190 m
3 mins
3m
-1m
Easy track
Continue straight: From the intersection the track follows the Lane Cove River arrow along the servicetrail for a while before it loops around the top of Big Ducky Waterhole.
Big Ducky Waterhole
The servicetrail loops around the top of the Big Ducky waterhole and there is a nice rock overhang in which to break. Is also a popular bird watching area. Unfortunately, recently there has been large quantities of rubbish in the area. (If going down to the waterhole please consider carrying out some of the rubbish if every walker carrys out a bit it will make a difference)
(2.61km) Big Ducky Waterhole → Whale Rock
480 m
8 mins
6m
-9m
Easy track
Continue straight: From the top of Big Ducky Waterhole the continues through the valley keeping Devlins Creek below on the left of the track all the way to Whale Rock.
Whale Rock
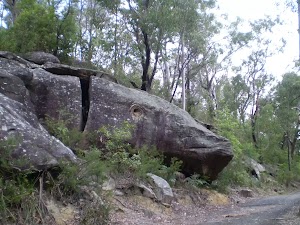
This is a large boulder that looks eerily like a whale, complete with eye socket. It is a good place to break and climb around the Rock.
(3.09km) Whale Rock → Browns Waterhole int
2.1 km
40 mins
47m
-66m
Moderate track
Continue straight: From Whale Rock the track follows the Penant Hills Park arrow along the service trail as it winds through the valley, crossing several small concrete creek crossings until it comes to the signposted intersection of the Pennant Hills ovals service trail.
Continue straight: From the intersection the track follows the Thornleigh via Great North Walk arrow down the short but steep hill and across the river at the causeway. On the other side of the river the track comes up to the intersection of the Great North Walk service trail.
Veer right: From the intersection, this walk follows the ‘Lane Cove River Park’ sign[1], gently uphill along the management trail, keeping the river to your right. After about 80m, the trail leads to a Y-intersection with sealed management trail[2] (on the left), marked with a STEP Track map/sign[3].
Veer right: From the intersection, this walk follows the ‘The Great North Walk’ sign[4] along the mostly flat management trail, initially keeping the sealed ‘Canoon Rd’ trail up to your left. The trail undulates through the tall forest[5] and valley (weedy in places[6]), keeping the river to your right, for just shy of 600m to come to an intersection marked with a ‘STEP track’ sign[7][8] (on your left).
Continue straight: From the intersection, this walk follows GNW arrow post[9] down the short, fairly steep hill, following the management trail over a small culverted creek[10]. The walk then heads gently uphill for about 30m to come to a clear three-way intersection[11], marked with a GNW arrow post.
Veer right: From the intersection, this walk follows the GNW arrow post[12] south-east, gently up along the wide trail, keeping the main valley to your right. The trail leads gently up through the valley for about 400m, then under some high tension power lines[13], where there is a mostly clear view over the river[14] (to your right). Here the trail continues for another 80m to come to an intersection with a wide concrete path (just past the ‘Caution’ sign[15]), beside the Lane Cove River crossing[16] (on your right), marked with a ‘The Great North Walk’ sign[17].
(5.16km) Browns Waterhole int → Browns Waterhole
90 m
2 mins
5m
-1m
Moderate track
Veer right: From the intersection, this walk crosses the the causeway of Browns Waterhole. (Caution is needed during and after rain, may become impassable) From here the track continues up the hill on the other side until reaching a small picnic area signposted as ‘Browns Waterhole’.
Browns Waterhole
Browns Waterhole is a wide, shallow section of the Lane Cove River, downstream of a concrete weir[18]. There is a concrete shared cycle/footpath crossing over the top of the weir, linking Kissing Point Road, South Turramurra to Vimiera Rd, Macquarie Park. On the western side of the waterhole, there is a picnic table[19] and small clearing with a view over this section of the river.
(5.25km) Browns Waterhole → Int of Terry’s Creek Walking Track and Brown’s Waterhole Servicetrail
40 m
1 mins
3m
0m
Very easy
Continue straight: From Browns Waterhole, at the picnic tables, this walk follows the concrete management trail away from the river, up the gentle hill until reaching the large green ‘Terrys Creek Walking Track’ sign.
(5.29km) Int of Terry’s Creek Walking Track and Brown’s Waterhole Servicetrail → Int of Eastwood station and waterfall loop tracks
2.9 km
55 mins
70m
-51m
Moderate track
Turn right: From the intersection the track follows the Terrys creek walking track sign through the dense bush and along a metal walkway the winds along for a little while, joining back onto a bushtrack and following it up some wooden steps and all the way along to the signposted intersection of a bushtrack heading down across the creek.
Continue straight: From the intersection the track follows the bushtrack south through the bush winding up some steps and crossing underneath the M2 moter way and back down and around to the signposted intersection of the Crimea road and Epping road tracks.
Turn right: From the intersection the tack follows the Epping road arrow down across the creek and up the other side to the signposted intersection of the Eastwood Station track at the number 18 plaque
Turn right: From the intersection the track follows the Eastwood Station arrow through the bush winding all the way along to a rock platform where you can see the M2 motorway and continues along the track, all the way through until it comes to the signposted intersection of the signposted intersection of the Eastwood Station track
Continue straight: From the intersection the track heads west through the bush winding down a gentle hill and around a sewage access point, coming back up the other side to the signposted intersection of the Eastwood Station track.
Turn left: From the intersection the track heads south, up the short hill and through the bush passing 2 sewage access points as it winds along the left hand side of the creek, all the way to the intersection of the Eastwood Station track, a short distance after passing the 3rd sewage access point.
Continue straight: From the intersection the track follows the bushtrack south alongside the creek, passing a sewage access point and continuing up a short hill to the intersection of the unnamed bushtrack.
Veer left: From the intersection the track heads south west along the bushtrack winding up and down along the left side of the creek until it crosses a small wooden bridge and continues through the bush, all the way to the intersection of the unnamed bushtrack.
Continue straight: From the intersection the track follows the Eastwood Station arrow along the creek and through the bush past signpost 15, and a sewage access point. continuing up a short hill to the intersection of the Epping road track.
Continue straight: From the intersection the track follows the bushtrack down the gentle hill, winding around and under the Epping road bridge and across the rocks until it comes to the intersection of the Pembroke road path and the Eastwood Station track at the base of the wooden steps.
Veer left: From the intersection the track heads up the steps to the top, at the intersection of the Rest area track.
Turn right: From the intersection the track follows the Eastwood Station sign south along the bushtrack winding past a sewage access point and the number 12 signpost, coming down and along the creek, all the way to the intersection of the Eastwood station tracks.
Continue straight: From the intersection the track heads south along the bushtrack climbing up a small hill and down across a thin wooden creek bridge, passing a sewage access point as the track continues along the creek for a short while until it turns up and away from the creek, winding up a rocky hill and along the side of the valley for a short while, coming back down towards the creek, passing the number 11 signpost and crossing the creek again. From the creek crossing the track continues up and along the gentle hill winding through the bush until it comes to the signposted intersection of Eastwood station and Pembroke park tracks.
Turn right: From the intersection the track follows the Dence Park sign down across the creek (for safety reasons you should avoid the crossing after recent rainfall) and up the other side to the intersection of the Eastwood station and Dence Park tracks.
Turn left : From the intersection the track follows the Eastwood station arrow south through the bush winding along side the creek and through a thick patch of bamboo. Staying close to the creek, the track continues upstream until it comes to the unsignposted intersection of the Eastwood station and waterfall tracks.
Turn right: From the intersection the track follows the bushtrack heading up the hill through dense ferns and along the side of the valley for a short distance to the intersection of the waterfall loop track.
(8.24km) Int of Eastwood station and waterfall loop tracks → Terrys Creek Waterfall
30 m
1 mins
0m
-3m
Moderate track
Veer left: From the intersection the track follows the bushtrack heading down towards the creek, winding around and down some rock steps to the intersection of the Terrys creek waterfall. At the end of this side trip, retrace your steps back to the main walk then Turn left.
Terrys Creek Waterfall
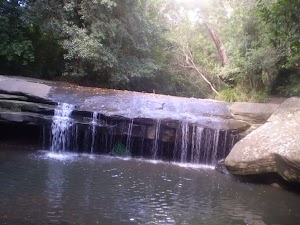
This is a small waterfall on Terrys Creek, and makes a good spot to break from the walk.
(8.24km) Int of Eastwood station and waterfall loop tracks → Forrester Park
690 m
13 mins
17m
-15m
Moderate track
Veer right: From the intersection the track follows the bushtrack heading up a short rocky hill and through some grass trees, coming down the other side and around beside a short rock wall to the top of the Terrys creek waterfall.
Continue straight: From the top of the falls the track follows the creek up stream along the bushtrack winding through the fairly open bush for a while until it heads up some wooden steps onto a platform and continues along all the way through thicker bush, crossing the bridged Terrys creek and continuing all the way along to the back of Forrester park.
Continue straight: From the top of the falls the track follows the creek up stream along the bushtrack winding through the fairly open bush for a while until it heads up some wooden steps onto a platform and continues along all the way through thicker bush, crossing the bridged Terrys creek and continuing all the way along to the back of Forrester park.
(8.93km) Forrester Park → Eastwood Railway Station
1.3 km
23 mins
28m
-20m
Easy track
Veer left: From Forrester Park, this walk heads south-east along Davis Avenue for about 30m to the right-hand bend in the road. From here, the walk crosses Terry’s Creek on a bridge and then turns right onto Vimiera Road. At the end of Vimiera Rd, the walk turns right onto Balaclava Rd, then immediately left onto Blaxland Road. The walk passes May St and Ethel Lane, and turns right into Ethel Street, following this road to the end where it comes to Eastwood Railway Station.
Maps for the Epping to Eastwood Station (via Lane Cove River) walk
You can download the PDF for this walk to print a map.
These maps below cover the walk and the wider area around the walk, they are worth carrying for safety reasons.
| Parramatta River | 1:25 000 Map Series | 91303N PARRAMATTA RIVER | NSW-91303N |
| Sydney | 1:100 000 Map Series | 9130 SYDNEY | 9130 |
Cross sectional view of the Epping to Eastwood Station (via Lane Cove River) bushwalking track
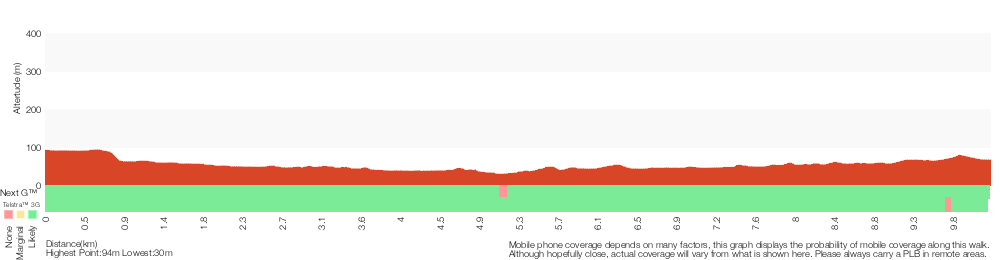
Analysis and summary of the altitude variation on the Epping to Eastwood Station (via Lane Cove River)
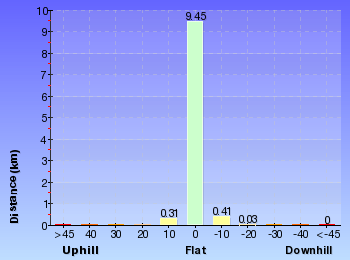
Overview of this walks grade – based on the AS 2156.1 – 2001
Under this standard, a walk is graded based on the most difficult section of the walk.
| Length | 10.2 km | ||
| Time | 3 hrs 45 mins | ||
| . | |||
| Grade 3/6 Moderate track |
AS 2156.1 | Gradient | Gentle hills with occasional steps (2/6) |
| Quality of track | Formed track, with some branches and other obstacles (3/6) | ||
| Signs | Directional signs along the way (3/6) | ||
| Experience Required | Some bushwalking experience recommended (3/6) | ||
| Weather | Storms may impact on navigation and safety (3/6) | ||
| Infrastructure | Limited facilities, not all cliffs are fenced (3/6) |
Some more details of this walks Grading
Here is a bit more details explaining grading looking at sections of the walk
Gradient
Around 9km of this walk has gentle hills with occasional steps, whilst the remaining 1.1km is flat with no steps.
Quality of track
4.1km of this walk follows a formed track, with some branches and other obstacles and another 3.7km follows a clear and well formed track or trail. The remaining (2.4km) follows a smooth and hardened path.
Signs
Around 7km of this walk is clearly signposted, whilst the remaining 3.2km has directional signs at most intersection.
Experience Required
Around 7km of this walk requires no previous bushwalking experience, whilst the remaining 3.6km requires some bushwalking experience.
weather
Around 9km of this walk is not usually affected by severe weather events (that would unexpectedly impact safety and navigation), whilst the remaining 880m is affected by storms that may impact your navigation and safety.
Infrastructure
Around 7km of this walk is close to useful facilities (such as fenced cliffs and seats), whilst the remaining 3.6km has limited facilities (such as not all cliffs fenced).
Similar walks
A list of walks that share part of the track with the Epping to Eastwood Station (via Lane Cove River) walk.
1.3 km One way
30 mins
Moderate track
2.7 km Circuit
1 Hr
Moderate track
2.8 km Return
1 Hr
Moderate track
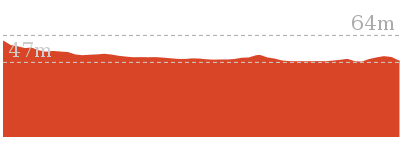
3.2 km Return
1 hr 30 mins
Moderate track
4.1 km One way
1 hr 30 mins
Moderate track
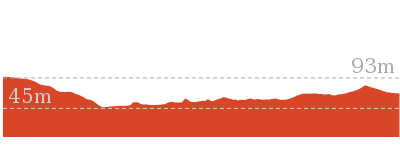
5.1 km One way
2 hrs
Hard track

5.3 km One way
2 hrs
Moderate track
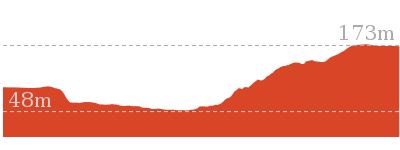
6.1 km One way
2 hrs 30 mins
Hard track
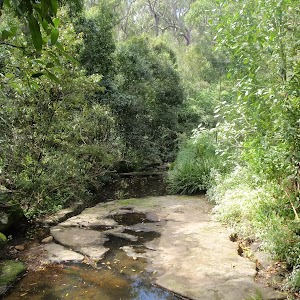
6.8 km One way
2 hrs 30 mins
Hard track
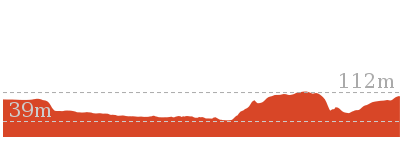
8 km One way
3 hrs
Hard track
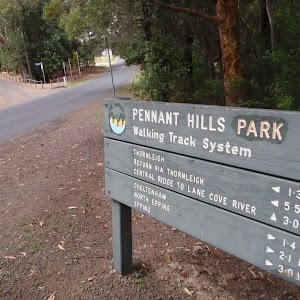
8.2 km Circuit
3 hrs
Hard track
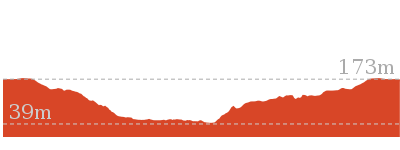
8.4 km One way
3 hrs 15 mins
Hard track
8.4 km Circuit
3 hrs
Moderate track
9.7 km One way
3 hrs 45 mins
Hard track
10.3 km One way
3 hrs 45 mins
Hard track
11.6 km One way
4 hrs 30 mins
Hard track
11.7 km One way
4 hrs 15 mins
Hard track
16.3 km One way
6 hrs
Hard track
17.5 km One way
6 hrs 45 mins
Hard track
18.1 km One way
6 hrs 45 mins
Hard track
20.6 km One way
8 hrs
Hard track
25.8 km One way
2 Days
Hard track
33 km One way
2 Days
Hard track
44.4 km One way
3 Days
Hard track
Other Nearby walks
A list of walks that start near the Epping to Eastwood Station (via Lane Cove River) walk.
516 m Return
15 mins
Moderate track
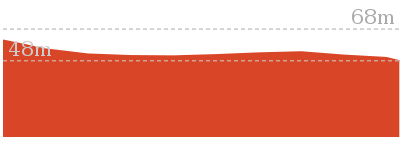
6 km One way
2 hrs 30 mins
Hard track
4.4 km One way
1 hr 45 mins
Hard track
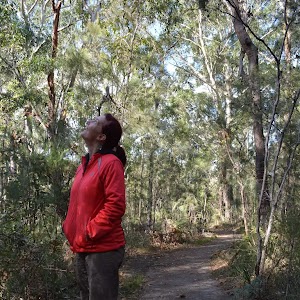
717 m Circuit
20 mins
Very easy

5.5 km One way
2 hrs
Hard track
6.6 km Circuit
2 hrs 30 mins
Hard track
35.9 km One way
2 Days
Hard track
15.5 km One way
6 hrs
Hard track
10.2 km One way
4 hrs
Hard track
28.1 km One way
2 Days
Hard track
2.6 km One way
1 Hr
Moderate track
6.1 km One way
2 hrs 30 mins
Moderate track
Plan your trip to and from the walk here
The Epping to Eastwood Station (via Lane Cove River) walk starts at the Epping Station (gps: -33.772529, 151.08242)
Your transport options to Epping Station are by;
![]() Train. (get details)
Train. (get details)
![]() Bus. (get details)
Bus. (get details)
![]() Car. There is free parking available.
Car. There is free parking available.
(get details)
![]() Train. (get details)
Train. (get details)
The Epping to Eastwood Station (via Lane Cove River) ends at the Eastwood Railway Station (gps: -33.790145, 151.08226)
Your transport options to Eastwood Railway Station are by;
![]() Bus. (get details)
Bus. (get details)
![]() Car. There is free parking available.
Car. There is free parking available.
(get details)
Short URL = http://wild.tl/eteslcr
Gallery images
There are other downloads I am still working on.
You will probably need to login to access these — still all free.
* KML (google earth file)
* GPX (GPS file)
Special Maps/ brochures
* A3 topo maps
* PDF with Lands Topo map base
* PDF with arial image (and map overlay)
I wanted to get the main site live first, this extra stuff will come in time.
Happy walking
Matt 🙂
STEP Track
And Walk
STEP Track

1 Hr
2.7 km Circuit
95 m
Moderate track
One of the most enjoyable walks in the Lane Cove valley, this relatively short trail ventures down into the valley and explores a variety of bushland. Spend a short while and go out to the scenic lookout and take your time around the waterfall. The track is pretty well signposted with a few information signs explaining some features. This walk was established by STEP a community based environmental organisation, based in South Turramurra.
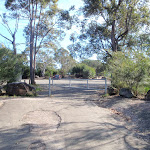
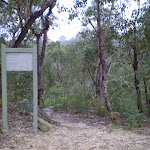
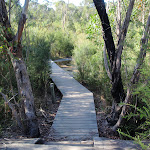
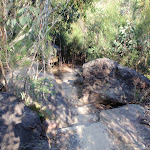
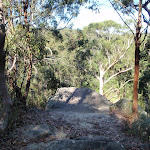


Canoon Tennis Courts
This is a series of tennis and netball courts in South Turramurra and is used regularly for training, competition and leisure.
(0km) Canoon Tennis Courts carpark → Int of Step Track and Canoon road service trail
380 m
7 mins
0m
-30m
Moderate track
From the tennis courts car park, the walk follows the service trail away from the courts. The trail passes through the metal gate and down the long hill, passing through another gate and arriving at the signposted intersection with the Step Track.
(0.38km) Int of STEP Track and Canoon Road service trail → Int of STEP and Scenic Lookout tracks
440 m
9 mins
21m
-11m
Moderate track
Turn left: From the intersection, this walk follows the ‘STEP Track’ sign down along the bush track, winding down some steps to the bottom of the hill and up the other side. The walk continues along to a rock platform, where it turns right and crosses a wooden boardwalk, following the STEP track markers up the long rocky hill to the intersection with the Ulm Street track.
Veer right: From the intersection, the walk follows the STEP track markers along the thin management trail, along to the intersection with the ‘scenic views’ lookout track.
Veer right: From the intersection, the walk follows the STEP track markers along the thin management trail, along to the intersection with the ‘scenic views’ lookout track.
(0.81km) Int of STEP and Scenic Lookout tracks → Scenic Lookout
90 m
2 mins
0m
-10m
Moderate track
Turn right: From the intersection, the walk follows the ‘Scenic Views’ sign down the hill along the rocky track for approximately 100 metres to the scenic lookout. At the end of this side trip, retrace your steps back to the main walk then Veer right.
Scenic Lookout

This lookout is a great side trip from the STEP Track in the Lane Cove National Park, as it provides you with a great view through the forest, looking down into the valley at a range of local flora.
(0.81km) Int of STEP and Scenic Lookout tracks → Int of STEP Track
300 m
5 mins
2m
-15m
Moderate track
Turn left: From the intersection, the walk follows the ‘STEP’ sign up the short hill and along the thin management trail, then comes down to the intersection with the Cove Street management trail.
Turn right: From the intersection, this walk follows the management trail down the long winding hill, to the intersection on the STEP Track.
Turn right: From the intersection, this walk follows the management trail down the long winding hill, to the intersection on the STEP Track.
(1.12km) Int of STEP Track → Int of Great North Walk and the STEP track (east)
290 m
6 mins
1m
-30m
Moderate track
Turn right: From the intersection, the walk follows the STEP track marker off the management trail and down through the bush. The trail turns right at the STEP Track marker and continues up the rocky track and along the side of the hill, flattening out and continuing down past a bushfire regeneration plaque. The walk heads down the steep rocky track to the intersection with the Great North Walk trail.
(1.41km) Int of GNW and the STEP track (east) → Int of GNW and the STEP track (west)
580 m
10 mins
8m
-9m
Easy track
Turn sharp right: From the intersection, this walk follows the GNW arrow post[1] and STEP Track markers[2] along the management trail, whilst keeping the river to your left. The trail undulates through the valley (weedy in places[3]) and tall forest[4] for just shy of 600m, to come to a clear intersection at the bottom of a sealed management trail[5] (on your right). This intersection is marked with another ‘STEP Track’ map/sign[6] and a ‘The Great North Walk’ sign[7].
(1.99km) Int of Great North Walk and the STEP track → Canoon Tennis Courts carpark
680 m
13 mins
63m
0m
Moderate track
Turn right: From the intersection, the walk follows the sealed management trail up the steep hill. The trail flattens out and turns around a left-hand bend, continuing steeply up the side of the valley to the signposted intersection with the STEP Track.
Veer left: From the intersection, the walk follows the service trail up the hill onto the gravel trail. The trail climbs steeply up through a metal gate, flattens out while then climbs up the long hill, passing through another metal gate to reach the Canoon road tennis courts car park.
Veer left: From the intersection, the walk follows the service trail up the hill onto the gravel trail. The trail climbs steeply up through a metal gate, flattens out while then climbs up the long hill, passing through another metal gate to reach the Canoon road tennis courts car park.
Maps for the STEP Track walk
You can download the PDF for this walk to print a map.
These maps below cover the walk and the wider area around the walk, they are worth carrying for safety reasons.
| Hornsby | 1:25 000 Map Series | 91304S HORNSBY | NSW-91304S |
| Parramatta River | 1:25 000 Map Series | 91303N PARRAMATTA RIVER | NSW-91303N |
| Sydney | 1:100 000 Map Series | 9130 SYDNEY | 9130 |
Cross sectional view of the STEP Track bushwalking track
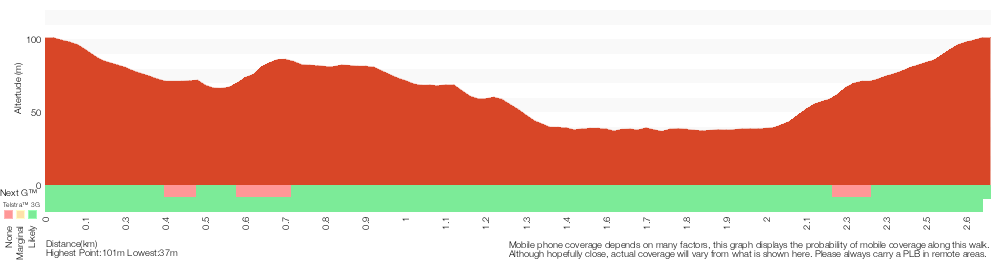
Analysis and summary of the altitude variation on the STEP Track
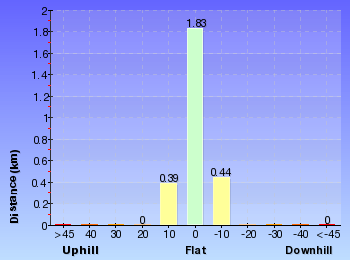
Overview of this walks grade – based on the AS 2156.1 – 2001
Under this standard, a walk is graded based on the most difficult section of the walk.
| Length | 2.7 km | ||
| Time | 1 Hr | ||
| . | |||
| Grade 3/6 Moderate track |
AS 2156.1 | Gradient | Short steep hills (3/6) |
| Quality of track | Formed track, with some branches and other obstacles (3/6) | ||
| Signs | Directional signs along the way (3/6) | ||
| Experience Required | Some bushwalking experience recommended (3/6) | ||
| Weather | Weather generally has little impact on safety (1/6) | ||
| Infrastructure | Limited facilities, not all cliffs are fenced (3/6) |
Some more details of this walks Grading
Here is a bit more details explaining grading looking at sections of the walk
Gradient
Around 1.9km of this walk has short steep hills, whilst the remaining 770m has gentle hills with occasional steps.
Quality of track
Around 1.7km of this walk follows a formed track, with some branches and other obstacles, whilst the remaining 950m follows a clear and well formed track or trail.
Signs
Around 2.1km of this walk has directional signs at most intersection, whilst the remaining 580m is clearly signposted.
Experience Required
Around 1.4km of this walk requires some bushwalking experience, whilst the remaining 1.3km requires no previous bushwalking experience.
weather
This whole walk, 2.7km is not usually affected by severe weather events (that would unexpectedly impact safety and navigation).
Infrastructure
Around 1.3km of this walk has limited facilities (such as not all cliffs fenced), whilst the remaining 1.3km is close to useful facilities (such as fenced cliffs and seats).
Similar walks
A list of walks that share part of the track with the STEP Track walk.
3.2 km Return
1 hr 30 mins
Moderate track
6.1 km One way
2 hrs 30 mins
Hard track
8.4 km One way
3 hrs 15 mins
Hard track
8.4 km Circuit
3 hrs
Moderate track
9.7 km One way
3 hrs 45 mins
Hard track
10.2 km One way
3 hrs 45 mins
Moderate track
10.3 km One way
3 hrs 45 mins
Hard track
11.6 km One way
4 hrs 30 mins
Hard track
20.6 km One way
8 hrs
Hard track
25.8 km One way
2 Days
Hard track
33 km One way
2 Days
Hard track
44.4 km One way
3 Days
Hard track
Other Nearby walks
A list of walks that start near the STEP Track walk.
516 m Return
15 mins
Moderate track
1.3 km One way
30 mins
Moderate track
4.4 km One way
1 hr 45 mins
Hard track
360 m Return
15 mins
Easy track
2.8 km Return
1 Hr
Moderate track
5.1 km One way
2 hrs
Hard track
717 m Circuit
20 mins
Very easy

1.8 km One way
50 mins
Moderate track
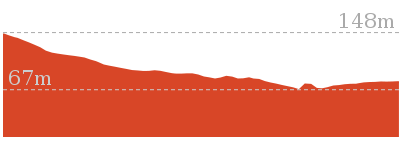
8.2 km Circuit
3 hrs
Hard track
6.6 km Circuit
2 hrs 30 mins
Hard track
35.9 km One way
2 Days
Hard track
15.5 km One way
6 hrs
Hard track
Plan your trip to and from the walk here
The STEP Track walk starts and ends at the Canoon Tennis Courts carpark (gps: -33.749542, 151.10222)
Your transport options to Canoon Tennis Courts carpark are by;
![]() Bus. (get details)
Bus. (get details)
![]() Car. There is free parking available.
Car. There is free parking available.
(get details)
Short URL = http://wild.tl/st
Gallery images
There are other downloads I am still working on.
You will probably need to login to access these — still all free.
* KML (google earth file)
* GPX (GPS file)
Special Maps/ brochures
* A3 topo maps
* PDF with Lands Topo map base
* PDF with arial image (and map overlay)
I wanted to get the main site live first, this extra stuff will come in time.
Happy walking
Matt 🙂
Woolwich Wharf to Boronia Park
And Walk
Woolwich Wharf to Boronia Park

2 hrs
5.8 km One way
175 m
Moderate track
Going through the streets of Hunters Hill, this walk is on the first segment of the Great North Walk. The majority of the walk is on roads and footpaths so you may not really consider it a bush walk. The track does pop into some pockets of nice bushland, but these are short, relative to the walking along the streets.

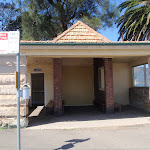

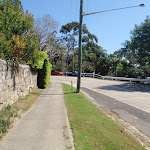
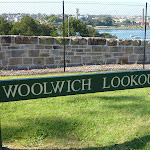
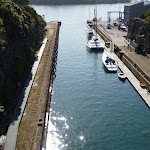

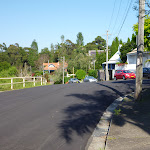
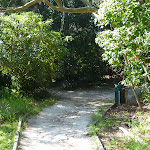

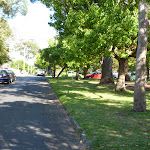


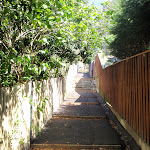
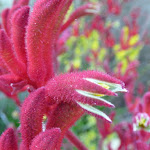


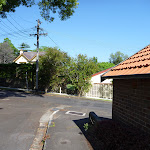


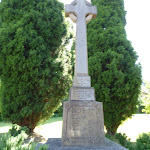
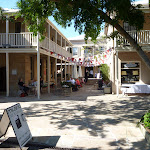
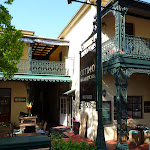
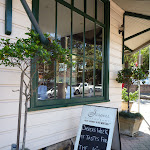
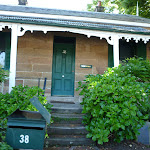
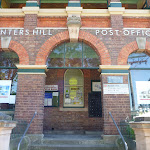
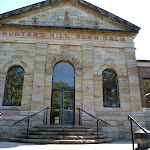

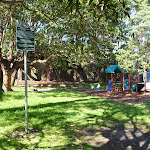
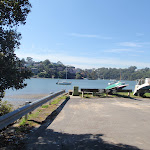


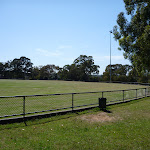

(0km) Woolwich Ferry Wharf, Valentia St → Goat Paddock
720 m
13 mins
23m
-6m
Very easy
From Woolwich Wharf[1] (at the end of Valentia Street[2]), this walk follows the footpath, past the toilets[3] and the large ‘Great North Walk’ sign[4] (and past the children’s playground[5] which is across the road) to the top of ‘Valentia St’[6]. The walk turns left and follows the tree-lined ‘The Point Rd’[7], which bends left and becomes ‘Gale St’[8]. Not far along Gale St, this walk comes to the front of the gates at the top of the signposted ‘Goat Paddock’ park[9][10] (on your left)
Goat Paddock
Goat Paddock is the open area north of Woolwich Dock. The park has a path winding down through the middle[11], providing access to the waters edge. In 1835, the Clarke family received a grant of the land at the eastern end of the peninsula, what we now call Woolwich. In 1898, Morts Dock and Engineering Company bought this land and commissioned the excavation of the dock. The area is well maintained and is used by many locals for their morning strolls.
(0.72km) Goat Paddock → Woolwich Lookout
80 m
1 mins
1m
-2m
Easy track
Continue straight: From the gates at the top of ‘Goat Paddock’[13][14], this walk follows the footpath uphill beside Gale St, which soon bends right. The walk passes ‘Woolwich Pier Hotel’[15] (on the opposite side of the road), then veers left across the grass on the signposted ‘Woolwich Lookout’ park[16], and soon comes to the fenced[17] lookout platform[18] on the left, about 80m from the lookout.
Woolwich Lookout
Woolwich Lookout is a fenced lookout[19] atop of the cliffs at the western end of Woolwich Dock[20]. There are great views down the sandstone cutting[21], through the dock at the mouth of the Lane Cove River and to North Sydney. In December 1901, the W. Solomon & Sons company (commissioned by Morts Dock and Engineering Company) completed the excavation of 85,000 cubic metres of sandstone to construct this dry dock. At the time, this 188 metres long, and 27 metres wide, pit was the largest dry dock in Australia. In 1963, the Army purchased the site and now it is managed by the Sydney Harbour Federation Trust.
(0.8km) Woolwich Lookout → Bottom of Kellys Bush
360 m
7 mins
10m
-11m
Easy track
Continue straight: From ‘Woolwich Lookout’[23], this walk winds down the concrete footpath[24], initially keeping the water view to your left. Crossing the road[25], this walk then follows the GNW arrow post[26] downhill along Edgecliff Rd[27][28], which soon bends right (enjoying the water views across to Cockatoo Island[29]), then crosses Margaret St[30] to become Alfred St. Continuing to the end of Alfred St[31], this walk comes to a short sandstone wall and a ‘Kellys Bush’ sign[32]
(1.16km) Bottom of Kellys Bush → Top of Kellys Bush
230 m
6 mins
25m
0m
Easy track
Continue straight: From the end of Alfred St[33], this walk follows the ‘Nelson Parade’ sign[34] up the sandstone steps[35]. At the top of the steps, this walk turns right, following the ‘Picnic Area’ sign[36] along the dirt track[37] for about 80m to a three-way intersection just past a bench seat[38]. This walk veers right, following the ‘Nelson Parade’ sign[39] up the steps[40], passing a ‘Kellys bush’ information sign[41] at the top of the hill, then leaves the park through a gap in the timber fence[42] to come to a road[43] beside Weil Park[44] (a large playing field[45]).
Kellys Bush
In the late 1880s, pocket of bushland between Prince George Parade and Alfred St, Woolwich was set aside to to act as a buffer zone between the Parramatta River and the Sydney Smelting Company. The area was named after the owner of the land and smelting company, T.H. Kelly [46]. From the passion of the local people who fought to protect this area, Kelly’s Bush is now owned by the Hunters Hill Council and cared for by a team of local bush regenerators[47].
(1.39km) Top of Kellys Bush → End of Serpentine Rd
410 m
7 mins
5m
-14m
Very easy
Continue straight: From the top of Kellys Bush, this walk follows the GNW arrow[48] gently uphill along Prince George Parade[49] (directly away from the park). Soon after passing a set of swings[50] (on the central reservation), this walk turns right[51] (crossing over the other part Prince George Parade) to follow another GNW arrow post along ‘Gladstone Ave’[52] until coming to an intersection with ‘Woolwich Rd’[53].
Turn left: From the intersection, this walk follows the GNW arrow west alongside Woolwich Rd[54] for about 100m, then turns right across the road[55] and heads to the end of Serpentine Rd[56]. There are some GNW arrows here and a footpath[57] on the left.
Turn left: From the intersection, this walk follows the GNW arrow west alongside Woolwich Rd[54] for about 100m, then turns right across the road[55] and heads to the end of Serpentine Rd[56]. There are some GNW arrows here and a footpath[57] on the left.
(1.8km) End of Serpentine Rd → Int of Brookes and Vernon Sts
420 m
10 mins
22m
-32m
Moderate track
Continue straight: From the end of Serpentine Rd[58], this walk follows the GNW arrows down a few steps[59], then downhill along the footpath[60]. The path soon leads down to Vernon St to turn left[61], following the street for about 30m. Here the walk turns right[62], leading down a pedestrian lane-way[63] and steps[64][65] between two house, coming to ‘Mornington Reserve’, beside Alexandra Bay on the Lane Cove River[66][67]. Here the walk turns left, leading up along the grassy track reserve behind some houses[68] for about 180m to turn left at a GNW post[69] marking another pedestrian lane-way. The walk heads up this lane-way[70] then up the steps to turn right on Vernon St[71], coming almost immediately to an intersection with Brookes St[72] (on your right).
(2.22km) Int of Brookes and Vernon Sts → Hunters Hill Shops
1.2 km
22 mins
31m
-24m
Easy track
Continue straight: From the intersection, this walk heads uphill along Vernon St[73] which soon bends left. At the top of the hill, this walk turns right to follow the footpath beside Woolwich Rd[74] for about 150m, then turns right down Futuna Lane[75]. At the T-intersection, this walk turns left to follow Futuna St past the grand ‘St. Peter Chanel Catholic Church’ building[76] and then come to another T-intersection[78]. Here the walk crosses Crescent St and turns right a short distance and then left into Garrick Ave[79]. At the end of Garrick Ave[80], this walk follows the GNW arrow along the zigzagging pedestrian lane way[81][82] for about 170m to come to Passy Ave[83]. Here the walk crosses the road and turns right, following the footpath for about 150m to then turn left onto Ambrose St[84]. After a further 100m, the walk turns right at Ferry St to pass in front of the large sandstone ‘All Saints Anglican Church’ building[85]. Just past this church, the walk passes a few shops[87] to cross Alexandra St, then turns left. Just after crossing Ady St, this walk comes to to ‘Jaspers Restaurant’[88], opposite more cafes and shops[90][91].
Hunters Hill Shops
Just opposite the intersection of Alexandra and Ady Streets is a community shopping village in Hunters Hill. There are a few cafes and small restaurants[92] set among a lovely series of sandstone buildings[93]. You could even get your hair cut if so desired. The Ricciotti Deli Cafe open 7 days 0800-1700 (weekends 0800-1500) ph: (02) 9817-7388.[95]
(3.42km) Hunters Hill Shops → End of Mount St
770 m
15 mins
15m
-43m
Easy track
Continue straight: From in front of ‘Jaspers Restaurant’[96], this walk heads gently downhill along Alexandra St[98] almost immediately passing ‘Vienna’ Cottage[99][100] (an artisan’s home built in 1871). This walk continues along beside Alexandra St[102] for about 500m, passing the post office[103], Masonic Centre[104], town hall[105], Congregational Church[106], a tiny and very old-looking pharmacy[107] to come to a four-way intersection with Mount St[108] (on your right), opposite a children’s playground[109]. Here the walk follows the GNW post right[110] and downhill along Mount St[111] to come to a waterfront[112] intersection[113] at the end of the street.
(4.2km) End of Mount St → Joubert Street Reserve
620 m
11 mins
17m
-2m
Easy track
Turn left : From the northern end of Mount St[114], this walk follows the asphalt footpath[115] behind Hunters Hill High School[116], whilst keeping the Lane Cover River[117] to your right. The path leads past a few information signs[118][119], then bends left at the grassy clearing[120] to head up the side of the school. The path leads up a small set of stairs[121] and turns right on Reiby Rd, where the walk follows the road[122] for 100m until the road bends right. Here, the walk crosses the road[123] to follow the GNW arrow[124] up to the right and along the concrete footpath, which leads under under Burns Bay Rd (Fig Tree Bridge)[125]. Just after passing under the bridge, the walk heads left, diagonally up through Joubert Street Reserve to Joubert St[126] (just downhill from the intersection with Figtree Rd).
(4.82km) Joubert Street Reserve → Boronia Park
930 m
17 mins
26m
-3m
Very easy
Continue straight: From Joubert Street Reserve, this walk crosses Joubert St and heads uphill to then turn right into Figtree Rd. The walk leads along the footpath beside Figtree Rd[127] for about 350m, then turns right onto Ryde Rd[128] (there is a Coles Express service station to your left[129], if you want a cold drink). Following the footpath alongside Ryde Rd for about 500m (passing St Joseph’s College[130] along the way), this walk comes to Boronia Ave, just beside Boronia Park[131].
Boronia Park
Boronia Park is found at the intersection of Ryde Rd and Boronia Ave[132]. The park is centered around a couple of large playing fields[133] and a grand stand[134]. Here you will find public toilets[135], tap water, electric BBQs[136] and a children’s playground[137]. There is also shade from the trees and rain shelter to provide some relief on the hot or wet days.
Maps for the Woolwich Wharf to Boronia Park walk
You can download the PDF for this walk to print a map.
These maps below cover the walk and the wider area around the walk, they are worth carrying for safety reasons.
| Parramatta River | 1:25 000 Map Series | 91303N PARRAMATTA RIVER | NSW-91303N |
| Sydney | 1:100 000 Map Series | 9130 SYDNEY | 9130 |
Cross sectional view of the Woolwich Wharf to Boronia Park bushwalking track
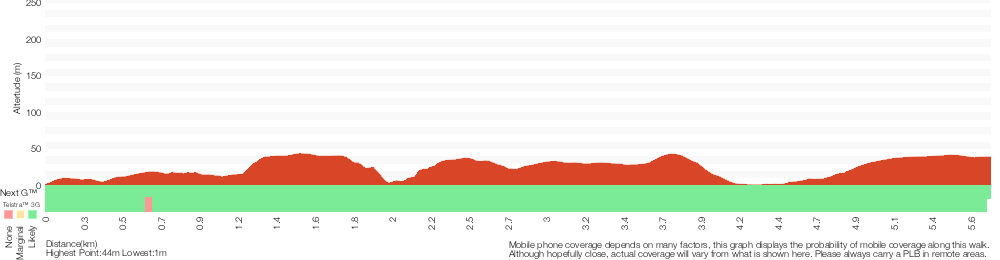
Analysis and summary of the altitude variation on the Woolwich Wharf to Boronia Park
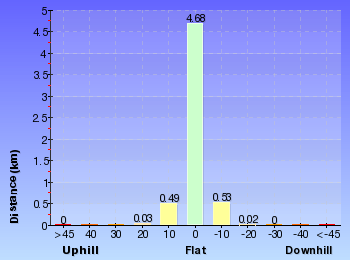
Overview of this walks grade – based on the AS 2156.1 – 2001
Under this standard, a walk is graded based on the most difficult section of the walk.
| Length | 5.8 km | ||
| Time | 2 hrs | ||
| . | |||
| Grade 3/6 Moderate track |
AS 2156.1 | Gradient | Gentle hills with occasional steps (2/6) |
| Quality of track | Formed track, with some branches and other obstacles (3/6) | ||
| Signs | Directional signs along the way (3/6) | ||
| Experience Required | No experience required (1/6) | ||
| Weather | Weather generally has little impact on safety (1/6) | ||
| Infrastructure | Generally useful facilities (such as fenced cliffs and seats) (1/6) |
Some more details of this walks Grading
Here is a bit more details explaining grading looking at sections of the walk
Gradient
Around 3.4km of this walk is flat with no steps, whilst the remaining 2.4km has gentle hills with occasional steps.
Quality of track
2.8km of this walk follows a smooth and hardened path and another 2.5km follows a clear and well formed track or trail. The remaining (420m) follows a formed track, with some branches and other obstacles.
Signs
Around 5km of this walk is clearly signposted, whilst the remaining 420m has directional signs at most intersection.
Experience Required
This whole walk, 6km requires no previous bushwalking experience.
weather
This whole walk, 6km is not usually affected by severe weather events (that would unexpectedly impact safety and navigation).
Infrastructure
This whole walk, 6km is close to useful facilities (such as fenced cliffs and seats).
Similar walks
A list of walks that share part of the track with the Woolwich Wharf to Boronia Park walk.
6 km One way
2 hrs 30 mins
Moderate track
33 km One way
2 Days
Hard track
44.4 km One way
3 Days
Hard track
Other Nearby walks
A list of walks that start near the Woolwich Wharf to Boronia Park walk.
9.8 km One way
4 hrs
Moderate track
5.5 km One way
2 hrs 30 mins
Moderate track
7.2 km One way
2 hrs 45 mins
Moderate track
2.7 km Circuit
1 hr 15 mins
Easy track
2 km One way
45 mins
Easy track
4.2 km One way
1 hr 45 mins
Moderate track
478 m Return
15 mins
Easy track
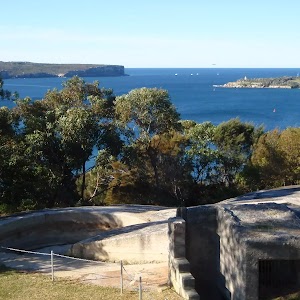
1.7 km Return
1 Hr
Moderate track
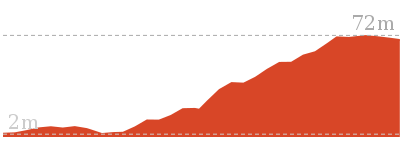
3.7 km One way
1 hr 45 mins
Moderate track
4.4 km One way
2 hrs
Moderate track
3 km Circuit
1 hr 30 mins
Moderate track
6.5 km Circuit
3 hrs 30 mins
Moderate track
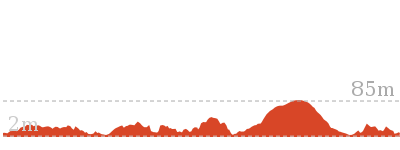
Plan your trip to and from the walk here
The Woolwich Wharf to Boronia Park walk starts at the Woolwich Ferry Wharf, Valentia St (gps: -33.83856, 151.17607)
Your transport options to Woolwich Ferry Wharf, Valentia St are by;
![]() Ferry. (get details)
Ferry. (get details)
![]() Bus. (get details)
Bus. (get details)
![]() Car. There is free parking available.
Car. There is free parking available.
(get details)
The Woolwich Wharf to Boronia Park ends at the Boronia Park (gps: -33.827196, 151.13814)
Your transport options to Boronia Park are by;
![]() Bus. (get details)
Bus. (get details)
![]() Car. There is free parking available.
Car. There is free parking available.
(get details)
Short URL = http://wild.tl/wwtbp
Gallery images
There are other downloads I am still working on.
You will probably need to login to access these — still all free.
* KML (google earth file)
* GPX (GPS file)
Special Maps/ brochures
* A3 topo maps
* PDF with Lands Topo map base
* PDF with arial image (and map overlay)
I wanted to get the main site live first, this extra stuff will come in time.
Happy walking
Matt 🙂
Eastwood to Thornleigh
And Walk
Eastwood to Thornleigh

3 hrs 45 mins
10.3 km One way
285 m
Hard track
This walk explores Terrys Creek and the Lane Cove National Park. From Eastwood station the track follows Terrys creek past a small waterfall, under the M2, past Browns Water hole and along the Lane Cove river before climbing up to Thornleigh Oval and the train station. There are picnic tables at Browns waterhole, not a bad place for lunch, otherwise there are a few nice creek banks to rest along the way

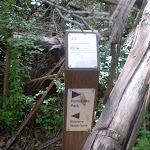


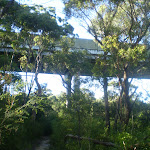
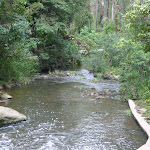


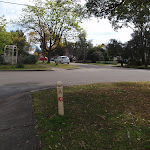
(0km) Eastwood Railway Station → Forrester Park
1.3 km
23 mins
20m
-28m
Easy track
From the east side of Eastwood Railway Station, this walk heads east along Ethel Street and left into Blaxland Road. At the traffic lights at Balaclava Road, this walk turns right then immediately left Vimiera Road. As Vimiera Rd bends to the right (about 100m past Vanimo Place), this walk turns left onto a bridge, crossing Terry’s Creek. This takes the walk onto a corner of Davis Avenue. The walk turns right and heads north-west along Davis Avenue, soon coming to Forrester Park.
(1.28km) Forrester Park → Int of Eastwood station and waterfall loop tracks
690 m
13 mins
15m
-17m
Moderate track
Veer right: From the back of Forrester park the track follows the Terrys creek walking track sign along the bushtrack that winds through the bush and down through the valley, crossing a small bridge creek and continuing through for a while until it comes to a wooden platform where it heads down the wooden steps and along the bushtrack heading down stream along Terrys creek all the way to the top of the waterfall.
Continue straight: From the intersection the track follows the bushtrack down stream past the short rock wall and up a small rocky hill, through a few grass trees and down the other side coming to the un signposted intersection of the waterfall loop track.
Continue straight: From the intersection the track follows the bushtrack down stream past the short rock wall and up a small rocky hill, through a few grass trees and down the other side coming to the un signposted intersection of the waterfall loop track.
(1.98km) Int of Eastwood station and waterfall loop tracks → Terrys Creek Waterfall
30 m
1 mins
0m
-3m
Moderate track
Turn right: From the intersection the track follows the bushtrack heading down towards the creek, winding around and down some rock steps to the intersection of the Terrys creek waterfall. At the end of this side trip, retrace your steps back to the main walk then Veer right.
Terrys Creek Waterfall
This is a small waterfall on Terrys Creek, and makes a good spot to break from the walk.
(1.98km) Int of Eastwood station and waterfall loop tracks → Int of Eastwood station and Dence park tracks
240 m
5 mins
7m
-6m
Moderate track
Veer left: From the intersection the track follows the bushtrack heading north east along the side of the valley for a short distance, turning back down towards the creek and winding through bracken ferns to the intersection of the Dense park track.
Turn left: From the intersection the track follows the bushtrack heading down stream and along side Terrys creek, winding through the bush and through a thick patch of bamboo, coming out the other side and along the creek for a short while to the intersection of the Browns Waterhole and Dence park tracks.
Turn left: From the intersection the track follows the bushtrack heading down stream and along side Terrys creek, winding through the bush and through a thick patch of bamboo, coming out the other side and along the creek for a short while to the intersection of the Browns Waterhole and Dence park tracks.
(2.21km) Int of Eastwood station and Dence park tracks → Int of Eastwood station and Pembroke park tracks
20 m
1 mins
0m
-3m
Moderate track
Turn right: From the intersection the track follows the bushtrack heading down across the creek and up the other side to the intersection of the Browns Waterhole and Pembroke Park tracks.
(2.24km) Int of Eastwood station and Pembroke park tracks → Int of Eastwood Station and Rest area tracks
720 m
13 mins
7m
-15m
Moderate track
Turn left: From the intersection the track follows the Browns Waterhole arrow north along the bushtrack following the creek for a short while until it crosses to the other side and continues up the hill passing the number 11 signpost as it winds up and along the side of the valley for a short while, following the bushtrack as it turns back down the valley and along side the creek, passing a sewage access point and coming to a creek crossing at a thin wooden bridge. From here the track continues up the other side and along the bushtrack coming down to the intersection of the Browns Waterhole bushtrack.
Continue straight: From the intersection the track follows the bushtrack heading north along the right hand side of the creek, passing the number 12 signpost and a sewage access point as it heads through the bush to the intersection of the rest area and Terrys creek steps.
Continue straight: From the intersection the track follows the bushtrack heading north along the right hand side of the creek, passing the number 12 signpost and a sewage access point as it heads through the bush to the intersection of the rest area and Terrys creek steps.
(2.96km) Int of Eastwood Station and Rest area tracks → Int of Eastwood Station and Epping road track
110 m
2 mins
0m
-1m
Moderate track
Turn left: From the intersection the track heads down the steps to the intersection of the Pembroke Street path at the bottom.
Veer right: From the intersection the track heads under the Epping road bridge on the right side of the creek and onto the bushtrack which winds up the gentle hill to the intersection of the Epping Road bushtrack.
Veer right: From the intersection the track heads under the Epping road bridge on the right side of the creek and onto the bushtrack which winds up the gentle hill to the intersection of the Epping Road bushtrack.
(3.07km) Int of Eastwood Station and Epping road track → Signpost 16 int
630 m
10 mins
7m
-8m
Moderate track
Continue straight: From the intersection the track follows the Browns Waterhole arrow down the short hill passing a sewage access point and signpost 15, continuing along side the creek to the intersection of the Browns Waterhole bushtrack.
Continue straight: From the intersection the track follows the bush track north east along the bushtrack winding along the creek and down across a wooden bridge continuing up and along through the bush to the intersection of the Browns Waterhole bushtrack.
Veer right: From the intersection the track heads north down the short hill and past a sewage access point, winding along the creek to the intersection of the Browns Waterhole bushtrack.
Continue straight: From the intersection the track follows the bushtrack north passing a sewage access point and continuing through the bush as the track winds along the right hand side of the creek, passing 2 more sewage access points along the track before coming to the signposted intersection of the Browns Waterhole track.
(3.7km) Signpost 16 int → Signpost 18 int
210 m
4 mins
10m
0m
Moderate track
Turn right: From the intersection the track heads east down the gentle hill and around a sewage access point, continuing up the other side for a short while to the signposted intersection of the Browns Waterhole track.
Continue straight: From the intersection the track follows the Browns Waterhole arrow through the bush, winding all the way through the bush as it winds around to a rock platform with views of the M2 motorway bridge and continues through the bush for a short while to the signposted intersection of the Browns Waterhole track.
Continue straight: From the intersection the track follows the Browns Waterhole arrow through the bush, winding all the way through the bush as it winds around to a rock platform with views of the M2 motorway bridge and continues through the bush for a short while to the signposted intersection of the Browns Waterhole track.
(3.91km) Signpost 18 int → Int of Terry’s Creek Walking Track and Brown’s Waterhole Servicetrail
1 km
20 mins
20m
-37m
Moderate track
Turn left: From the intersection the track follows the bushtrack heading down and across the creek and up the other side coming to the signposted intersection of the Crimea road and Browns Waterhole tracks
Turn left: From the intersection the track follows the Browns Waterhole arrow north along the bushtrack crossing underneath the M2 moter way and continuing along, down some steps and through to the intersection of a bushtrack winding down across the creek.
Continue straight: From the intersection the track heads north east away from the M2 overpass, following the bushtrack through the valley as it winds down some wooden steps and joins onto a metal walkway which continues through dense bushland until joining back onto a dirt track and continues all the way along to the intersection of the Browns Waterhole track.
(4.93km) Int of Terry’s Creek Walking Track and Brown’s Waterhole Servicetrail → Browns Waterhole
40 m
1 mins
0m
-3m
Very easy
Turn left: From the intersection, this walk follows the concrete management trail down the gentle hill to the picnic tables and clearing signposted as ‘Browns Waterhole’.
Browns Waterhole
Browns Waterhole is a wide, shallow section of the Lane Cove River, downstream of a concrete weir[1]. There is a concrete shared cycle/footpath crossing over the top of the weir, linking Kissing Point Road, South Turramurra to Vimiera Rd, Macquarie Park. On the western side of the waterhole, there is a picnic table[2] and small clearing with a view over this section of the river.
(4.97km) Browns Waterhole → Browns Waterhole int
90 m
2 mins
1m
-5m
Moderate track
Continue straight: From Browns Waterhole picnic area, this walk follows the management trail down to the causeway and across Browns Waterhole (caution is needed during and after rain, may become impassable). Immediately after the river, the walk comes to an intersection with the Great North Walk trail.
(5.06km) Browns Waterhole int → Int of the GNW and the Morona Ave trail
3.4 km
1 hr 1 mins
86m
-46m
Moderate track
Veer left: From the intersection, this walk follows the ‘The Great North Walk’ sign[3] along the dirt management trail, keeping the Lane Cove River to your left. After about 80m, the trail leads under some high tension power lines[4], where there is a mostly clear view over the river[5] (to your left). The trail then gently leads down through the valley[6] for about 400m to come to an intersection with Cove St trail, marked with a GNW arrow post[7].
Veer left: From the intersection, this walk follows the GNW arrow post[8] downhill along the management trail for about 30m to cross a small culverted creek[9]. The walk then follows the trail up the short hill to come to an intersection with the signposted ‘STEP track’[10][11] (on your right).
Continue straight: From the intersection, this walk follows the GNW arrow post[12] and STEP Track markers[13] along the management trail, whilst keeping the river to your left. The trail undulates through the valley (weedy in places[14]) and tall forest[15] for just shy of 600m, to come to a clear intersection at the bottom of a sealed management trail[16] (on your right). This intersection is marked with another ‘STEP Track’ map/sign[17] and a ‘The Great North Walk’ sign[18].
Veer left: From the intersection, the walk follows the ‘The Great North Walk’ sign gently downhill along the management trail, directly away from the face of the ‘STEP Track’ map/sign[19]. Keeping the river to your left, the trail leads downhill for about 80m to come to a Y-intersection[20], where there is a ‘Lane Cove Valley’ map/sign[21] and a ‘Lane Cove River Park’ sign[22] pointing back along the trail.
Veer right: From the intersection, this walk follows the ‘Thornleigh Station’ sign[23] past the ‘Lane Cove Valley’ map, initially keeping the other trail and river to your left. The trail follows the valley floor, keeping the river just to your left, for a bit over 500m, to then cross the Lane Cove River at a rocky ford[24]. This crossing may become impassable after heavy or prolonged rain. On the other side of the river, this walk continues along the trail[25] for about 400m (with the river now close by on your right) to come to an intersection with a faint track[26] (on your left, that leads up towards Pennant Hills Park).
Continue straight: From the intersection, the walk follows the management trail, keeping the river just to your right. After about 60m, the trail bends right and crosses the Lane Cove River at a rocky ford[27], then continues along the valley floor among the fern trees (and concrete pipe access points[28]) for about 900m to cross the Lane Cove River again at another rocky ford[29]. (These crossings may become impassable after heavy or prolonged rain). The trail then continues along the valley floor[30] (with the river now on your left) for just over 150m to come to an intersection at the bottom of the sealed Morona Ave trail[31] (on your right), marked with a ‘Lane Cove Valley’ map/sign[32] and a GNW arrow post[33].
(8.41km) Int of the GNW and the Morona Ave trail → Conscript Pass
330 m
8 mins
24m
-8m
Moderate track
Veer left: From the intersection, this walk follows the GNW arrow post along the valley floor, away from the two trails, keeping the river just to your left. The track soon narrows, leading past a water depth indicator[34], and becomes rocky for about 150m before coming to a faint intersection, where GNW arrow post points left[35]. Here, the walk turns left and crosses the Lane Cove River using the concrete stepping stones[36] (this crossing may become impassable after heavy or prolonged rain) to follow the ‘Thornleigh Station’ sign[37] up the timber steps for about 40m and find a GNW registration box[38] (damaged at time of writing). The track bends sharply right[39] and zigzags up the rocky hill for another 30m, before bending sharply left to find the ‘Conscript Pass’ and ‘B Stevens’[40][41] engravings (at the third metal hand rail).
Conscript Pass
Conscript Pass is a small sandstone pass between the Lane Cove River and Thornleigh, on the Great North Walk. During the 1930s, some stone steps were built through a cleft in the rock[42] as part of a public works program, in response to the depression. The pass has two main engravings. Firstly ‘Conscript Pass’ is followed with a downwards pointing arrow[43] and a series of initials and numbers. On another wall (that you face when walking up) is engraved ‘B Stevens’ followed a surprisingly good caricature[44][45] of the then Premier of NSW, Bertram Stevens. Stevens (later knighted) replaced Jack Lang in 1932 as Premier of NSW, when Lang was dismissed by the Governor (just two months Lang after opening the Sydney Harbour Bridge).
(8.74km) Conscript Pass → Int of the GNW and Lorna Pass tracks
100 m
3 mins
19m
0m
Moderate track
(8.84km) Int of the GNW and Lorna Pass tracks → Int of Handley and Ferguson Avenues
580 m
14 mins
50m
0m
Hard track
Veer left: From the intersection, the walk follows the ‘Thornleigh’ sign[50] uphill along the rocky track, keeping the valley to your left. The track leads up a series of timber steps[51] for about 230m, becoming steeper as they go[52], to come to a clear T-intersection signposted with a large ‘The Great North Walk’ sign[53], and a stone ‘Lorna Pass’ arrow[54] pointing back down the track.
Veer right: From the intersection, this walk follows the GNW arrow post and ‘Thornleigh Station’ sign[55] uphill along the wide rocky track[56]. After just over 150m, the track bends left (ignoring a faint track on your right[57]) and heads uphill for another 40m to come to the back (south-east corner) of Thornleigh Oval[58], marked with a ‘Lane Cove National Park’ signpost[59].
Turn right: From the intersection, this walk follows the GNW arrow post along the fence line around the oval, keeping the oval to your left. After about 100m, this walk passes in front of the clubhouse[60] (there are toilets[61] and a water tap[62] on your right) to pass a ‘Great North Walk’ sign[63] and come to the corner of ‘Handley’ and ‘Ferguson’ Avenues[64] in front of the ‘Thornleigh Oval’ sign[65].
Thornleigh Oval
Thornleigh Oval is found at the intersection of Handley and Ferguson Avenues, Thornleigh. There is a large playing field[66], tap water[67], public toilets[68][69] and some shelter in the awning of the club house[70]. The oval has a car park, and a number io signs for the Great North walk[71] and other local tracks[72].
(9.42km) Int of Handley and Ferguson Avenues → Thornleigh Train Station
920 m
16 mins
19m
-5m
Easy track
Continue straight: From the intersection, this walk follows the ‘Thornleigh Station’ sign across the road to follow the footpath beside ‘Handley Ave’. After about 130m, the walk crosses Clifford Ave[73] then after about 250m, crosses ‘Orchard St’ to follow ‘Station St’ almost directly ahead[74]. About 190m along ‘Station St’, this walk continues straight across ‘Wood St’[75] (you can get to Parkway Plaza if you turn right here) and continues for just over 200m to find a footbridge[76] beside Pennant Hills Rd. Here the walk heads up the ramp and crosses over the busy road[77] then down the ramp (or steps) to find the intersection with Railway Parade[78].
Veer left: From the base of the steps, this walk follows the GNW arrow across ‘Railway Pde’[79], heading towards the train line. At the fence, this walk veers left and leads along the pedestrian alley[80] for about 60m before turning right and climbing up the railway bridge steps[81], coming to the ‘Thornleigh’ Train Station[82].
Veer left: From the base of the steps, this walk follows the GNW arrow across ‘Railway Pde’[79], heading towards the train line. At the fence, this walk veers left and leads along the pedestrian alley[80] for about 60m before turning right and climbing up the railway bridge steps[81], coming to the ‘Thornleigh’ Train Station[82].
Maps for the Eastwood to Thornleigh walk
You can download the PDF for this walk to print a map.
These maps below cover the walk and the wider area around the walk, they are worth carrying for safety reasons.
| Hornsby | 1:25 000 Map Series | 91304S HORNSBY | NSW-91304S |
| Parramatta River | 1:25 000 Map Series | 91303N PARRAMATTA RIVER | NSW-91303N |
| Sydney | 1:100 000 Map Series | 9130 SYDNEY | 9130 |
Cross sectional view of the Eastwood to Thornleigh bushwalking track
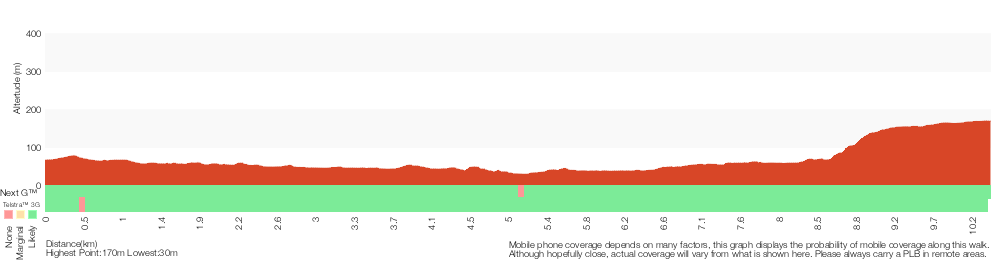
Analysis and summary of the altitude variation on the Eastwood to Thornleigh
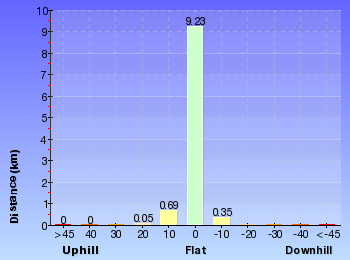
Overview of this walks grade – based on the AS 2156.1 – 2001
Under this standard, a walk is graded based on the most difficult section of the walk.
| Length | 10.3 km | ||
| Time | 3 hrs 45 mins | ||
| . | |||
| Grade 4/6 Hard track |
AS 2156.1 | Gradient | Very steep (4/6) |
| Quality of track | Formed track, with some branches and other obstacles (3/6) | ||
| Signs | Directional signs along the way (3/6) | ||
| Experience Required | Some bushwalking experience recommended (3/6) | ||
| Weather | Storms may impact on navigation and safety (3/6) | ||
| Infrastructure | Limited facilities, not all cliffs are fenced (3/6) |
Some more details of this walks Grading
Here is a bit more details explaining grading looking at sections of the walk
Gradient
8km of this walk has gentle hills with occasional steps and another 1.1km is flat with no steps. Whilst another 630m has short steep hills and the remaining 230m is very steep.
Quality of track
4.4km of this walk follows a formed track, with some branches and other obstacles and another 3.6km follows a clear and well formed track or trail. The remaining (2.3km) follows a smooth and hardened path.
Signs
Around 8km of this walk is clearly signposted, whilst the remaining 2.5km has directional signs at most intersection.
Experience Required
Around 6km of this walk requires no previous bushwalking experience, whilst the remaining 4.6km requires some bushwalking experience.
weather
Around 8km of this walk is not usually affected by severe weather events (that would unexpectedly impact safety and navigation), whilst the remaining 2.5km is affected by storms that may impact your navigation and safety.
Infrastructure
Around 5km of this walk is close to useful facilities (such as fenced cliffs and seats), whilst the remaining 4.9km has limited facilities (such as not all cliffs fenced).
Similar walks
A list of walks that share part of the track with the Eastwood to Thornleigh walk.
1.3 km One way
30 mins
Moderate track
2.7 km Circuit
1 Hr
Moderate track
3.2 km Return
1 hr 30 mins
Moderate track
4.1 km One way
1 hr 30 mins
Moderate track
5.1 km One way
2 hrs
Hard track
6.1 km One way
2 hrs 30 mins
Hard track
8 km One way
3 hrs
Hard track
8.4 km One way
3 hrs 15 mins
Hard track
8.4 km Circuit
3 hrs
Moderate track
9.7 km One way
3 hrs 45 mins
Hard track
10.2 km One way
3 hrs 45 mins
Moderate track
11.6 km One way
4 hrs 30 mins
Hard track
11.7 km One way
4 hrs 15 mins
Hard track
16.3 km One way
6 hrs
Hard track
17.5 km One way
6 hrs 45 mins
Hard track
18.1 km One way
6 hrs 45 mins
Hard track
20.6 km One way
8 hrs
Hard track
25.8 km One way
2 Days
Hard track
33 km One way
2 Days
Hard track
44.4 km One way
3 Days
Hard track
Other Nearby walks
A list of walks that start near the Eastwood to Thornleigh walk.
6.8 km One way
2 hrs 30 mins
Hard track
5.3 km One way
2 hrs
Moderate track
11.9 km Circuit
5 hrs
Hard track
3.4 km Return
1 hr 30 mins
Moderate track
5.9 km Return
2 hrs 30 mins
Moderate track
6.9 km Circuit
2 hrs 30 mins
Hard track
2.8 km Return
1 Hr
Moderate track
2.6 km One way
1 Hr
Moderate track
1.3 km Return
1 Hr
Moderate track
5.3 km One way
2 hrs
Hard track
4.3 km Circuit
1 hr 27 mins
Moderate track
1.5 km Return
45 mins
Moderate track
Plan your trip to and from the walk here
The Eastwood to Thornleigh walk starts at the Eastwood Railway Station (gps: -33.790145, 151.08226)
Your transport options to Eastwood Railway Station are by;
![]() Train. (get details)
Train. (get details)
![]() Bus. (get details)
Bus. (get details)
![]() Car. There is free parking available.
Car. There is free parking available.
(get details)
The Eastwood to Thornleigh ends at the Thornleigh Train Station (gps: -33.731948, 151.07815)
Your transport options to Thornleigh Train Station are by;
![]() Train. (get details)
Train. (get details)
![]() Bus. (get details)
Bus. (get details)
![]() Car. There is free parking available.
Car. There is free parking available.
(get details)
Short URL = http://wild.tl/ett
Gallery images
There are other downloads I am still working on.
You will probably need to login to access these — still all free.
* KML (google earth file)
* GPX (GPS file)
Special Maps/ brochures
* A3 topo maps
* PDF with Lands Topo map base
* PDF with arial image (and map overlay)
I wanted to get the main site live first, this extra stuff will come in time.
Happy walking
Matt 🙂
Comments